How Can We Help?
[Sprites] Create an Extension for Sprites
This page uses an API-type extension as an example to describe how to use mBlock 5 Extension Builder. You can create an extension for sprites simply by a few steps.
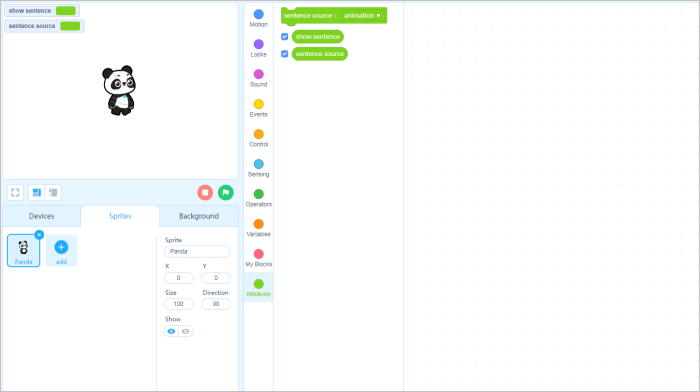
Our task is to enable the stage to display a sentence for each time of block execution.
Basic Principle
On mBlock 5, when you click to execute a block, a js program is executed. Creating an executable block is not as difficult as you think.
Use an API provided by Hitokoto as an example. By analyzing the API document, we can find that the following API request can be used to obtain a sentence from the source of animation: (You can copy the following statement to a browser to view the result. If the API you use can’t be connected, a cross-domain problem may occur.)
Note:
The API used in this example is in Chinese. You can use any API in English when creating your own extension.
Plain Text:
https://v1.hitokoto.cn/?c=a&encode=json
The result is shown as follows:
Plain Text:
1 {
2 “id”: 84,
3 “hitokoto”: “因为无法再见面,所以要笑着说再见。”,
4 “type”: “a”,
5 “from”: “AIR”,
6 “creator”: “Sai”,
7 “created_at”: “1468605909”
8 }
We can define the request process in the execution program of a block, and the result is returned after the execution.
Steps for creating the extension
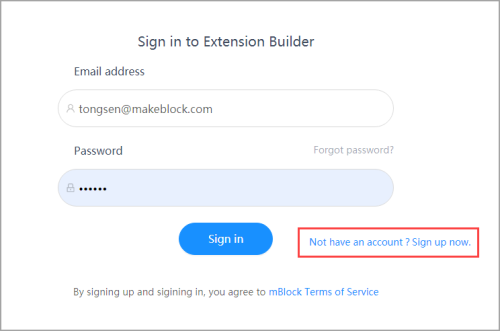
Step 1: Sign in to Extension Builder
Visit https://ext.mblock.cc.
Note:
If you don’t have an Extension Builder account, you can simply sign up one. The account can be used in all Makeblock product systems, including the mBlock community, mBlock 5 on mobile terminals, mBlock 5 on PCs, and mBlock 5 webpages. With the account, you can synchronize your projects and use the AI services of mBlock 5.
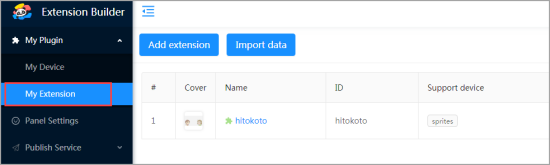
Step 2: Create an extension
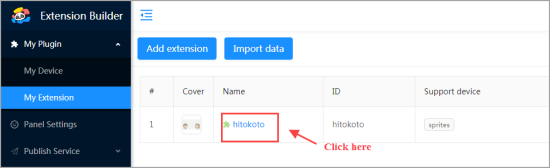
After signing in to Extension Builder, choose My Plugin > My Extension in the navigation tree on the left side.
Note:
On Extension Builder, My Device refer to specific hardware devices, distinguished from sprites; and My Extension refer to extensions that must be used in combination with hardware devices or sprite.
In this development example, click Add extension, instead of Add device, to create an enhanced extension for sprites.
Step 3: Enter basic information
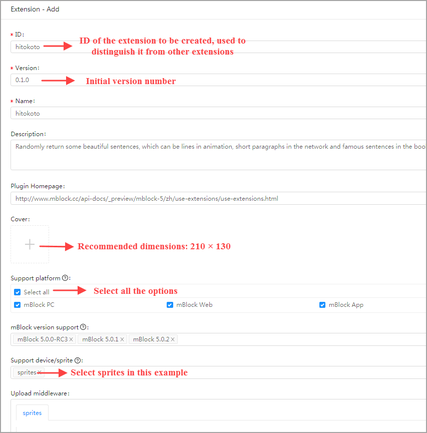
After entering the basic information, click OK.
The extension list is displayed, and you can click the extension name to enter the editing page.
Step 4: Set the category and blocks
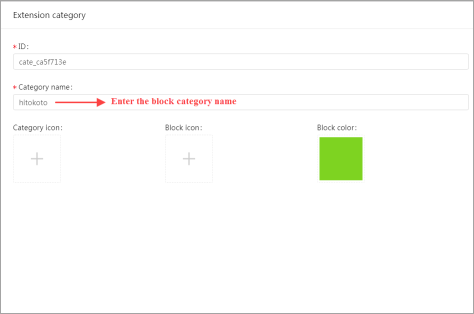
Click Add category to set the category.
The Extension category dialog box is displayed for you to enter the information. You can use the default ID.
Step 5: Design blocks
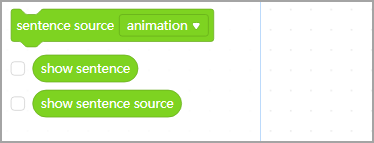
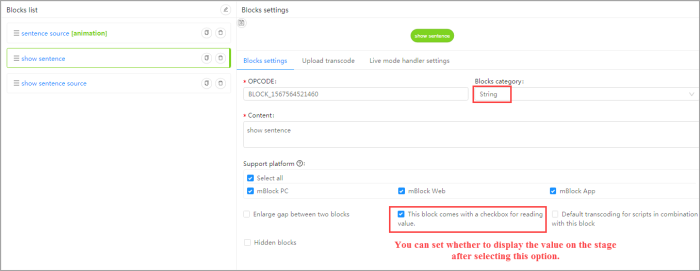
As shown in the preceding figure, we need three blocks, where the sentence source block is used to initiate an HTTP request, the show sentence and show sentence source blocks are used to display the result of the request.
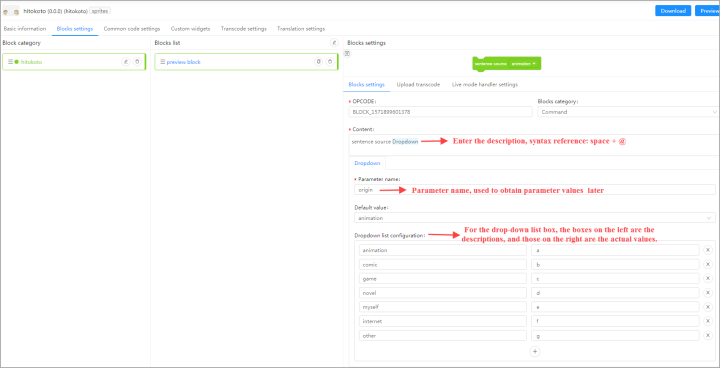
(1) Design the sentence source block.
Refer to https://v1.hitokoto.cn/?c=a&encode=json. The parameter can be set to one of the following: animation, comic, game, novel, Myself, Internet, or other.
Click + at the bottom of Blocks list to add a block.
Step 6: Complete the live mode handler settings and common code settings
Live mode handler settings
After defining the description and parameter, we can define the specific action of the block. Click the Live mode handler settings tab, the following area is displayed. Double-click the black box to enter the specific execution program of the block.
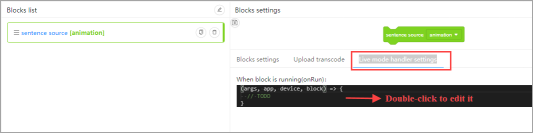
Extension Builder has encapsulated the execution interface, and so we need only to enter the corresponding js execution code in the braces. Extension Builder supports the es6 and es7 syntaxes. We can use async or other syntax.
Plain Text:
1 async (args, app, device, block) => {
2 const { origin } = args; // args.origin indicating to obtain the value of the drop-down list box
3 await getYiYanOfCategory(origin);
4 }
We can see the function getYiYanOfCategory. Where does it come from? The following describes a useful configuration item Common code settings.
Click the Common code settings tab, as shown in the following figure.
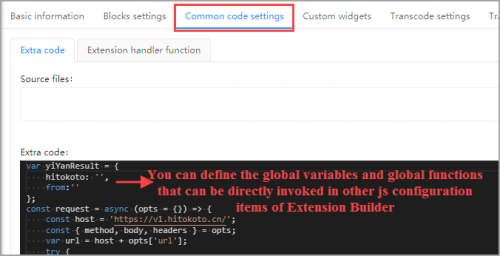
Double-click to edit the code. You can define the global variables and global functions that can be directly invoked in other js configuration items of Extension Builder. The getYiYanOfCategory function we see in Live mode handler settings is defined in this area. The complete code is shown in the following:
PlainText:
1 var yiYanResult = {
2 hitokoto: ”,
3 from:”
4 };
5 const request = async (opts = {}) => {
6 const host = ‘https://v1.hitokoto.cn/’;
7 const { method, body, headers } = opts;
8 var url = host + opts[‘url’];
9 try {
10 if (!navigator.onLine) {
11 console.log(‘Poor network~~~~’)
12 }
13 let req = {
14 // POST request by default
15 method: method ? method : ‘POST’,
16 headers: new Headers(),
17 }
18 // Add the request parameter in body if POST request
19 if (method == ‘POST’) {
20 Object.assign({}, req, { body: JSON.stringify(body) })
21 }
22 const res = await fetch(url, req);
23 return res.json()
24 } catch (err) {
25 console.log(err.toString())
26 }
27 }
28 const getYiYanOfCategory = async (category) => {
29 return await request({
30 url: `?/c=${category}&encode=json`,
31 method: ‘GET’
32 })
33 }
Step 7: Define the result return blocks
Based on step 6, we can use yiYanResult to store the content obtained by the API and return the content in blocks.
Configure the blocks.
Live mode handler settings
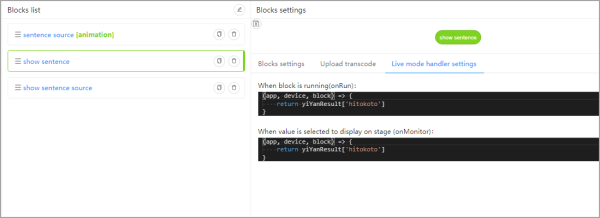
The code is as follows. The execution of the block is to return a value.
Plain Text:
1 (app, device, block) => {
2 return yiYanResult[‘hitokoto’]
3 }
Test and commissioning
Way 1: Click “Preview” in the upper right corner of Extension Builder
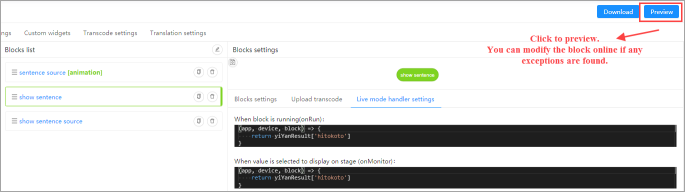
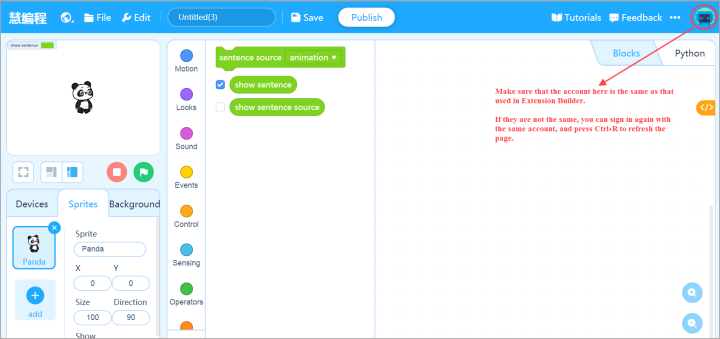
A preview window is displayed. We can see the extension we created. If no extension appears, check whether the account used to sign in mBlock 5 is the same as that used in Extension Builder.
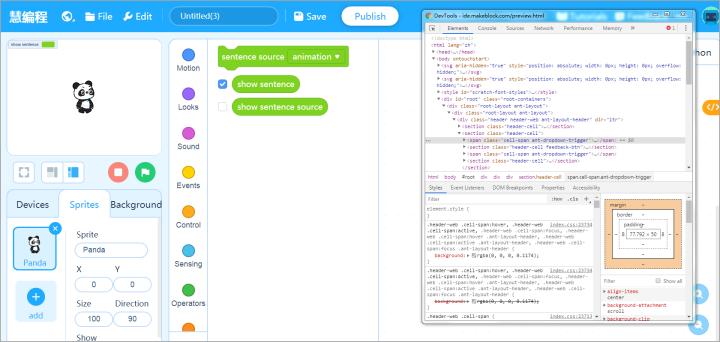
You can also right-click the title bar and choose to check your code as in a common browser.
Way 2: Download the extension to your computer and drag it to mBlock 5 to use it.
For details, see “Important an Extension into the mBlock 5 PC client.”
Summary
You may find that creating an extension is not as difficult as you think before. After you master how to create extensions, you can create more interesting ones. You can also refer to “Extension Sharing–Set a Homepage for Your Extension” to create your extension homepage, where you can introduce your extensions, describe how to use them, and discuss your ideas with other users.