How Can We Help?
Motion sensing
43. control[spriteMenu_1]to follow CyberPi with sensitivity[GRADE]

Makes the specified sprite follow CyberPi with the specified sensitivity
How to use
This block recognizes all the sprites on the stage. Click to select a sprite from the drop-down list box
For how to add a sprite, see Add a Sprite.
Click to select a sensitivity from the drop-down list box.
A higher sensitivity indicates that the sprite responds more quickly to the motion of CyberPi.
Example
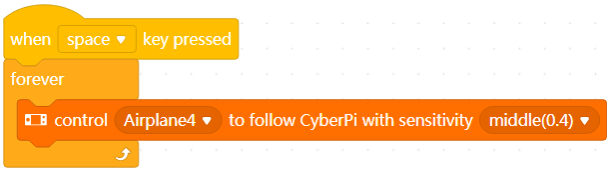
In Live mode, when you press the space key, the plane on the stage moves as you move CyberPi.

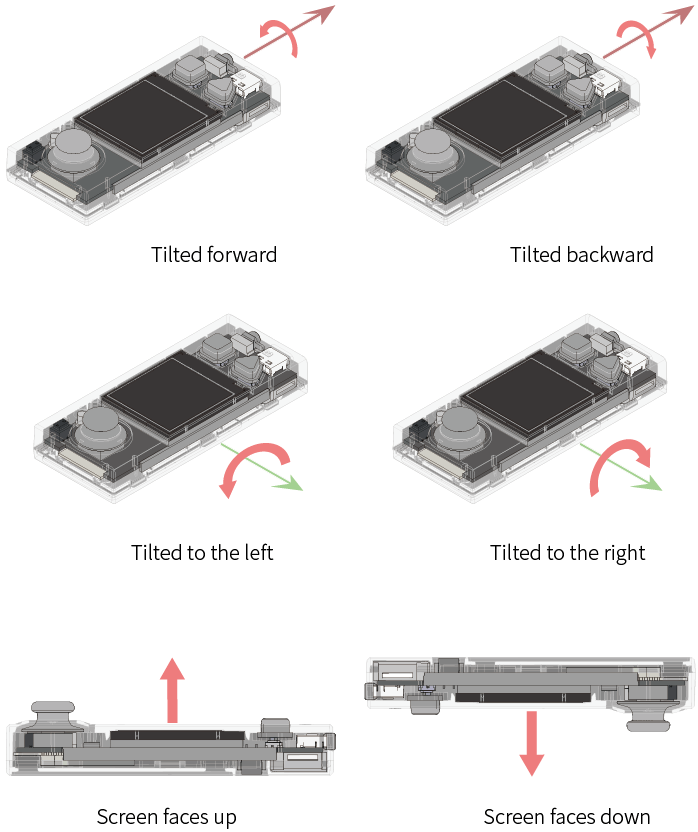
44. [tilt]?

Determines whether CyberPi is placed in the specified posture
How to use
Click to select a posture from the drop-down list box.
The following figure shows the postures defined for CyberPi.
This is a Boolean block that contains a condition. Use it in combination with another block that requires a condition.
Example
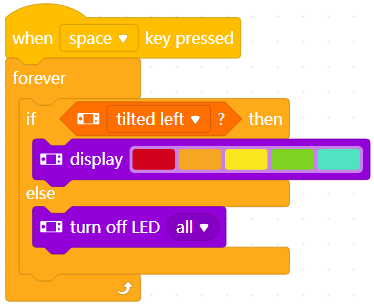
In Live mode, after you press the space key, the LEDs on CyberPi are lit up when you tilt CyberPi forward and turned off when you place it in another posture.
45. [tilt]detected?

Determines whether CyberPi is the specified motion state
How to use
Click to select a motion state from the drop-down list box.
The following figure shows the motion states defined for CyberPi.
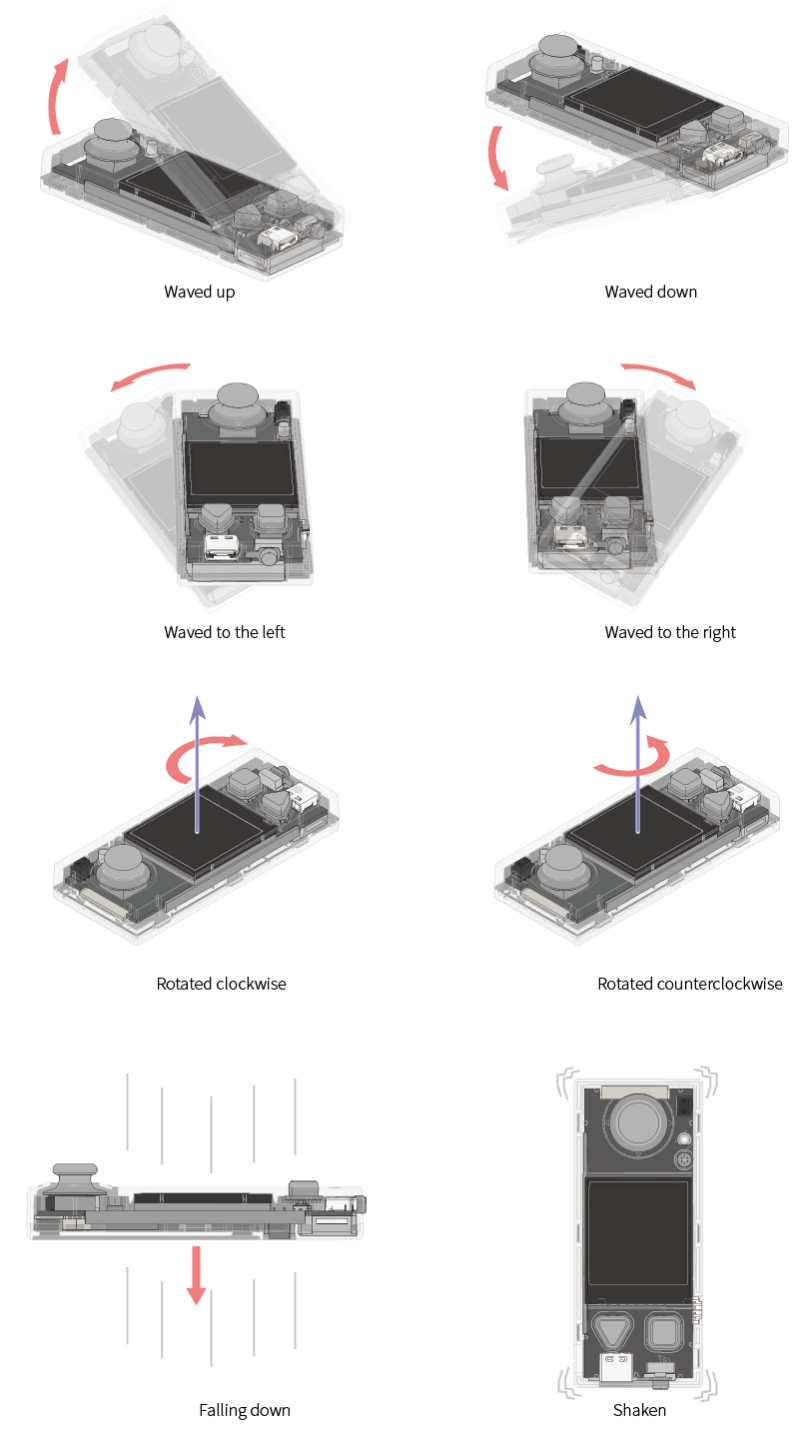
This is a Boolean block that contains a condition. Use it in combination with another block that requires a condition.
Example
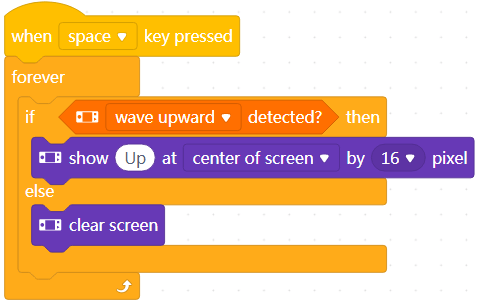
In Live mode, after you press the space key, CyberPi displays Up on its screen when you wave it up and clears the screen when you stop waving it up.
46. shaking strength

Reports how strong CyberPi is shaken
How to use
The shaking strength is positively related to the shaking frequency and amplitude.
Value range: 0–100
You can select the check box on the left of this block to see the shaking strength on the stage.
This is a reporter block that must be used in combination with another block requiring data.
Example
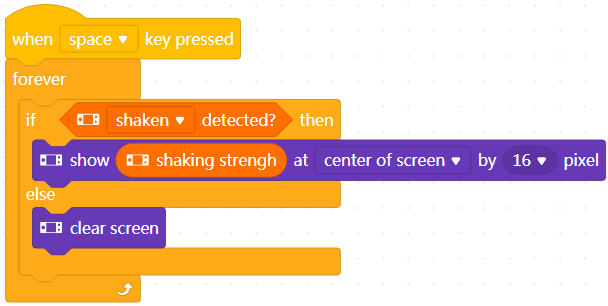
Use this block in combination with Display blocks.
In Live mode, after you press the space key, CyberPi displays the shaking strength in the center of its screen when you shake it and clears the screen when you stop shaking it.
47. waving direction (°)

Reports the direction in which CyberPi is waved
How to use
The waving direction is defined by angle, as shown in the following figure.

Value range: –179 to +180, in degrees (°)
You can select the check box on the left of this block to see the waving direction on the stage.
This is a reporter block that must be used in combination with another block requiring data.
Example

Use this block in combination with Display blocks.
In Live mode, after you press the space key, CyberPi displays the waving direction in the center of its screen when you wave it up and clears the screen when you stop waving it.
48. waving speed

Reports the speed at which CyberPi is waved
How to use
Value range: 0–100
You can select the check box on the left of this block to see the waving speed on the stage.
This is a reporter block that must be used in combination with another block requiring data.
Example
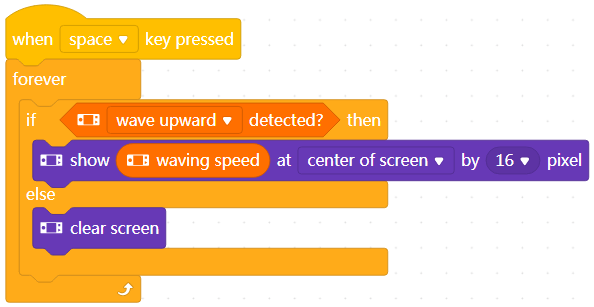
Use this block in combination with Display blocks.
In Live mode, after you press the space key, CyberPi displays the waving speed in the center of its screen when you wave it up and clears the screen when you stop waving it.
49. [rotation]angle (°)

Reports the angle of the specified posture
How to use
Click to select a posture from the drop-down list box.
The pitch, roll, and yaw angles are defined as follows.
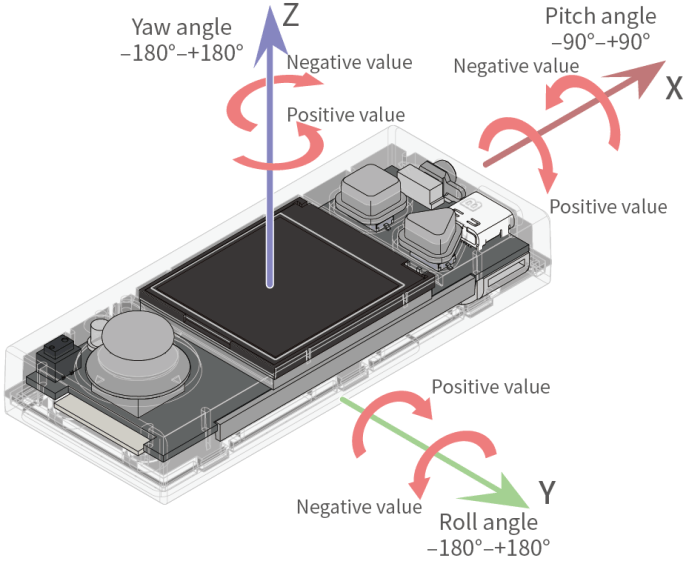
Value ranges:
Pitch angle: –90 to +90, in degrees
Roll angle: –180 to +180, in degrees
Yaw angle: –180 to +180, in degrees
You can select the check box on the left of this block to see the angle of the posture on the stage.
This is a reporter block that must be used in combination with another block requiring data.
Example

Use this block in combination with Display blocks.
In Live mode, after you press the space key, CyberPi displays the posture angle in the center of its screen when you tilts it backward and clears the screen when you stop tilting it.
50. motion sensor[axis]acceleration(m/s²)

Reports the acceleration of CyberPi on the specified axis
How to use
Click to select an axis from the drop-down list box.
CyberPi is equipped with a motion sensor that can detects the acceleration of CyberPi on the x-, y-, and z-axis.
Note that the accelerometer measures Earth’s gravity. When CyberPi is placed on a desk, the output of the accelerometer on the z-axis is –9.8m/s² (1g = 9.8m/s²).
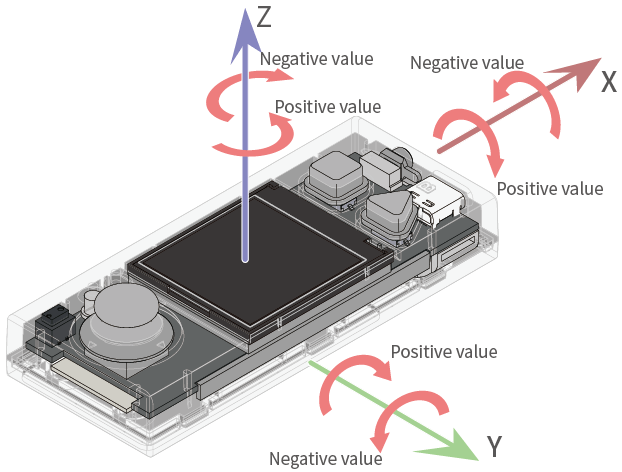
The axes are defined as follows.

You can select the check box on the left of this block to see the acceleration on the stage.
This is a reporter block that must be used in combination with another block requiring data.
Example
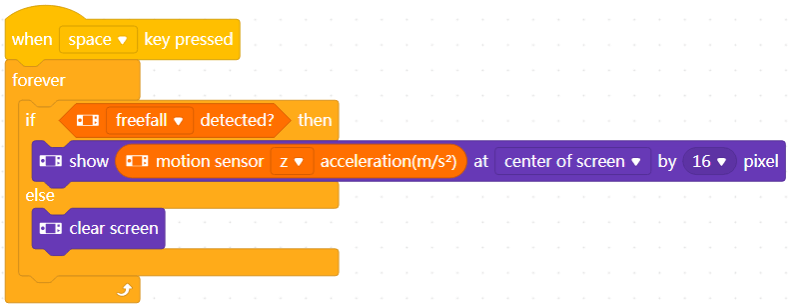
Use this block in combination with Display blocks.
In Live mode, after you press the space key, CyberPi displays the acceleration on the z-aixs in the center of its screen when it falls down and clears the screen when you hold it.
Note: When CyberPi falls down, let it land on a soft surface or catch it with your hand to prevent damage to CyberPi.
51. angle speed around [axis]axis(°/s)

Reports the angular speed at which CyberPi is rotated around the specified axis
How to use
Click to select an axis from the drop-down list box.
The axes are defined as follows.
Value range: –500 to +500, in degrees/second ()
You can select the check box on the left of this block to see the angular speed on the stage.
This is a reporter block that must be used in combination with another block requiring data.
Example
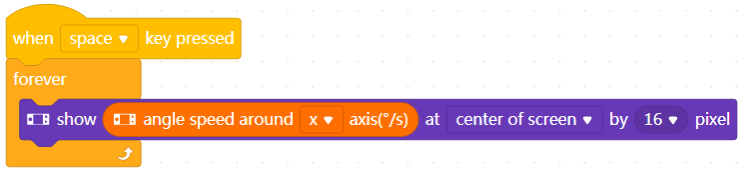
Use this block in combination with a Display block.
In Live mode, after you press the space key, CyberPi displays the angular speed of CyberPi around the x-axis in the center of its screen when you rotates it around the x-axis.
52. rotated angle around [axis]axis (°)

Reports the angle CyberPi is rotated around the specified axis
How to use
Click to select an axis from the drop-down list box.
The axes and angles are defined as follows.
You can select the check box on the left of this block to see the angle on the stage.
This is a reporter block that must be used in combination with another block requiring data.
Example
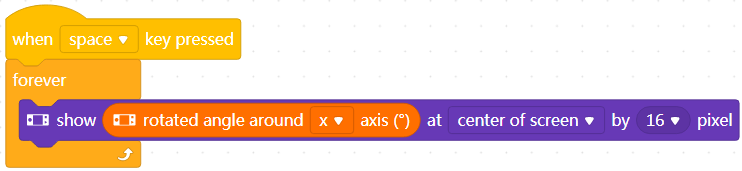
Use this block in combination with a Display block.
In Live mode, after you press the space key, CyberPi displays the angle in the center of its screen when you rotates it around the x-axis.
53. reset rotated angle around[axis]axis

Resets the angle CyberPi is rotated around the specified axis (axes) to zero
How to use
Click to select all the axes or an axis from the drop-down list box.
The axes are defined as follows.
After this block is executed, the angle CyberPi is rotated around the specified axis is counted from zero.
Example
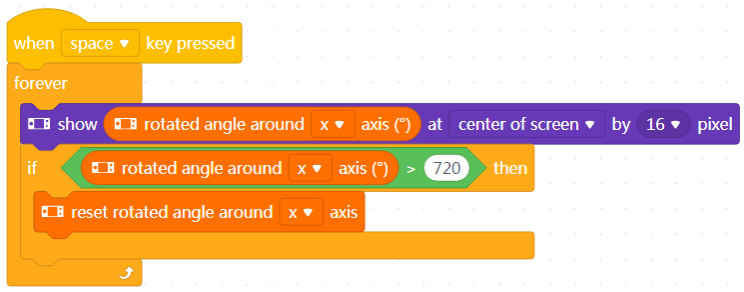
Use this block in combination with a Display block.
In Live mode, after you press the space key, CyberPi displays the angle in the center of its screen when you rotates it around the x-axis. When the angle is greater than 720, it is reset to zero and counted again.
54. reset yaw angle

Resets the yaw angle of CyberPi to zero
How to use
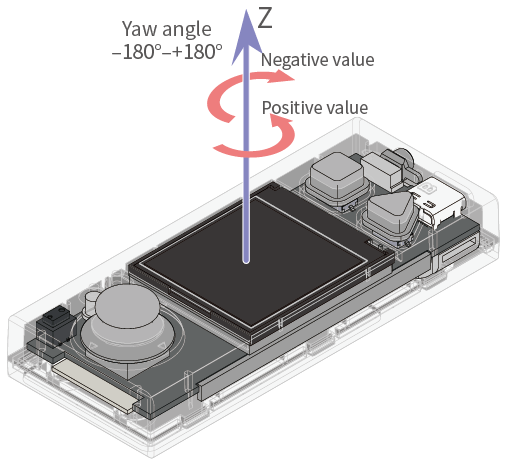
The yaw angle is defined as follows.
After this block is executed, the yaw angle of CyberPi is counted from zero.
Example
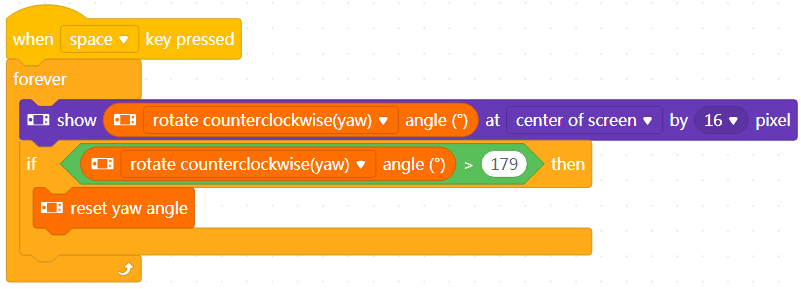
Use this block in combination with a Display block.
In Live mode, after you press the space key, CyberPi displays the yaw angle in the center of its screen when you rotates it around the z-axis. When the angle is greater than 179, it is reset to zero and counted again.