How Can We Help?
Display+
Sprites
1. set backdrop to ( )
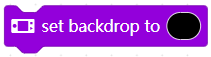
Sets the background color of the screen on CyberPi
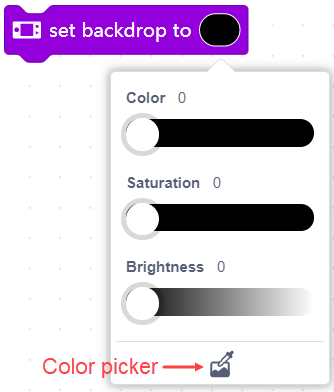
How to use
Click to set the color. You can set the color by setting the values of color, saturation, and brightness, or by using the color picker to pick a color from the stage.
Note: After setting a background color, you need to use the force rendering block to make the setting take effect.
Example
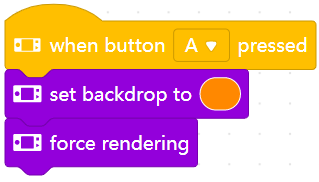
After you upload the program to CyberPi, the background color of the screen on CyberPi turns into orange when you press button A.
2. set backdrop to R: ( ) G: ( ) B: ( )

Sets the background color of the screen on CyberPi
How to use
Set the color by setting the intensity of red, green, and blue.
Intensity range of red, green, and blue: 0–255
Note: After setting a background color, you need to use the force rendering block to make the setting take effect.
Example
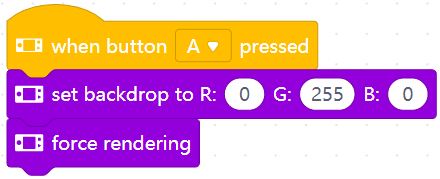
After you upload the program to CyberPi, the background color of the screen on CyberPi turns into green when you press button A.
3. set sprite ( ) to (matrix image)
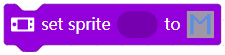
Creates a sprite and sets it to a matrix image
How to use
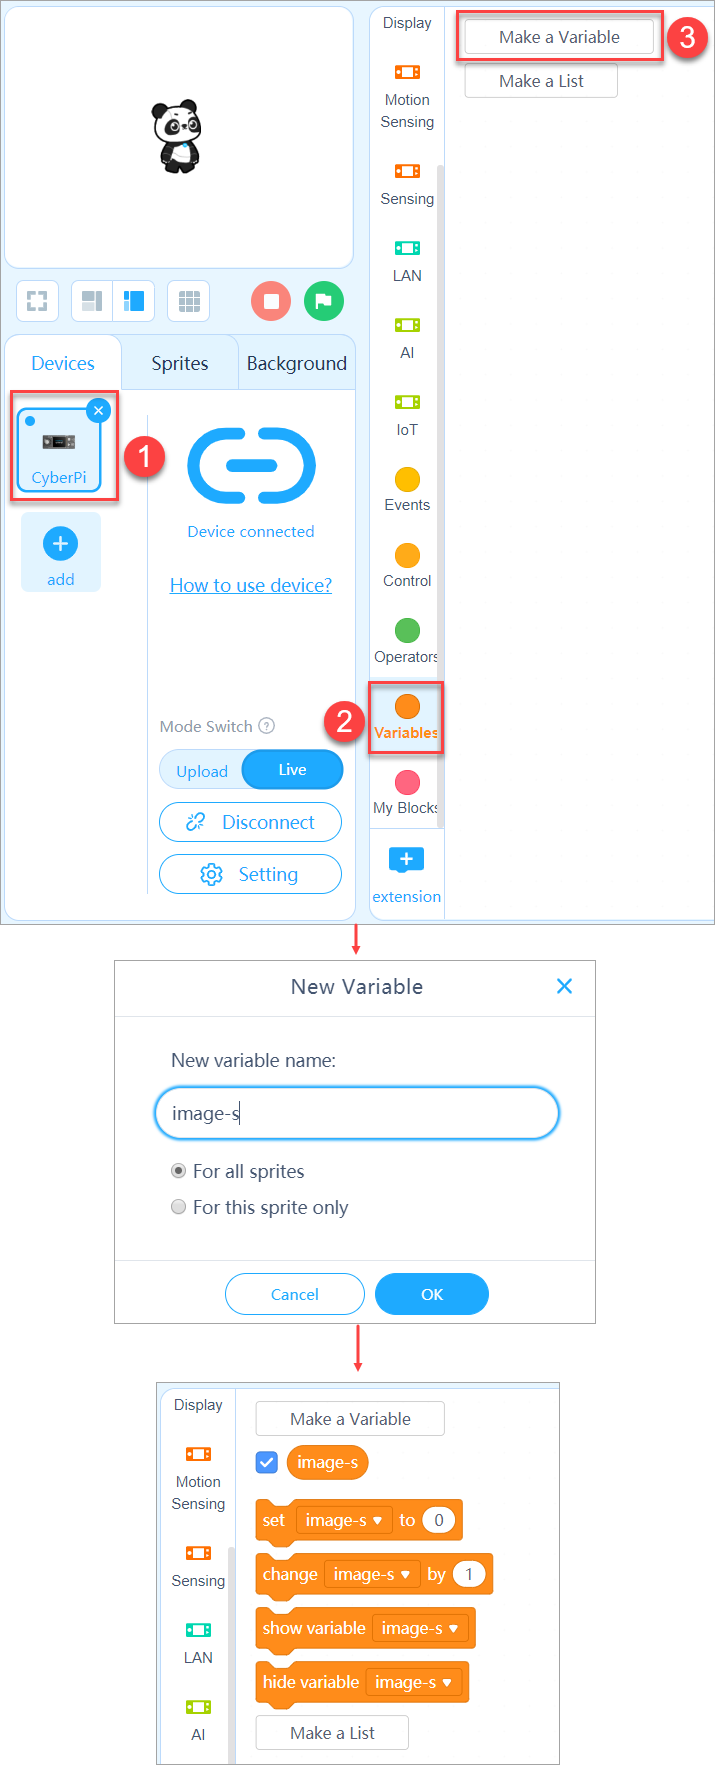
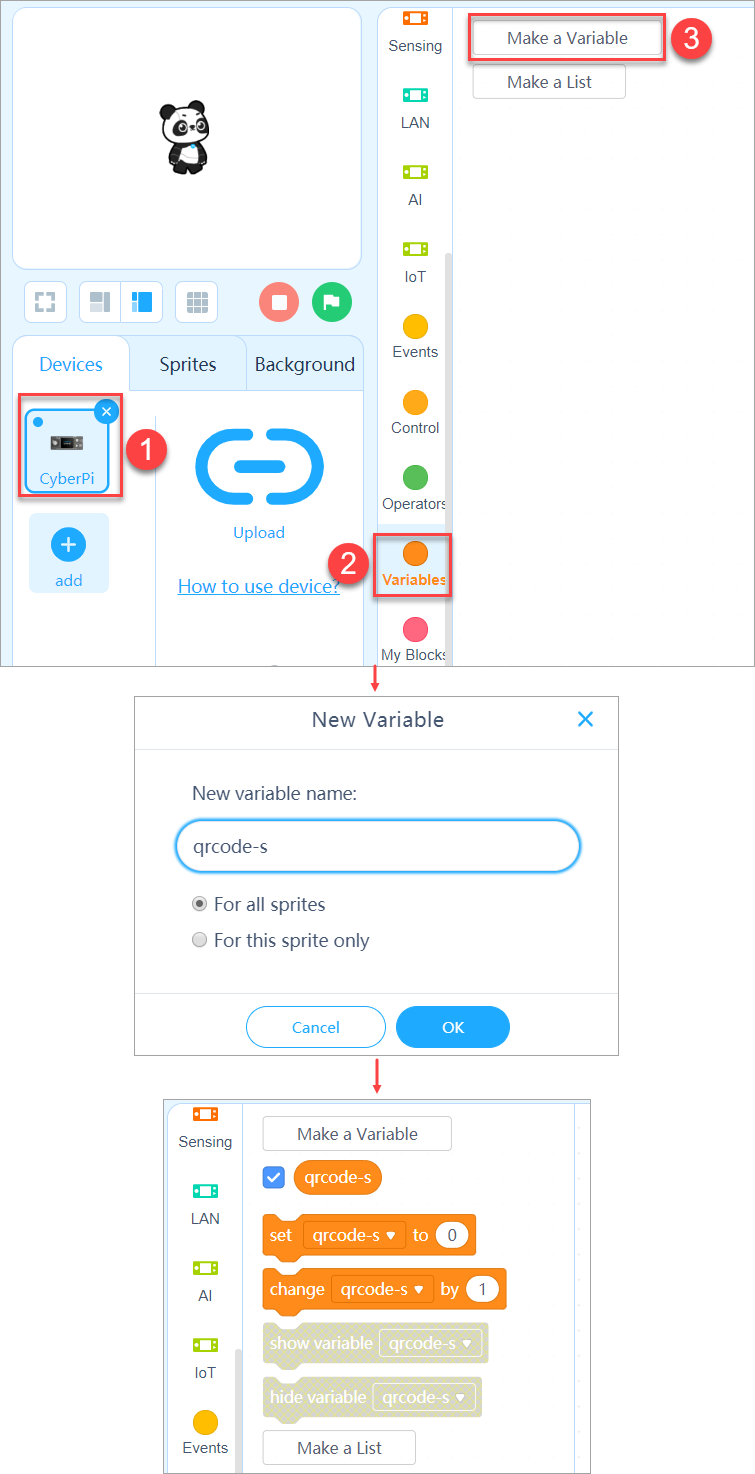
To create a sprite, you need create a variable in the Variables category, and then define the variable as a sprite.
After creating the sprite, you can set it to the specified matrix image.
Click the matrix image to draw one you want.
For more details about how to use the sprite blocks, see Operation Guide of the “Display +” Extension for CyberPi.
Note: The steps for displaying a sprite on the screen of CyberPi is described as follows:
Create a variable -> define the sprite -> set parameters for the sprite -> use the force rendering block to make the settings take effect
Example
1. Create the variable image-s.
2. Compile the following program.
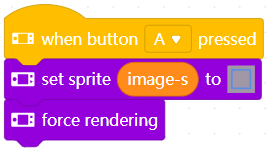
After you upload the program to CyberPi, the matrix image you’ve drawn is displayed in the middle of CyberPi’s screen when you press button A.
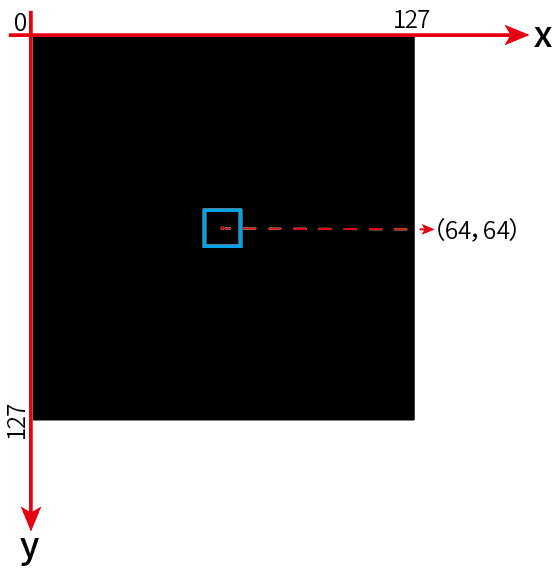
Note: The screen on CyberPi is a 128 × 128 LED matrix, and you can draw an image at the maximum size of 16 × 16. By default, the image is displayed in the middle of the screen.
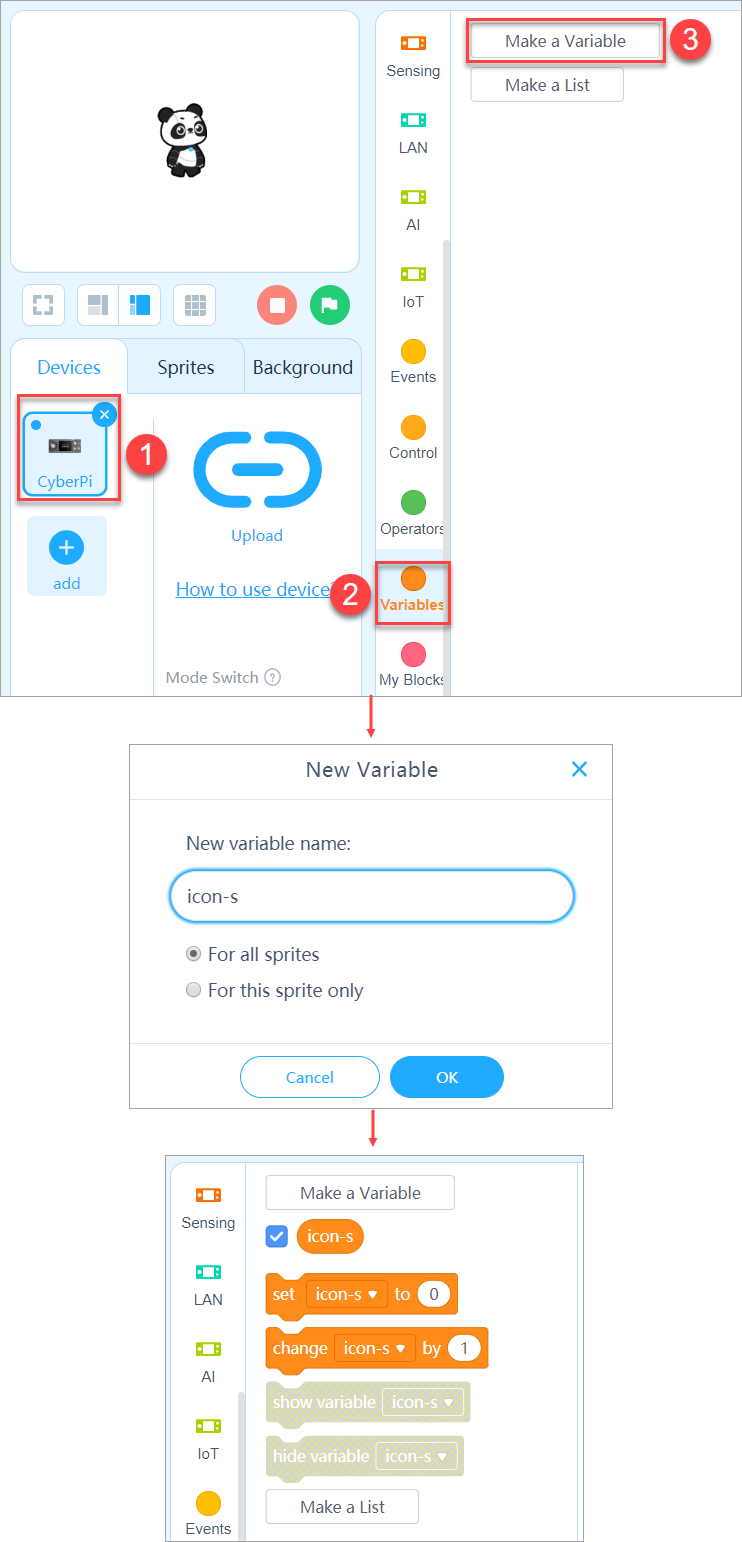
4. set sprite ( ) to (icon)

Creates a sprite and sets it to an icon
How to use
To create a sprite, you need create a variable in the Variables category, and then define the variable as a sprite.
After creating the sprite, you can set it to the specified icon.
This block provides more than 30 icons, as shown in the following figure.
| Value | Icon | Value | Icon | |
| music | download | |||
| picture |  |
sunny | ||
| video | cloudy | |||
| clock | rain | |||
| play | snow | |||
| pause | train | |||
| next | rocket | |||
| previous | truck | |||
| sound | car | |||
| temperature |  |
water drop | ||
| light | distance | |||
| motion | flame | |||
| house | magnet | |||
| gear | gas | |||
| list | vision | |||
| tick symbol | color | |||
| cross sign | overcast | |||
| power off | sandstorm | |||
| refresh | foggy | |||
| trash bin |
Click to select an icon from the drop-down list box.
For more details about how to use the sprite blocks, see Operation Guide of the “Display +” Extension for CyberPi.
Note: The steps for displaying a sprite on the screen of CyberPi is described as follows:
Create a variable -> define the sprite -> set parameters for the sprite -> use the force rendering block to make the settings take effect
Example
1. Create the variable icon-s.
2. Compile the following program.
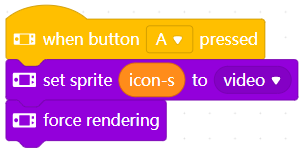
After you upload the program to CyberPi, the video icon is displayed in the middle of CyberPi’s screen when you press button A.
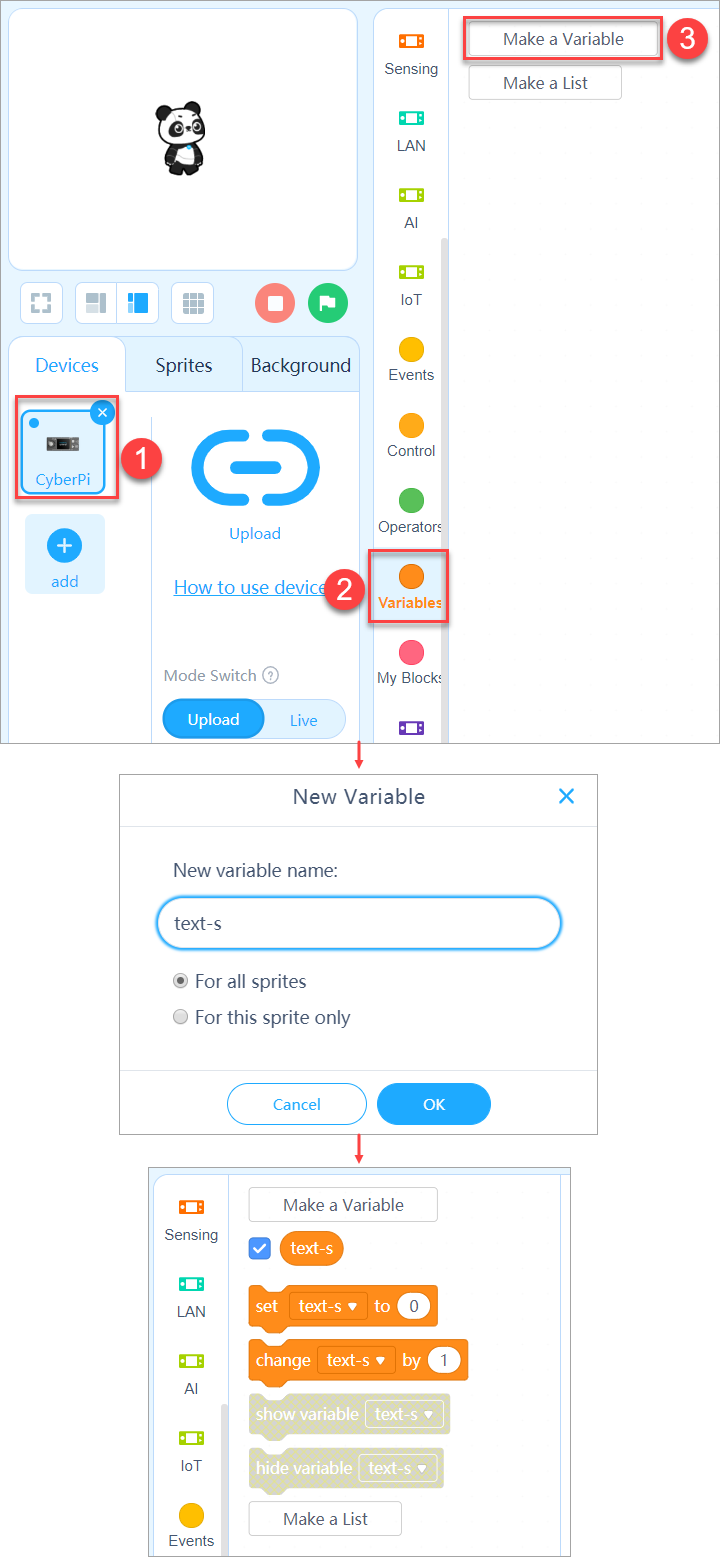
5. set sprite ( ) to (text)

Creates a sprite and sets it to a text
How to use
To create a sprite, you need create a variable in the Variables category, and then define the variable as a sprite.
After creating the sprite, you can set it to the specified text.
Click to enter a text or insert a reporter block of the string type into the block.
For more details about how to use the sprite blocks, see Operation Guide of the “Display +” Extension for CyberPi.
Note: The steps for displaying a sprite on the screen of CyberPi is described as follows:
Create a variable -> define the sprite -> set parameters for the sprite -> use the force rendering block to make the settings take effect
Example
1. Create the variable text-s.
2. Compile the following program.
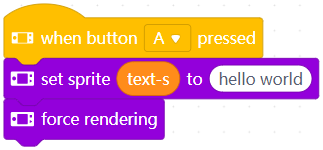
After you upload the program to CyberPi, The text hello world is displayed in the middle of CyberPi’s screen when you press button A.
You can also compile a program as follows.
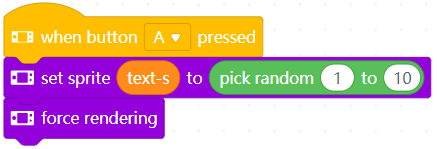
After you upload the program to CyberPi, a number ranging from 1 to 10 is displayed in the middle of CyberPi’s screen when you press button A.
6. set sprite ( ) to (QR code)

Creates a sprite and sets it to a QR code
How to use
To create a sprite, you need create a variable in the Variables category, and then define the variable as a sprite.
After creating the sprite, you can set it to the specified QR code.
Click to enter a text, such as the URL address of a website, or insert a reporter block of the string type. After the QR code is displayed, you can scan it to visit the website or view the text.
For more details about how to use the sprite blocks, see Operation Guide of the “Display +” Extension for CyberPi.
Note: The steps for displaying a sprite on the screen of CyberPi is described as follows:
Create a variable -> define the sprite -> set parameters for the sprite -> use the force rendering block to make the settings take effect
Example
1. Create the variable qrcode-s.
2. Compile the following program.
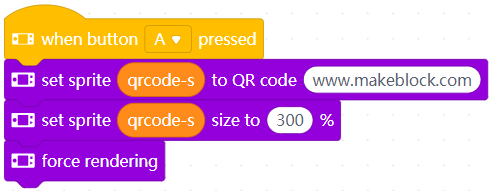
After you upload the program to CyberPi, a QR code is displayed in the middle of CyberPi’s screen when you press button A, and you can scan it to visit the website.
Note: The default size of the QR code is too small, and the scanning may fail. When this happens, you can use the size setting block to increase the size of the sprite.
7. sprite ( ) flips ( )
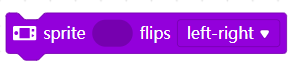
Flips the specified sprite from left to right or from up to down
How to use
Specify a sprite and click to select the flipping direction from the drop-down list box.
Example
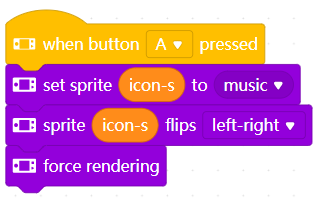
After you upload the program to CyberPi, the icon obtained by flipping the music icon from left to right is displayed in the middle of CyberPi’s screen when you press button A.
8. delete sprite ( )
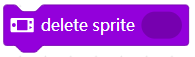
Deletes the specified sprite
How to use
Specify a sprite to delete it.
Example
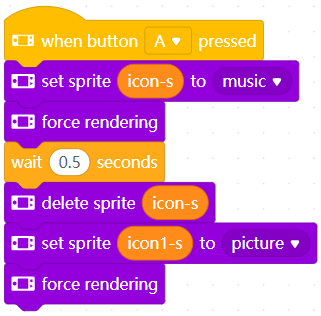
After you upload the program to CyberPi, the music icon is displayed first, and half a second later, the picture icon is displayed.
Note: When you use multiple sprites of the same type, they may overlap each other if you don’t use the delete sprite block to delete some of them.
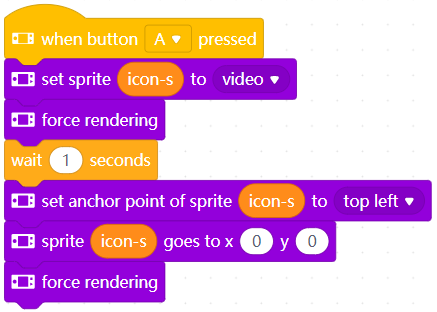
9. set anchor point of sprite ( ) to ( )

Sets the anchor point of the specified sprite
How to use
The anchor point of a sprite determines the start point for moving it or the center point for rotating it.
This block provides 9 position options.
Specify the sprite and click to select an anchor point.
Note: If you don’t set the anchor point for a sprite when moving or rotating it, its center point is used as the anchor point by default.
Example

After you upload the program to CyberPi and press button A, the video icon is displayed in the middle of the screen, and 1 second later, the icon moves 8 pixels right from the top left point.
10. sprite ( ) moves ( ) ( ) pixels

Moves the specified sprite the specified distance (in pixels) in the specified direction
How to use
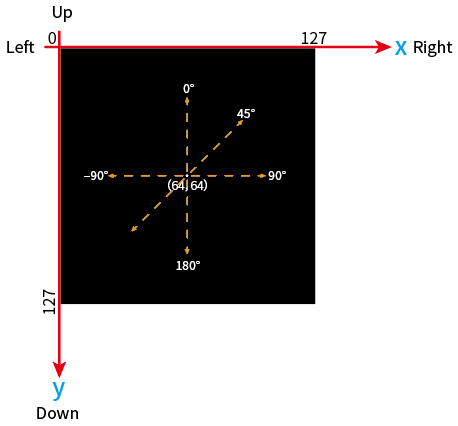
The screen on CyberPi is 128 × 128 (pixels). The following figure shows the axes and directions defined for the screen.
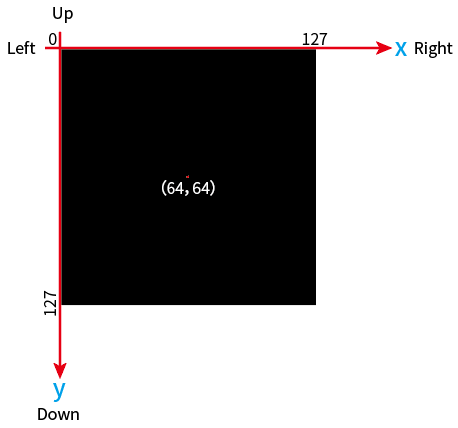
Specify the sprite, select a direction, and set the number of pixels for moving.
Example
After you upload the program to CyberPi and press button A, the video icon is displayed in the middle of the screen, and 1 second later, the icon moves 8 pixels right from the top left point.
11. sprite ( ) goes to x () y ()

Moves the specified sprite to the specified point (x, y)
How to use
The screen on CyberPi is 128 × 128 (pixels). The following figure shows the axes and directions defined for the screen.
Specify the sprite and set the coordinates of the target point.
Example
After you upload the program to CyberPi and press button A, the video icon is displayed in the middle of the screen, and 1 second later, the icon moves to the upper left corner of the screen, with the top left point located in the point (0,0).
12. sprite ( ) goes to random position

Moves the specified sprite randomly
How to use
Specify the sprite.
Example
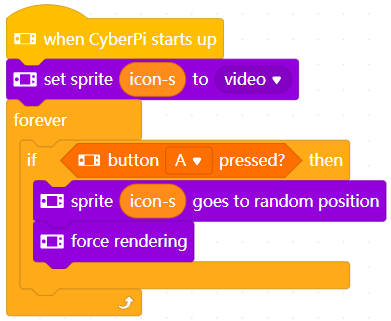
After you upload the program to CyberPi, the video icon moves randomly each time when you press button A.
13. sprite ( ) rotates ( )° clockwise

Rotates the specified sprite the specified number of degrees
How to use
Specify the sprite and set the number of degrees for rotating. Note that a positive value indicates rotating clockwise, and a negative one indicates rotating counterclockwise.
Example
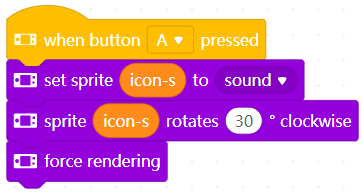
After you upload the program to CyberPi, the sound icon rotates 30 degrees clockwise each time when you press button A.
14. sprite ( ) points in direction ( )°

Sets the direction (in degrees) to be faced by the specified sprite
How to use
Using the sound icon as an example, the following figure shows the degrees and their corresponding directions.
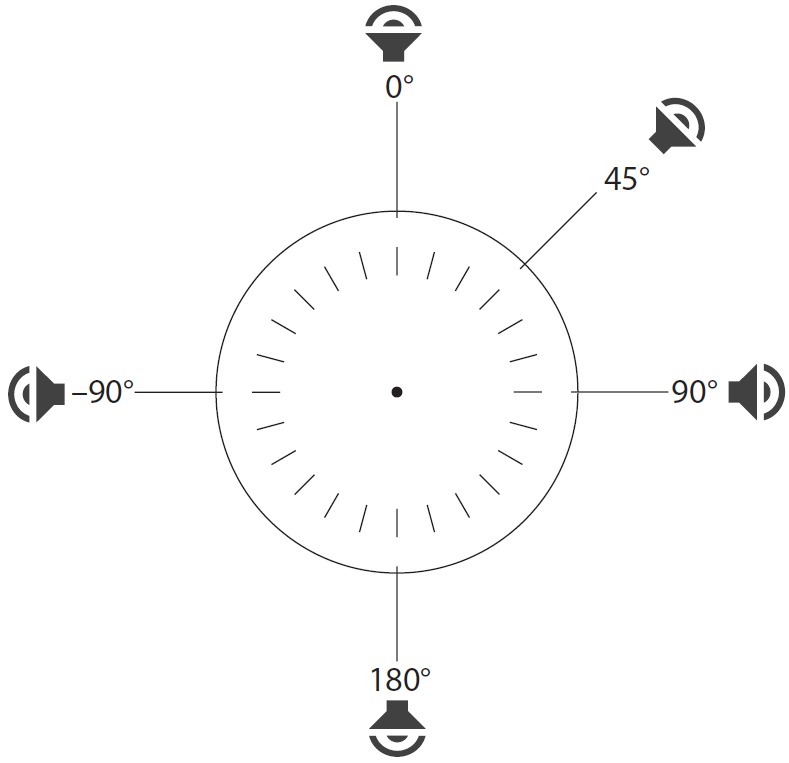
After being created, a sprite faces the direction of 90 degrees by default.
Specify the sprite and set the number of the degrees.
Example
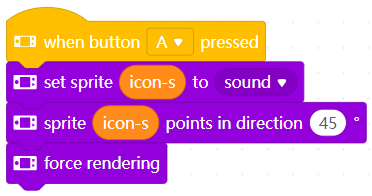
After you upload the program to CyberPi, the sound icon facing the direction of 45 degrees is displayed in the middle of the screen when you press button A.
15. set sprite ( ) size to ( ) %

Changes the size of the specified sprite by percentage
How to use
The percentage 100% indicates the default size of a sprite.
Specify the sprite and set the number of percents.
Example
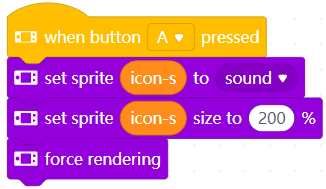
After you upload the program to CyberPi, the enlarged sound icon is displayed in the middle of CyberPi’s screen when you press button A.
16. set sprite ( ) color to ( )
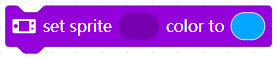
Sets the color of the specified sprite
How to use
Specify the sprite and click to set the color by setting the values of color, saturation, and brightness.
Example
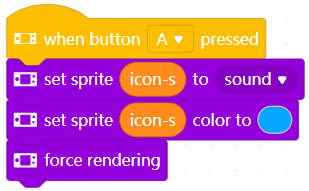
After you upload the program to CyberPi, the sound icon is displayed in blue in the middle of CyberPi’s screen when you press button A.
17. set sprite ( ) color to R: ( ) G: ( ) B: ( )

Sets the color of the specified sprite
How to use
Specify the sprite and set the color by setting the intensity of red, green, and blue.
Intensity range of red, green, and blue: 0–255
Example

After you upload the program to CyberPi, the sound icon is displayed in green in the middle of CyberPi’s screen when you press button A.
18. reset sprite ( ) to default color

Resets the color of the specified sprite
How to use
Specify the sprite.
Example

After you upload the program to CyberPi, the sound icon is displayed in blue in the middle of CyberPi’s screen when you press button A, and it turns into white (the default color) when you press button B.
19. show/hide sprite ( )

Shows or hides the specified sprite
How to use
Specify the sprite.
Example
1. Create two variables icon-s and icon1-s.
2. Compile the following program.
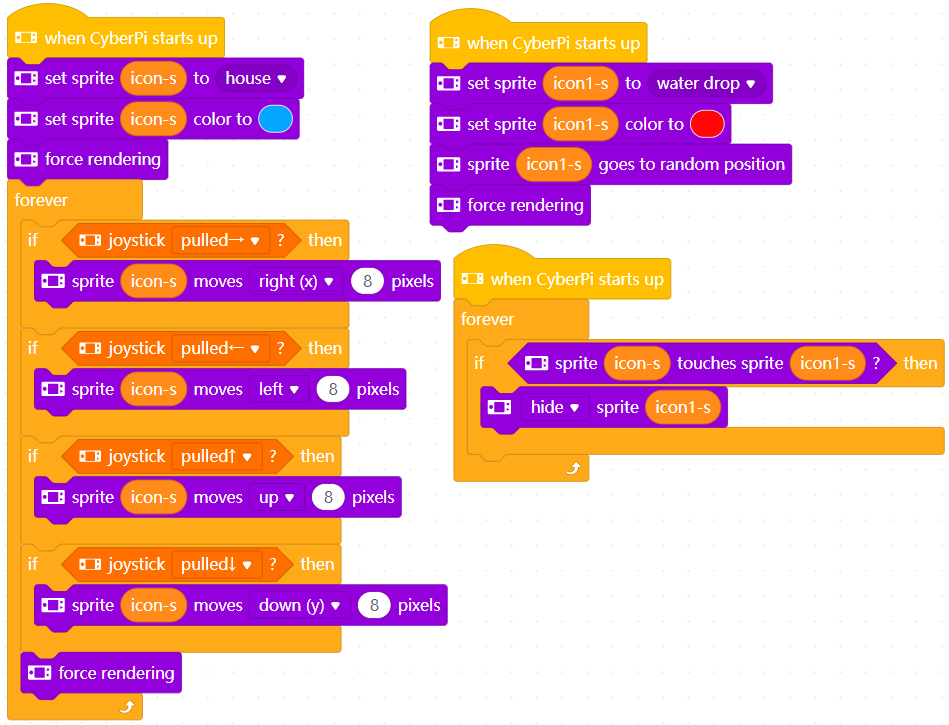
After you upload the program to CyberPi, two sprites are displayed on CyberPi’s screen.
Move the joystick to move the house icon.
When it comes in contact with the water drop icon, the latter disappears.
Note: You can add multiple sprites in the same way to compile a simple little game.
20. sprite ( ) goes to ( ) layer

Brings the specified sprite to the front or back
How to use
When multiple sprites are created, you can use this block to set which one to be displayed in the front or at the back.
Example
1. Create two variables icon-s and icon1-s.
2. Compile the following program.
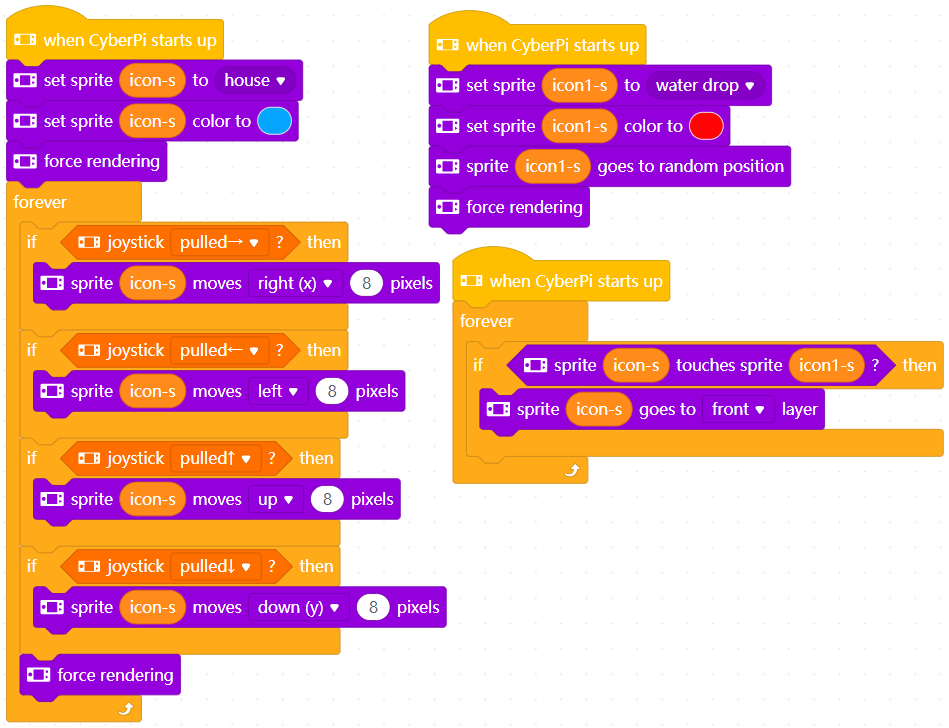
After you upload the program to CyberPi, two sprites are displayed on CyberPi’s screen.
Move the joystick to move the house icon.
When it comes in contact with the water drop icon, the latter is covered.
21. sprite ( ) goes ( ) ( ) layers

Brings the specified sprite forwad or sends it backward by the specified number of layers
How to use
When multiple sprites are created, you can use this block to set one layer to be displayed in front of or behind another.
Example
1. Create two variables icon-s and icon1-s.
2. Compile the following program.
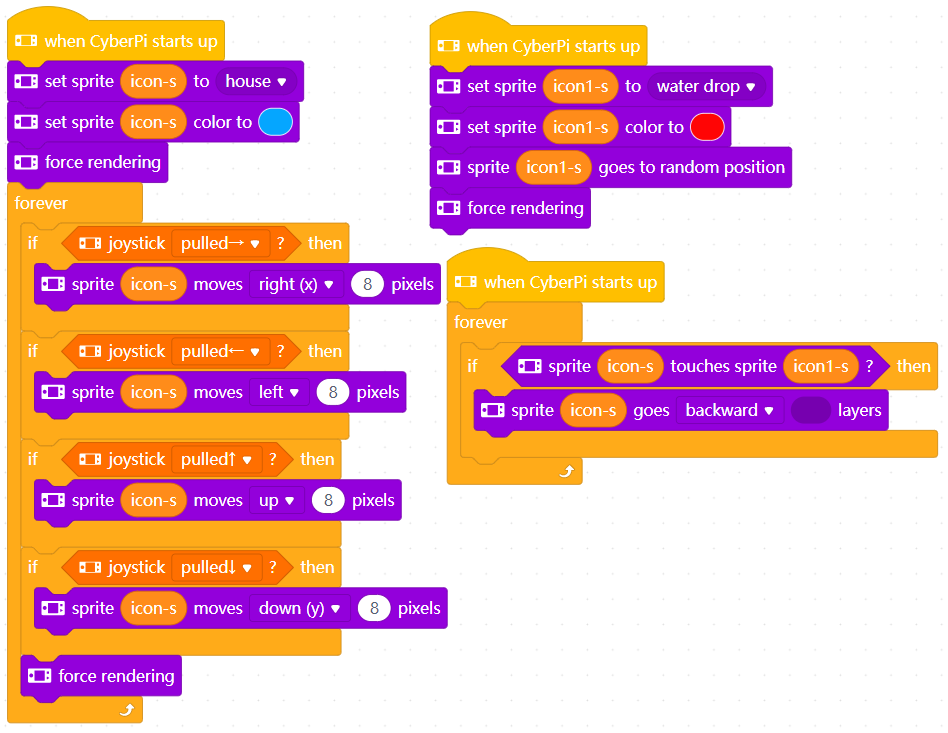
After you upload the program to CyberPi, two sprites are displayed on CyberPi’s screen.
Move the joystick to move the house icon.
When it comes in contact with the water drop icon, it is covered by the latter.
22. sprite ( ) touches sprite ( )
![]()
Determines whether two specified sprites come in contact with each other
How to use
Specify two sprites.
This is a Boolean block that contains a condition. Use it in combination with another block that requires a condition.
Example
1. Create two variables icon-s and icon1-s.
2. Compile the following program.
After you upload the program to CyberPi, two sprites are displayed on CyberPi’s screen.
Move the joystick to move the house icon.
When it comes in contact with the water drop icon, the latter is covered.
23. sprite ( ) on edge?
![]()
Determines whether the specified sprite touches the edge of the screen
How to use
Specify the sprite.
This is a Boolean block that contains a condition. Use it in combination with another block that requires a condition.
Example
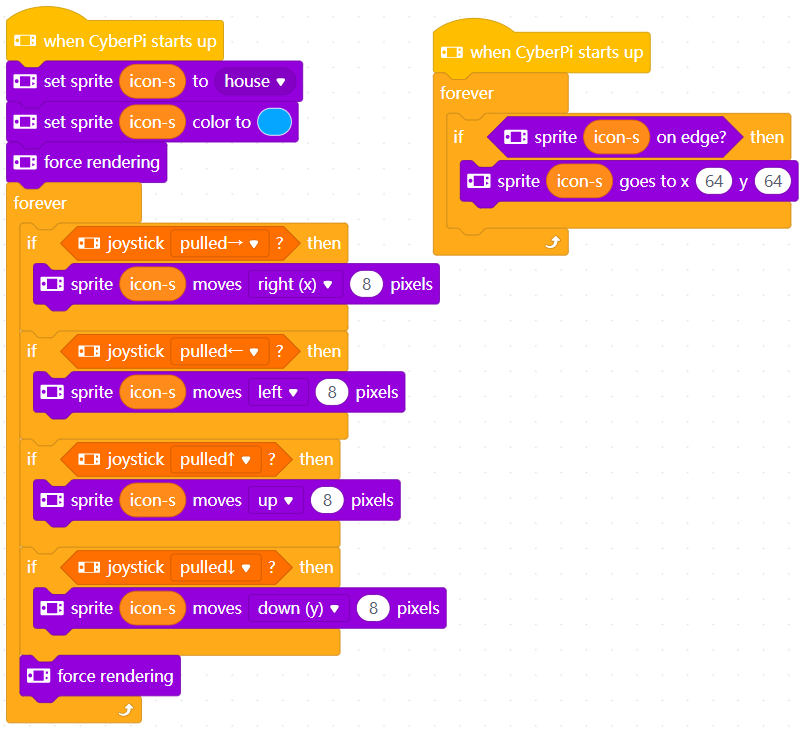
After you upload the program to CyberPi, the house icon is displayed in the middle of CyberPi’s screen.
Move the joystick to move the house icon.
When touching the edge of the screen, it goes back to the center of the screen.、
24. (x position) of sprite ( )

Obtains an attribute of the specified sprite
How to use
This block allows you to obtain the x-coordinate, y-coordinate, direction, size, or anchor point of the specified sprite.
Specify the sprite and click to select an information item from the drop-down list box.
Example
1. Create two variables icon-s and icon2-s.
2. Compile the following program.
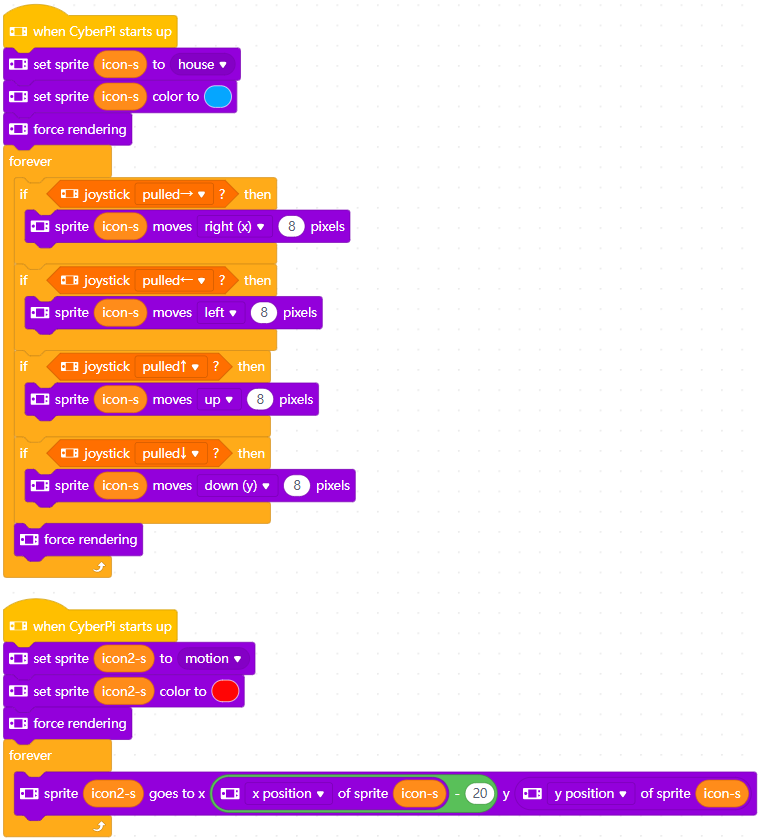
After you upload the program to CyberPi, two sprites are displayed on CyberPi’s screen.
Move the joystick to move the house icon.
The motion icon follows the house icon to move.
25. color of x: ( ) y: ( ) on the display is R: ( ) G: ( ) B: ( )?
![]()
Determines whether the specified point (x,y) is displayed in the specified color
How to use
Set the coordinates of the point and set the color.
Intensity range of red, green, and blue: 0–255
This is a Boolean block that contains a condition. Use it in combination with another block that requires a condition.
Example
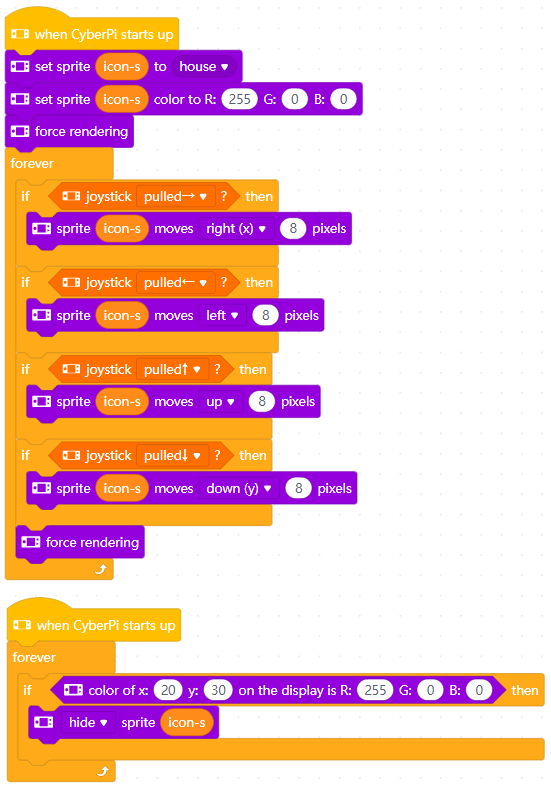
After you upload the program to CyberPi, the house icon is displayed in red in the middle of CyberPi’s screen.
Move the joystick to move the house icon.
When coming to the point (20,30), it disappears.
26. force rendering
Renders the specified sprite to make its attributes take effect
How to use
After creating a sprite or modifying the attributes of a sprite, you need to render it to make its attributes take effect.
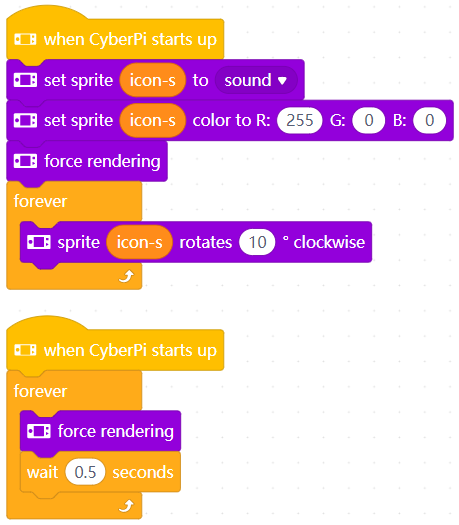
Example
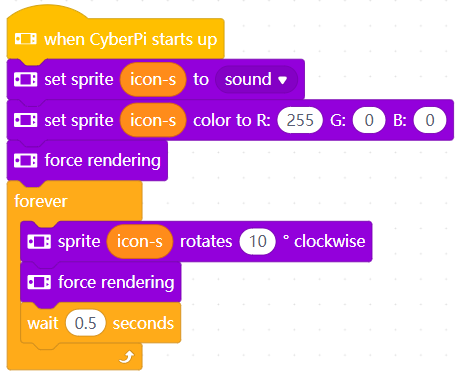
After you upload the program to CyberPi, the sound icon is displayed in the center of CyberPi’s screen and it keeps rotating.
CyberPi supports multiple threads, and therefore you can compile a rendering thread to keep making the attributes of the sound icon take effect.
Doodle
1. clear doodles
Deletes all doodles displayed on the screen
How to use
Before drawing a new doodle, you can use this block to delete all the doodles displayed on the screen of CyberPi.
Example
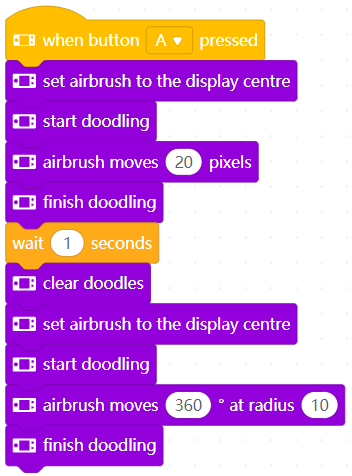
After you upload the program to CyberPi and press button A, a line is drawn on the screen first, and 1 second later, the line disappears and a circle is drawn.
2. start doodling

Starts drawing from the point where the airbrush is located
How to use
You need to use this block when you are to draw a doodle by moving the airbrush. Without this block, the moving of the airbrush leaves no line.
When you use this block, the default attributes of the airbrush are described as follows:
Position: (64,64), center of the screen
Stroke weight: 1 pixel
Color: white
Direction: 90 degrees (facing the right side of the screen)

Example
After you upload the program to CyberPi, a square is drawn in the center of the screen.
Note: Before you use the start doodling block, you can move the airbrush to the start point you need.
3. finish doodling
Stops drawing at the point where the airbrush is located
How to use
When you use this block, the drawing stops, that is, the moving of the airbrush leaves no line any more.
Example
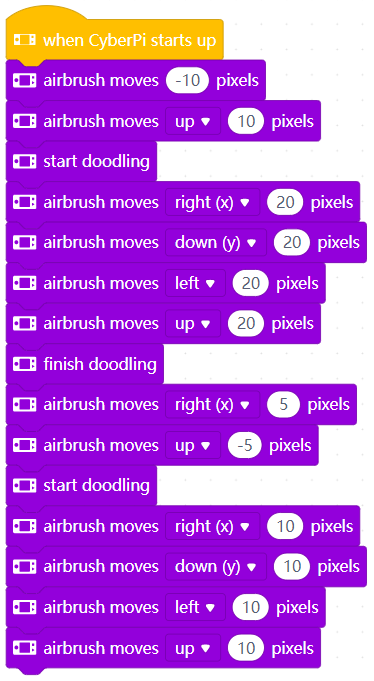
After you upload the program to CyberPi, two separate squares are drawn in the center of the screen.
4. set airbrush color to ( )
Sets the stroke color of the airbrush
How to use
Click to set the color by setting the values of color, saturation, and brightness.
Example

After you upload the program to CyberPi, two separate squares are drawn in different colors in the center of the screen.
5. set airbrush color to R: ( ) G: ( ) B: ( )

Sets the stroke color of the airbrush
How to use
Set the stroke color by setting the intensity of red, green, and blue.
Intensity range of red, green, and blue: 0–255
Example
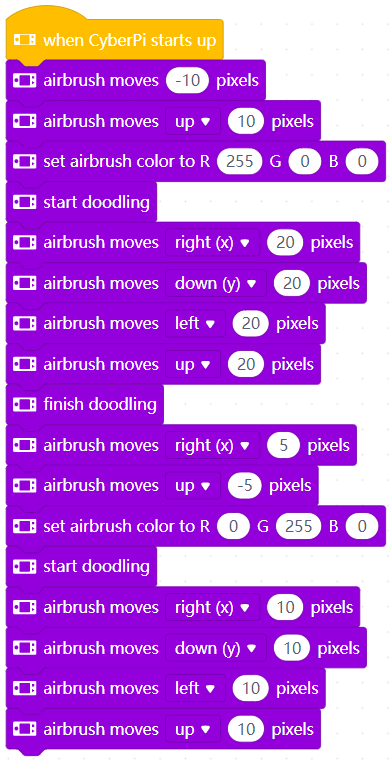
After you upload the program to CyberPi, two separate squares are drawn in different colors in the center of the screen.
6. set doodle thickness to ( ) pixels

Sets the stroke weight (in pixels) for drawing
How to use
The default stroke weight is 1 pixel. With this block, you can change the stroke weight as you want.
Click to enter the number of pixels.
Example
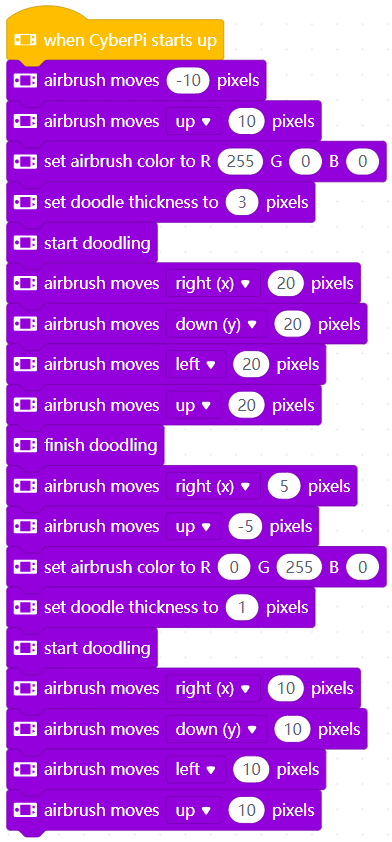
After you upload the program to CyberPi, two separate squares are drawn in different colors with different stroke weight in the center of the screen.
7. set doodling speed to ( )
Sets the moving speed of the airbrush
How to use
You can set the speed at which the airbrush moves.
Setting range: 1~10
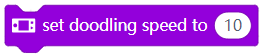
Example
After you upload the program to CyberPi, two lines are drawn at different speed on the screen.
8. airbrush rotates ( )° clockwise

Changes the direction (in degrees) faced by the airbrush
How to use
By default, the airbrush faces the direction of 90 degrees, that is, the right side of the screen.
With this block, you can change its direction and thus draw oblique lines.
Click to enter the number of degrees. A positive value indicates rotating clockwise, and a negative one indicates rotating counterclockwise.
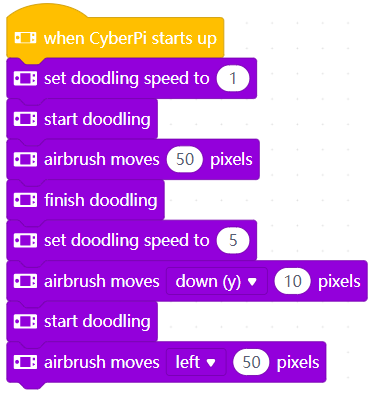
Example
After you upload the program to CyberPi, an equilateral triangle is drawn on the screen.
9. airbrush points in direction ( )°

Sets the direction (in degrees) faced by the airbrush
How to use
The following figure shows the directions and their corresponding degrees of the airbrush:
With this block, you can change its direction and thus draw oblique lines.
Click to enter the number of degrees.
Example
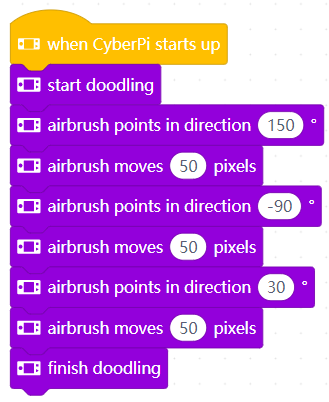
After you upload the program to CyberPi, an equilateral triangle is drawn on the screen.
10. airbrush moves ( ) pixels

Moves the airbrush the specified distance (in pixels)
How to use
By default, the airbrush is located at the center point (64, 64) of the screen.
With this block, you can move the airbrush along the direction it faces:
- If the start doodling block is not used, you can use this block to change the starting point for drawing.
- If the start doodling block is used, you can use this block to draw lines.
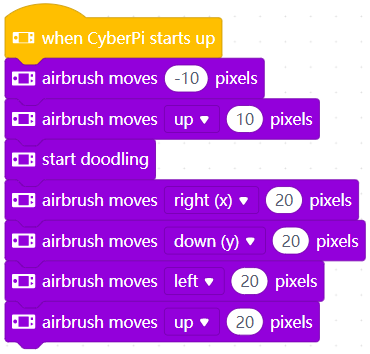
Example
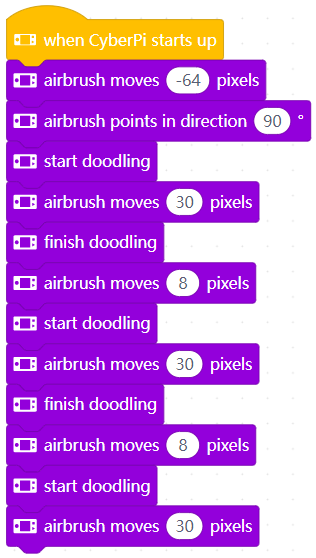
After you upload the program to CyberPi, three separate line segments are drawn on the screen.
11. set airbrush to the display centre

Moves the airbrush back to the center of the screen
How to use
After moving the airbrush, you can use this block to move it back to the center (64,64) of the screen.
Example
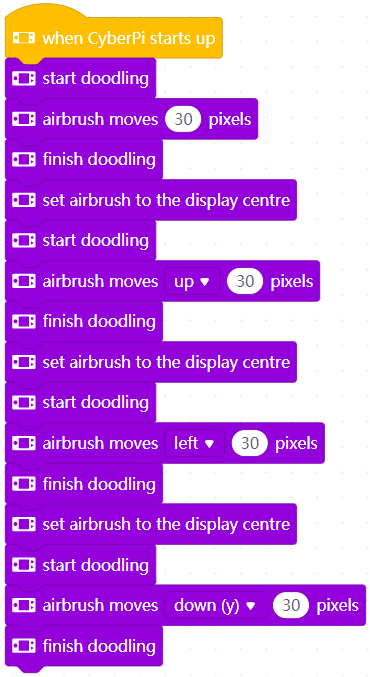
After you upload the program to CyberPi, a cross-shaped pattern is drawn on the screen.
12. airbrush goes to x: ( ) y: ( )

Moves the airbrush to the specified point (x,y)
How to use
With this block, you can move the airbrush to any point you want on the screen.
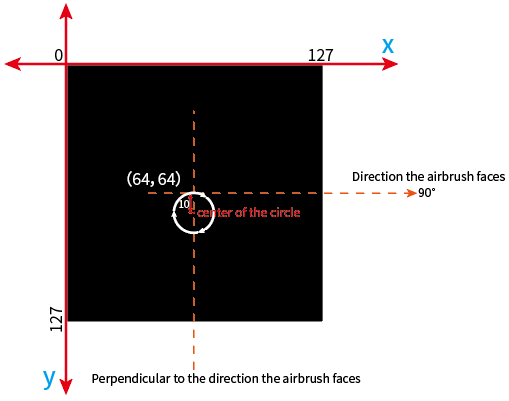
The following figure shows the axes and directions of the screen.

Click to enter the the coordinates of the target point.
Example
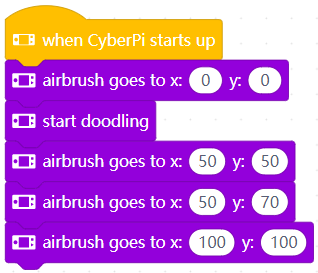
After you upload the program to CyberPi, a polyline is drawn on the screen.
13. airbrush moves (right (x)) ( ) pixels

Moves the airbrush the specified distance (in pixels) along the direction of the x-axis or y-axis
How to use
The following figure shows the axes defined for the screen.
Example
After you upload the program to CyberPi, a square is drawn in the center of the screen.
14. airbrush moves ( )° at radius ( )

Moves the airbrush the specified distance along a circle with the specified radius
How to use
Click to enter the radius and the number of degrees.
When performing the circular motion, the airbrush moves clockwise, and the center of the circle is in the line perpendicular to the direction the airbrush faces.
For example, if you set the block as follows,

the airbrush moves as follows.
Example
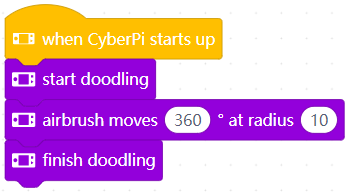
After you upload the program to CyberPi, a circle is drawn on the screen.
15. airbrush (x position)

Obtains an attribute of the airbrush
How to use
This block allows you to obtain the x-coordinate, y-coordinate, direction, or stroke weight of the airbrush.
Click to select an attribute from the drop-down list box.
Example
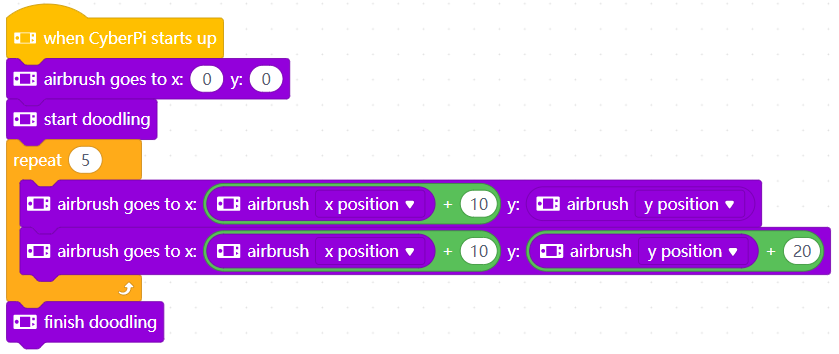
After you upload the program to CyberPi, a polyline is drawn on the screen.
16. set current doodle as sprite ( )

Creates a sprite and sets it to the current doodle
How to use
To create a sprite, you need create a variable in the Variables category, and then define the variable as a sprite.
After creating the sprite, you can set it to the current doodle.
Note: The steps for displaying a sprite on the screen of CyberPi is described as follows:
Create a variable -> define the sprite -> set parameters for the sprite -> use the force rendering block to make the settings take effect
Example
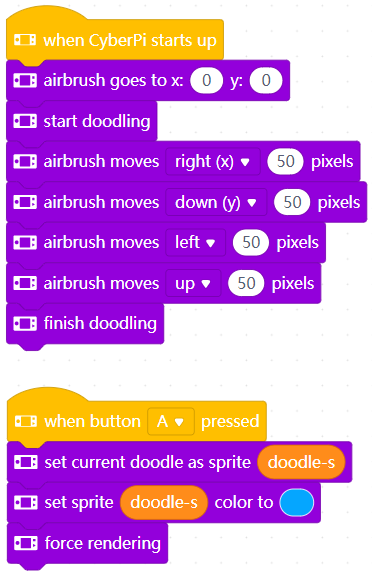
After you upload the program to CyberPi, the drawing starts on the screen.
Wait till the drawing ends and press button A.
The square turns into blue and is displayed in the center of the screen.