How Can We Help?
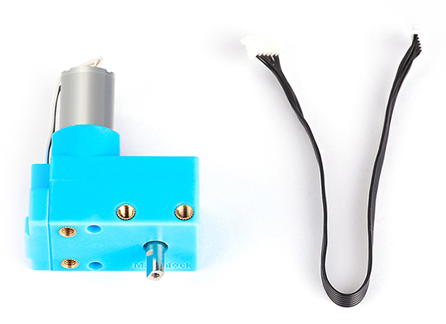
180 Optical Encoder Motor
Overview
The 180 optical encoder motor is equipped with an optical encoder that enables high-accuracy control. With two M4 threaded holes on each of the three sides, it can be easily connected to Makeblock mechanical parts and thus can be used flexibly in combination with various other parts. The customized material it uses reduces noise and promises large output torque. It supports multiple motor drivers and main control boards, such as Orion, MegaPi, MegaPi Pro, and Me Auriga.
Specifications
- Reduction gear ratio: 39.6
- Rated voltage: 7.4 V
- No-load current: 240 mA
- Load current: ≤750 mA
- No-load speed: 350 ± 5% (RPM)
- Original speed: 14,000 ± 5% (RPM)
- Start torque: 5 kg·cm
- Rated torque: 800 g·cm
- Length of output shaft: 9 mm
- Power: 3.7 W
- Encoder rotation angle: 360°
Programming guide
Block description (main control board: Auriga)


After the following program runs, encoder motor 1 and encoder motor 2 rotate at the speed of 100 RPM for 1 second and stop rotating for 1 second, and then repeat this process.

After the following program runs, encoder motor 1 and encoder motor 2 rotate at the speed of 100 RPM for 1 second and stop rotating for 1 second, and then repeat this process.

If you program in Arduino, you need to use Makeblock-Library-master to control the motor.
After the following program runs, encoder motor 1 and encoder motor 2 rotate at the speed of 100 RPM for 1 second and then stop rotating for 1 second, and then repeat this process.
#include <Arduino.h>
#include <Wire.h>
#include <SoftwareSerial.h>
#include <MeMegaPiPro.h>
double angle_rad = PI/180.0;
double angle_deg = 180.0/PI;
MeEncoderOnBoard Encoder_1(SLOT1);
MeEncoderOnBoard Encoder_2(SLOT2);
void isr_process_encoder1(void)
{
if(digitalRead(Encoder_1.getPortB()) == 0){
Encoder_1.pulsePosMinus();
}else{
Encoder_1.pulsePosPlus();
}
}
void isr_process_encoder2(void)
{
if(digitalRead(Encoder_2.getPortB()) == 0){
Encoder_2.pulsePosMinus();
}else{
Encoder_2.pulsePosPlus();
}
}
void setup(){
TCCR1A = _BV(WGM10);//PIN12
TCCR1B = _BV(CS11) | _BV(CS10) | _BV(WGM12);
TCCR2A = _BV(WGM21) | _BV(WGM20);//PIN8
TCCR2B = _BV(CS22);
attachInterrupt(Encoder_1.getIntNum(), isr_process_encoder1, RISING);
attachInterrupt(Encoder_2.getIntNum(), isr_process_encoder2, RISING);
}
void loop(){
Encoder_1.setTarPWM(100);
Encoder_2.setTarPWM(100);
delay(1);
Encoder_1.setTarPWM(0);
Encoder_2.setTarPWM(0);
delay(1);
loop();
}
- Install MegaPi Pro on Raspberry Pi, and connect the 180 optical encoder motor to the DC/encoder driver.
- Install the latest Makeblock library for Raspberry Pi, do a “pip3 install makeblock” in the command line, and then do an “upgrade” in the command line.
- Create a Python file suffixed with .py.
- Write a program in the Python file.
- Run the Python file, for example, “python123.py”.
After the following program runs, the encoder motor connected to port 1 for DC/encoder motor on MegaPi Pro rotates clockwise at the speed of 50 RPM for 2 seconds, stops rotating for 1 second, rotates anticlockwise at the speed of 50 RPM for 2 seconds, stops rotating for 1 second, and then repeats this process.
from time import sleep
from makeblock import MegaPiPro
board = MegaPiPro.create()
encoder = board.EncoderMotor(MegaPiPro.PORT1)
while True:
encoder.run(50)
sleep(2)
encoder.run(0)
sleep(1)
encoder.run(-50)
sleep(2)
encoder.run(0)
sleep(1)
After the following program runs, the encoder motor connected to port 1 for DC/encoder motor on MegaPi Pro rotates to the target position.
10 lines (9 sloc) 274 Bytes
RawBlameHistory
from time import sleep
from makeblock import MegaPiPro
board = MegaPiPro.create()
encoder = board.EncoderMotor(MegaPiPro.PORT1)
position = 0
def on_finished(value):
position = 5000 – position
encoder.move_to(position,100,on_finished)
on_finished(position)
Wiring mode
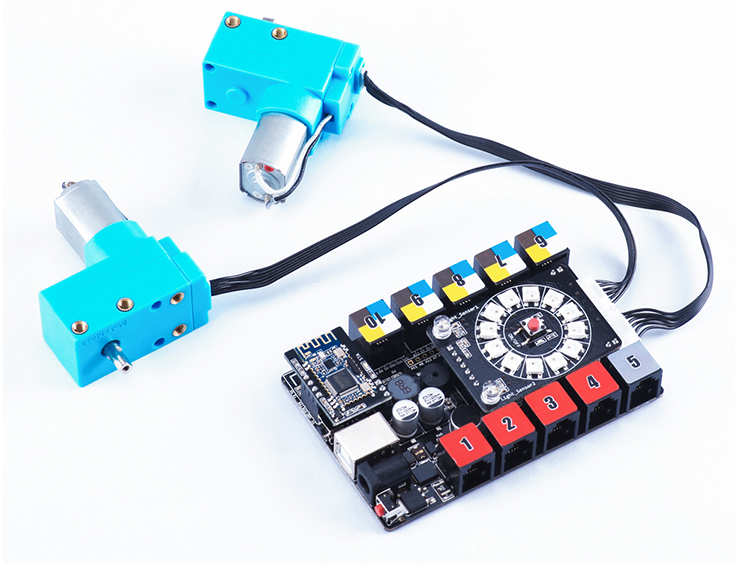
Connect the 180 optical encoder motor to the port for encoder motor on the main control board or the port for encoder motor on the encoder motor driver by using the cable for 180 optical encoder motor.
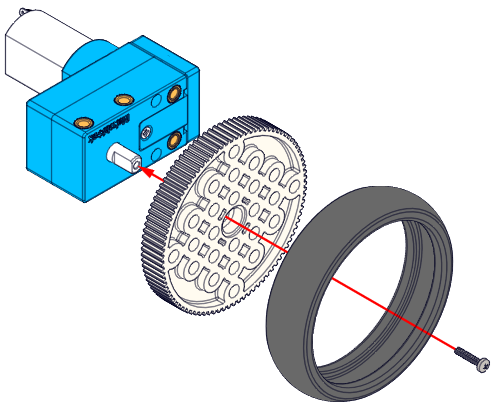
The 180 optical encoder motor can be used to provide power or used as a part of the chassis of mBot Ranger. Its shaft is compatible with the plastic timing pulley 62T with step and the plastic timing pulley 90T with step on Maker’s Platform of Makeblock.