How Can We Help?
APIs for Function Extension
To help you use the APIs more efficiently, the application scenarios of the APIs are labelled as follows:
![]() : indicates that an API supports Python 3 programming and can be used in Live mode on the mBlock Python editor.
: indicates that an API supports Python 3 programming and can be used in Live mode on the mBlock Python editor.
![]() : indicates that an API supports MicroPython programming and can be used in Upload mode on the mBlock Python editor.
: indicates that an API supports MicroPython programming and can be used in Upload mode on the mBlock Python editor.
 : indicates that an API supports both Python 3 and MicroPython programming and can be used in both Live and Upload modes on the mBlock Python editor.
Display+
In addition to extending functions through extension boards and electronic modules, CyberPi can extend functions through its components and parts. Currently, the Sprites and Doodle APIs are provided to extend the functions of CyberPi’s screen. More APIs are being developed.
Tips: These APIs support only MicroPython programming and can’t be used in Python 3 programming. Use thses APIs only in Upload mode. For details about the description and instructions of the programming modes, see “Live and Upload modes.”
Sprites
The Sprites APIs enable you to make the maximum use of CyberPi’s screen for creation. With these APIs, you can make various games and UIs.
Setting the background
![]()
cyberpi.background.fill(r, g, b)
Initiates the background of the screen
Currently, you can set the entire background to only one color. You can’t set a multi-color background.
Parameters:
- r:
int, intensity of the red color, ranging from0to255 - g:
int, intensity of the green color, ranging from0to255
- b:
int, intensity of the blue color, ranging from0to255
![]()
cyberpi.background.copy()
Copies all the elements displayed on the screen to serve as the background
Currently, this API is not open to users.
Creating sprites
![]()
sprite1 = cyberpi.sprite()
Declares a sprite
The following table describes the default attributes of a sprite when it is created.
|
Attribute |
Default value |
|
x-coordinate |
64 |
|
y-coordinate |
64 |
|
Direction |
90°
|
|
Size |
100% |
|
Anchor point |
Center of the sprite |
|
Displayed |
Yes |
|
Color |
White |
|
Layer |
The one created latest is located on the top layer. |

![]()
sprite.draw_text(text)
Defines a text as a sprite
By default, the font size of the text is 16 pixels.
Parameter:
- text:
str, character string to be used as the sprite
If you enter a text in a language that is not supported by the character library, garbage characters are displayed. CyberPi supports the following languages:
- ✅Simplified Chinese (SC)
- ✅English (EN)
- ✅French | Français
- ✅Spanish | Español
- ✅Traditional Chinese | 繁體中文
- ✅German | Deutsch
- ✅Italian | Italiano
- ✅Portuguese | Português
- ✅Russian | русский язык
- ✅Korean | 한국어
- ✅Japanese | 日本語
- ✅Dutch | Nederlands
![]()
sprite.draw_pixel(pixel, x_size, y_size)
Defines a pixel pattern as a sprite
Parameters:
- pixel:
array, hexadecimal array, describing the colors of pixels from left to right and from top to bottom of the pattern. For example, [0xFF0000, 0x00FF00, 0x0000FF] indicates that colors of the first three pixels of the pattern to be used are red, green, and blue, respectively. - x_size:
int, width of the pixel pattern,16by default
- y_size:
int, height of the pixel pattern,16by default
Colors set for pixels that exceed the defined width (x_size) and height (y_size) are discarded, and areas without color settings are defined as transparent.
![]()
sprite.draw_QR(content)
Defines a QR code as a sprite
Parameter:
content: str, content of the QR code to be used as the sprite
Example
import cyberpi
2
3 qrcode = cyberpi.sprite()
4 qrcode.draw_qrcode("Welcome")
5 qrcode.set_size(size=300)
6 qrcode.show()
7 cyberpi.screen.render()
![]()
sprite.draw_sketch()
Defines a sketch as a sprite
![]()
sprite.mirror(axis)
Reflects the sprite vertically or horizontally
Parameter:
- axis:
str, the value range is as follows:
"x": reflecting the sprite around the x-axis, that is, reflecting it vertically
"y": reflecting the sprite around the y-axis, that is, reflecting it horizontally
![]()
sprite.delete()
Deletes the sprite
Moving sprites
![]()
sprite.set_align(align_point = "center")
Sets the anchor point of the sprite
The anchor point of the sprite determines its central point when it moves or rotates.
Parameter:
- align_point:
str, position of the anchor point; the value range is as follows:
"top_mid": in the upper center of the sprite
"top_left": in the upper left of the sprite
"top_right": in the upper right of the sprite
"center": in the center of the sprite
"mid_left": in the middle left of the sprite
"mid_right": in the middle right of the sprite
"bottom_mid": in the lower center of the sprite
"bottom_left": in the lower left of the sprite
"bottom_right": in the lower right of the sprite
![]()
sprite.move_x(step)
Moves the sprite along the x-axis for the specified pixels
Parameter:
- step:
int, number of pixels the sprite is to be moved
![]()
sprite.move_y(step)
Moves the sprite along the y-axis for the specified pixels
Parameter:
- step:
int, number of pixels the sprite is to be moved
![]()
sprite.move_to(x, y)
Moves the sprite to the specified position (defined by the x- and y- coordinates)
Parameters:
- x:
int, x-coordinate of the position - y:
int, y-coordinate of the position
![]()
sprite.move_random()
Moves the sprite to a random position
This API sets the x- and y-coordinates of the position randomly to values ranging from 0 to 127.
Rotating sprites
![]()
sprite.rotate(angle)
Rotates the sprite clockwise the specified degrees
Parameter:
- angle:
int
![]()
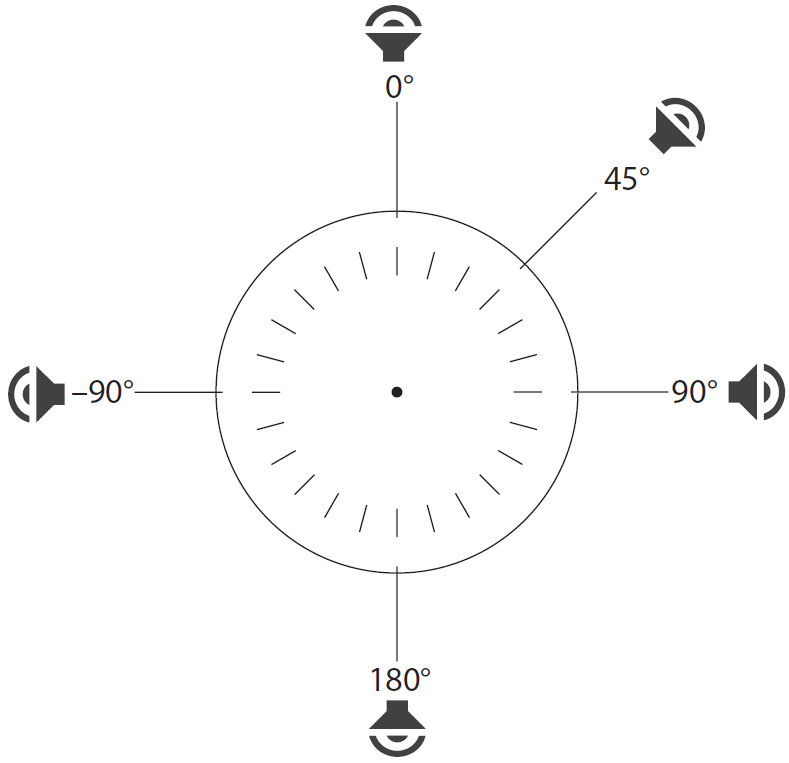
sprite.rotate_to(angle = 90)
Rotates the sprite to the specified direction (defined by degrees)
Parameter:
- angle:
int,90° by default
Using the sound icon as the sprite, the following figure shows the degrees and their corresponding directions:
Scaling sprites
![]()
sprite.set_size(size = 100)
Sets the percentage for scaling the sprite uniformly
Parameter:
- size:
int,100% by default
![]()
sprite.set_scale(x_size = 100, y_size = 100)
Sets the percentage for scaling the width and height of the sprite
Parameters:
- x_size:
int, percentage for scaling the width of the sprite,100% by default - y_size:
int, percentage for scaling the height of the sprite,100% by default
Currently, this API is not open to users.
Setting colors
![]()
sprite.set_color(r, g, b)
Sets the color of the sprite
With this API, all the non-empty pixels are rendered in the specified color.
Parameters:
- r:
int, intensity of the red color of the color filter, ranging from0to255 - g:
int, intensity of the green color of the color filter, ranging from0to255
- b:
int, intensity of the blue color of the color filter, ranging from0to255
![]()
sprite.close_color()
Removes the color filter
This API restores the sprite to the initial state defined by draw_XXX().
Layer and display control
![]()
sprite.show()
Shows the sprite
By default, sprites are shown.
![]()
sprite.hide()
Hides the sprite
![]()
sprite.z_up(step)
Brings the sprite forward by the specified number of layers
Parameter:
step: int, number of layers by which the sprite is brought forward
![]()
sprite.z_down(step)
Sends the sprite backward by the specified number of layers
Parameter:
step: int, number of layers by which the sprite is sent back
![]()
sprite.z_max()
Brings the sprite to the front
![]()
sprite.z_min()
Sends the sprite to the back
Detection
![]()
screen.color_get(x, y)
Obtains the color of the specified pixel (defined by x- and y-coordinates) displayed on the screen
Parameters:
- x:
int, x-coordinate of the pixel, ranging from0to127 - y:
int, x-coordinate of the pixel, ranging from0to127
A string is returned, indicating the hexadecimal value of the color, ranging from "0x000000" to "0xFFFFFF".
![]()
sprite.is_touch(other_sprite)
Determines whether the sprite touches another one or the edge of the screen
When a non-empty pixel of a sprite comes in contact with that of another sprite, it is determined that the two sprites touch each other. When the x- or y-coordinate of one non-empty pixel of a sprite is greater than or equal to 128, it is determined that the sprite touches the edge of the screen.
Parameter:
other_sprite: sprite or str
When you set other_sprite to sprite, the value can be any one sprite, indicating that this API determines whether the sprite touches the specified one.
When you set other_sprite to str, the value can only be "edge", indicating that this API determines whether the sprite touches the edge of the screen.
A bool value is returned.
![]()
sprite.get_align()
Obtains the anchor point of the sprite
A string is returned. The string can be one of the following:
"top_mid": in the upper center of the sprite
"top_left": in the upper left of the sprite
"top_right": in the upper right of the sprite
"center": in the center of the sprite
"mid_left": in the middle left of the sprite
"mid_right": in the middle right of the sprite
"bottom_mid": in the lower center of the sprite
"bottom_left": in the lower left of the sprite
"bottom_right": in the lower right of the sprite
![]()
sprite.get_x()
Obtains the x-coordinate of the sprite
An int value is returned.
![]()
sprite.get_y()
Obtains the y-coordinate of the sprite
An int value is returned.
![]()
sprite.get_rotation()
Obtains the angle the sprite faces
An int value is returned. Value range: –180° to +180°
![]()
sprite.get_xsize()
Obtains the scaling of the width (along the x-coordinate) of the sprite
An int value is returned.
![]()
sprite.get_ysize()
Obtains the scaling of the height (along the y-coordinate) of the sprite
An int value is returned.
Rendering
Rendering is a very important process. The attributes (the settings or change of the coordinates, size, direction) for a sprite can take effect only after you render the sprite.
![]()
cyberpi.screen.enable_autorender()
Enables the default rendering (ten frames) of the screen
![]()
cyberpi.screen.disable_autorender()
Disables the default rendering (ten frames) of the screen
![]()
cyberpi.screen.render()
Starts manual rendering
Doodle
The following table describes the default attributes of the airbrush.
|
Attribute |
Default value |
|
x-coordinate |
64 |
|
y-coordinate |
64 |
|
Stroke weight |
1 pixel |
|
Color |
White |
|
Put down to start doodling? |
No |
![]()
cyberpi.sketch.clear()
Deletes all the sketches
![]()
cyberpi.sketch.start()
Puts the airbrush down to start sketching
![]()
cyberpi.sketch.end()
Lifts the airbrush up to stop sketching
![]()
cyberpi.sketch.set_speed(speed)
Sets the moving speed of the airbrush
Parameter:
- speed:
int, speed at which the airbrush moves, ranging from1to10
![]()
cyberpi.sketch.set_color(r, g, b)
Sets the color of the airbrush
Parameters:
- r:
intorstr
When you set r toint, the value indicates the intensity of the red color of the airbrush, ranging from0to255.
When you set r tostr, the value indicates the name or abbreviation of the color of the airbrush. The following describes the color names and abbreviations:
red r
orange o
yellow y
green g
cyan c
blue b
purple p
white w
black k
- g:
int, intensity of the green color of the airbrush, ranging from0to255 - b:
int, intensity of the blue color of the airbrush, ranging from0to255
![]()
cyberpi.sketch.set_size(size)
Sets the stroke size of the airbrush
The stroke cap of the airbrush is in the round shape.
Parameter:
- size:
int, indicating the stroke weight of the airbrush
![]()
cyberpi.sketch.cw(angle)
Rotates the airbrush the specified degrees clockwise
Parameter:
- angle:
int, number of degrees the airbrush is rotated
![]()
cyberpi.sketch.ccw(angle)
Rotates the airbrush the specified degrees counterclockwise
Parameter:
- angle:
int, number of degrees the airbrush is rotated
![]()
cyberpi.sketch.set_angle(angle)
Sets the angle the airbrush faces
![]()
cyberpi.sketch.move(step)
Moves the airbrush the specified number of pixels in the direction it faces
Parameter:
- step:
int, number of pixels the airbrush moves
![]()
cyberpi.sketch.move_x(step)
Moves the airbrush the specified number of pixels from left to right along the x-axis
Parameter:
- step:
int, number of pixels the airbrush moves along the x-axis
![]()
cyberpi.sketch.move_y(step)
Moves the airbrush the specified number of pixels from top to bottom along the y-axis
Parameter:
- step:
int, number of pixels the airbrush moves along the y-axis
![]()
cyberpi.sketch.move_to(x, y)
Moves the airbrush to the specified position (defined by the x- and y-coordinates)
Parameters:
- x:
int, x-coordinate of the airbrush - y:
int, y-coordinate of the airbrush
![]()
cyberpi.sketch.circle(r, angle)
Draws a circular arc with the specified radius and angle
The circle center is in the direction that is perpendicular to that the airbrush faces.
Parameters:
- r:
int, radius of the circular arc the airbrush draws - y:
int, angles of the circular arc the airbrush draws
![]()
cyberpi.sketch.get_x()
Obtains the x-coordinate of the airbrush
An int value is returned.
![]()
cyberpi.sketch.get_y()
Obtains the y-coordinate of the airbrush
An int value is returned.
![]()
cyberpi.sketch.get_size()
Obtains the stroke size of the airbrush
An int value is returned.
![]()
cyberpi.sketch.get_angle()
Obtains the degrees of the direction the airbrush faces
An int value is returned.
![]()
cyberpi.sketch.if_start()
Determines whether the airbrush is put down
A bool value is returned.
![]()
sprite_sketch = sprite.draw_sketch()
Uses the sketch as the sprite
When you use the sketch as a sprite, the shape of the sketch is used. The anchor point of a sprite is located at the point (64,64) by default, and therefore a sketch is displayed in the center of the screen after it is set as a sprite.
Example (available only in Upload mode)
import cyberpi
2 import random
3
4
5 def draw():
6 cyberpi.sketch.move_to(0, 0)
7 cyberpi.sketch.start()
8 cyberpi.sketch.set_size(1)
9 cyberpi.sketch.set_speed(16)
10 x = 0
11 y = 0
12 for k in range(0, 9, 1):
13 r = random.randint(1, 255)
14 g = random.randint(1, 255)
15 b = random.randint(1, 255)
16 cyberpi.led.on(r, g, b)
17 cyberpi.sketch.set_color(r, g, b)
18 for i in range(1, 5, 1):
19 for j in range(0, 8 - k, 1):
20 cyberpi.sketch.move(16)
21 cyberpi.sketch.cw(90)
22 x += 8
23 y += 8
24 cyberpi.sketch.end()
25 cyberpi.sketch.move_to(x, y)
26 cyberpi.sketch.start()
27 cyberpi.sketch.end()
28 cyberpi.led.off()
29
30
31 while True:
32 if cyberpi.controller.is_press('a'):
33 draw()
34 if cyberpi.controller.is_press('b'):
35 cyberpi.sketch.clear()
Mesh LAN (to be implemented)
The wireless communication bewteen Halocodes on a LAN is implemented by using the mesh mechanism. For CyberPis, the ESP32-NOW technology is used to implement the wireless communication on a LAN. You can consider the mesh and ESP32-NOW technologies as two different communication protocols.
The following table describes the differences in application between them.
|
Mesh |
ESP32-NOW |
|
|
Supporting Internet connection simultaneously? |
No |
Yes |
|
Need to create and enter a LAN first? |
Yes |
No You need only to ensure that the CyberPis are within the signal transmission range. |
|
Anti-interference capacity |
Strong Halocode receives only messages sent by another one on the same LAN. |
Weak CyberPi receives all broadcast messages sent by other CyberPis nearby. |
|
Stability |
Stronger |
Not that strong |
From the preceding description, you can see that it is easier to use the LAN functions for CyberPi. You can use it in the similar way as using IR communication. The mesh mechanism for Halocode, however, provides better performance.
Therefore, a block-based extension is developed to provide the mesh mechanism for CyberPi. With this extension, Halocode can easily communicate with CyberPi, and a LAN mechanism with better performance is available.
The following describes the APIs available:
![]()
cyberpi.mesh.set(name = "mesh1")
Creates a LAN
Parameter:
- name:
str, name of the mesh LAN to be created. The default value is mesh1.
![]()
cyberpi.mesh.join(name = "mesh1")
Joins a LAN
Parameter:
- name:
str, name of the mesh LAN to be joined. The default value is mesh1.
![]()
cyberpi.mesh_broadcast.set(message, val)
Sends a LAN broadcast message with a value
Parameter:
- message:
str, name of the broadcast message - val: value sent in the LAN broadcast message
![]()
cyberpi.mesh_broadcast.get(message)
Obtains the value in the received broadcast message
Parameter:
- message:
str, name of the broadcast message
The value sent in the broadcast message is returned.
![]()
cyberpi.event.mesh_broadcast(message)
Listens to mesh broadcast messages and executes the subsequent code when a broadcast message is received
Parameter:
- message:
str, name of the mesh LAN broadcast message