How Can We Help?
Sensing
55. joystick[fieldMenu_1]?

Determines whether the joystick is moved in the specified direction
How to use
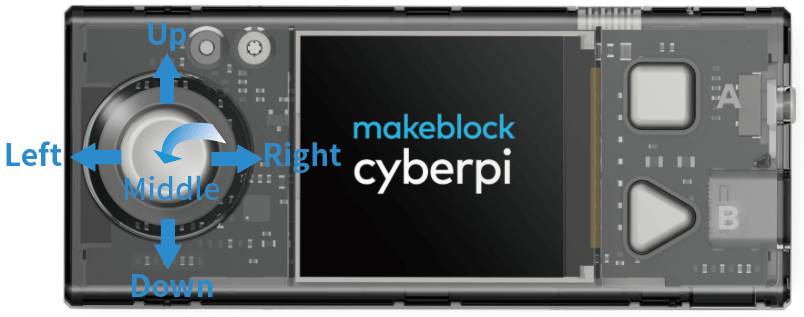
CyberPi is equipped with a joystick that can be moved in five directions.

Click to select a direction from the drop-down list box.
This is a Boolean block that contains a condition. Use it in combination with another block that requires a condition.
Example
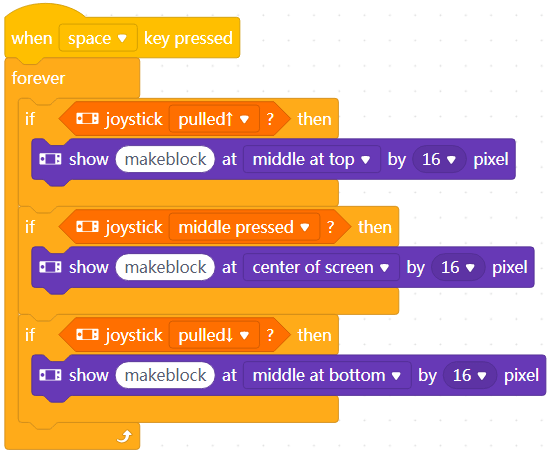
In Live mode, after pressing the space key, you can move the joystick to display “makeblock” in different positions.
56. joystick [fieldMenu_1]counts

Reports the number of times the joystick is moved in the specified direction
How to use
CyberPi is equipped with a joystick that can be moved in five directions.
Click to select a direction from the drop-down list box.
You can select the check box on the left of this block to see the number of times on the stage.
This is a reporter block that must be used in combination with another block requiring data.
Example
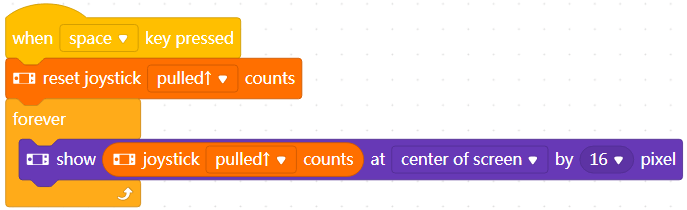
With this program, CyberPi can be used as a counter.
In Live mode, after pressing the space key, repeatedly move the joystick upward. CyberPi counts from zero and displays the number of times in the center of its screen.
57. reset joystick [fieldMenu_1]counts

Resets the number of times the joystick is moved in the specified direction to zero
How to use
CyberPi is equipped with a joystick that can be moved in five directions.
Click to select a direction from the drop-down list box.
After this block is executed, the number of times the joystick is moved in the specified direction is counted from zero.
Example
With this program, CyberPi can function as a counter.
In Live mode, after pressing the space key, repeatedly move the joystick upward. CyberPi counts from zero and displays the number of times in the center of its screen.
58. button[fieldMenu_1]pressed?

Determines whether specified button is pressed
How to use
CyberPi is equipped with two buttons, A and B.
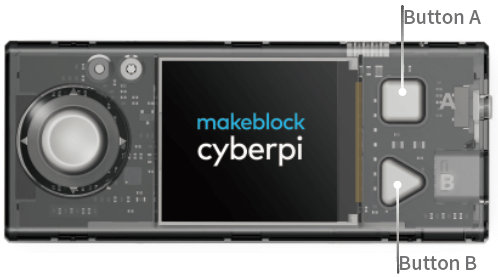
Click to select a button from the drop-down list box.
This is a Boolean block that contains a condition. Use it in combination with another block that requires a condition.
Example
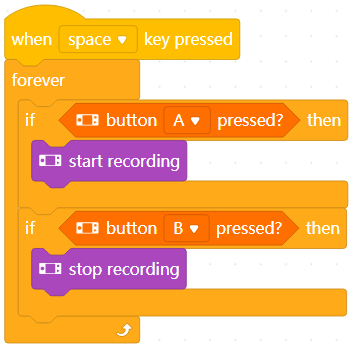
With this program, CyberPi can function as a recorder.
In Live mode, after pressing the space key, press A and B to start and stop recording.
59. button[fieldMenu_1]press counts

Reports the number of times the specified button is pressed
How to use
CyberPi is equipped with two buttons, A and B.
Click to select a button from the drop-down list box.
You can select the check box on the left of this block to see the number of times on the stage.
This is a reporter block that must be used in combination with another block requiring data.
Example

With this program, CyberPi can be used as a counter.
In Live mode, after pressing the space key, repeatedly press button A. CyberPi counts from zero and displays the number of times in the center of its screen.
60. reset button[fieldMenu_1]press counts

Resets the number of times the specified button is pressed to zero
How to use
CyberPi is equipped with two buttons, A and B.
Click to select a button from the drop-down list box.
After this block is executed, the number of times the specified button is pressed is counted from zero.
Example
With this program, CyberPi can be used as a counter.
In Live mode, after pressing the space key, repeatedly press button A. CyberPi counts from zero and displays the number of times in the center of its screen.
61. loudness

Reports the ambient loudness detected by the microphone on CyberPi
How to use
Value range: 0–100
You can select the check box on the left of this block to see the ambient loudness on the stage.
This is a reporter block that must be used in combination with another block requiring data.
Example
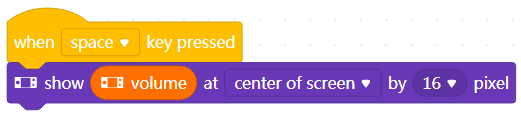
Use this block in combination with a Display block.
In Live mode, when you press the space key, CyberPi displays the ambient loudness detected by the microphone in the center of its screen.
62. ambient light intensity

Reports the ambient light intensity detected by the light sensor on CyberPi
How to use
Value range: 0–100
You can select the check box on the left of this block to see the ambient light intensity on the stage.
This is a reporter block that must be used in combination with another block requiring data.
Example

Use this block in combination with a Display block.
In Live mode, when you press the space key, CyberPi displays the ambient loudness detected by the microphone in the center of its screen.
63. timer(s)

Reports the count value of the timer
How to Use
The timer starts to count from 0 each time CyberPi is powered on. This block reports the duration CyberPi runs this time.
You can select the check box on the left of this block to see the count value of the timer on the stage.
This is a reporter block that must be used in combination with another block requiring data.
Example
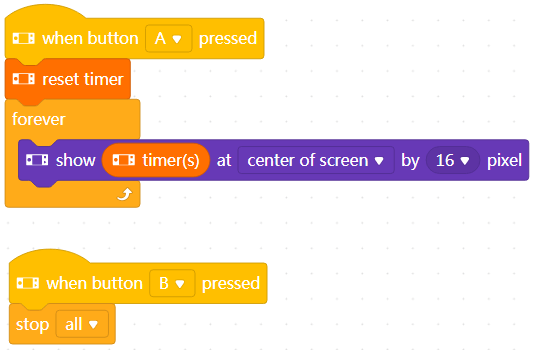
With this program, CyberPi can function as a timer.
In Live mode, when you press button A on CyberPi, CyberPi starts to count from 0 and displays the time in the center of its screen. When you press button B, CyberPi stops counting.
64. reset timer

Resets the timer to Zero
How to Use
The timer of CyberPi starts to count from zero each time CyberPi is powered on.
You can use this block to reset the timer, making it start to count from zero again.
Example
With this program, CyberPi can function as a timer.
In Live mode, when you press button A on CyberPi, CyberPi starts to count from 0 and displays the time in the center of its screen. When you press button B, CyberPi stops counting.
65. hostname

Reports the hostname of CyberPi
How to use
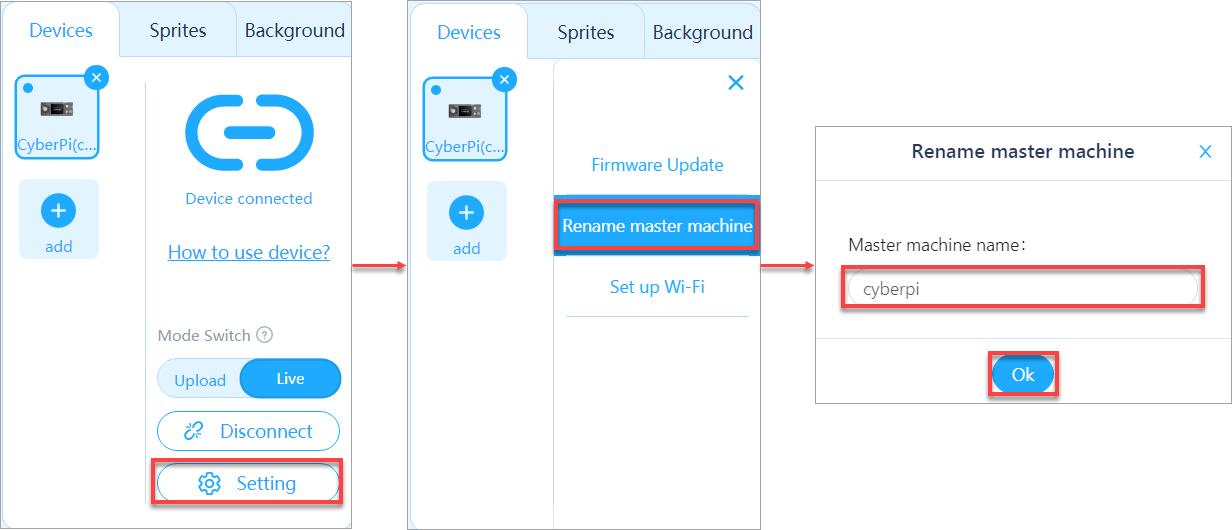
The default hostname of CyberPi is cyberpi.
The hostname is displayed on the UI of the CyberOS system that runs on your CyberPi. By setting device names, users can find their CyberPis or identify one another on a LAN or IoT.
You can set the hostname as follows.
You can select the check box on the left of this block to see the hostname on the stage.
This is a reporter block that must be used in combination with another block requiring data.
Example

Use this block in combination with a Display block.
In Live mode, when you press the space key, CyberPi displays the hostname you set in the center of its screen.
66. [fieldMenu_1]

Reports information of the hardware device
How to use
With this block, you can obtain the battery level, MAC address, Bluetooth name, system language, and extension board name of CyberPi.
The battery level refers to that of the extension board connected to CyberPi, ranging from 0 to 100. Do not use this option if no extension board is connected.
The MAC address is used to connect to Wi-Fi. Note that the MAC address you obtain by using this block may be wrong if CyberPi is not connected to Wi-Fi. The output value is a 12-byte string.
The Bluetooth name refers to that broadcast by CyberPi, used for Bluetooth connection.
The system language refers to the language currently used on the CyberOS system running on CyberPi.
The extension name refers to the name of the extension board connected to CyberPi (not implemented currently).
You can select the check box on the left of this block to see the corresponding information on the stage.
This is a reporter block that must be used in combination with another block requiring data.
Example
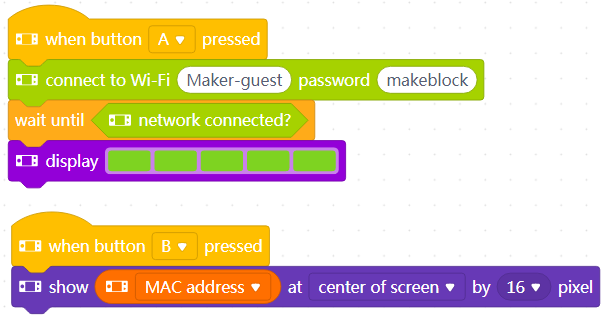
Note: Set the Wi-Fi account and password to those available.
Compile this program in Upload mode and upload it to CyberPi.
Press button A. CyberPi starts to connect to Wi-Fi.
After the LEDs are lit up in green, press button B. CyberPi displays its MAC address on its screen.