How Can We Help?
IoT
77. send user cloud broadcast[message]

Sends the specified user cloud message
How to use
What is a user cloud message?
With the same mBlock 5 account, user cloud messages enable cross-device and cross-project communication, that is, you can enable CyberPi to interact with other CyberPis and sprites after signing in with the same mBlock 5 account.
Before using the user cloud message function, you need to:
- Set mBlock 5 to the Upload mode
- Sign in to your mBlock 5 account
- Connect CyberPi to Wi-Fi
Click to set the name of the user cloud message to be sent.
Example
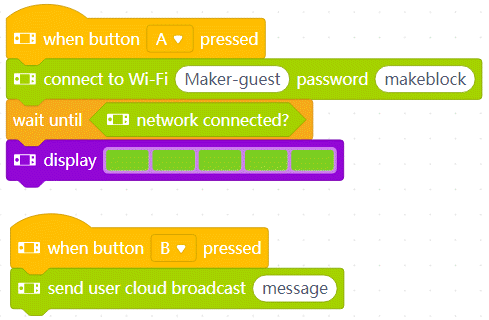
The following programs enable CyberPi to interact with a sprite.
CyberPi
Sprite
Note: Set the Wi-Fi account and password to those available.
Compile the two programs in Upload mode and upload the program to CyberPi.
Press button A. CyberPi starts to connect to Wi-Fi.
After the LEDs on CyberPi are lit up in green, press button B. CyberPi sends the user cloud message named message.
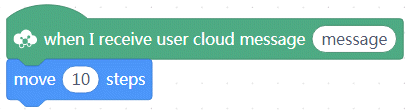
After receiving the user cloud message, the sprite moves 10 steps.
78. send user cloud broadcast [message]with value [value]

Sends the specified user cloud message and the specified value
How to use
Click to set the name of the user cloud message and the value to be sent.
Example
The following programs enable CyberPi to interact with another CyberPi.
CyberPi 1
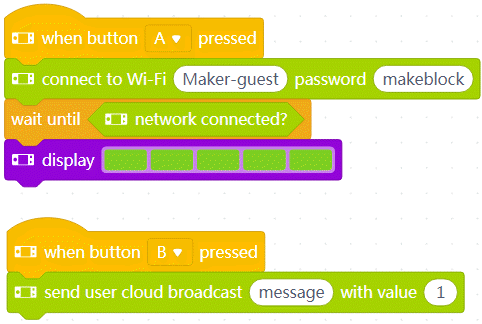
CyberPi 2
Note: Set the Wi-Fi account and password to those available.
Compile the two programs in Upload mode and upload them to CyberPis 1 and 2, respectively.
Press button A on CyberPis 1 and 2. They start to connect to Wi-Fi.
After the LEDs on CyberPi are lit up in green, press button B on CyberPi 1. CyberPi 1 sends the user cloud message named message and the value 1.
After receiving the user cloud message, CyberPi 2 displays the value 1 on its screen.
79. when receiving user cloud broadcast[message]

Executes the subsequent block(s) when the specified user cloud message is received
How to use
After being connected to Wi-Fi, CyberPi can interact with a sprite or another CyberPi that is programmed with the same mBlock 5 account.
Example
The following programs enable CyberPi to interact with a sprite.
CyberPi
Sprite
Note: Set the Wi-Fi account and password to those available.
Compile the two programs in Upload mode and upload the program to CyberPi.
Press button A. CyberPi starts to connect to Wi-Fi.
After the LEDs on CyberPi are lit up in green, press button B. CyberPi sends the user cloud message named message.
After receiving the user cloud message, the sprite moves 10 steps.
80. user cloud broadcast[message]value received

Reports the value received through the specified user cloud message
How to use
After being connected to Wi-Fi, CyberPi can interact with a sprite or another CyberPi that is programmed with the same mBlock 5 account.
This is a reporter block that must be used in combination with another block requiring data.
Example
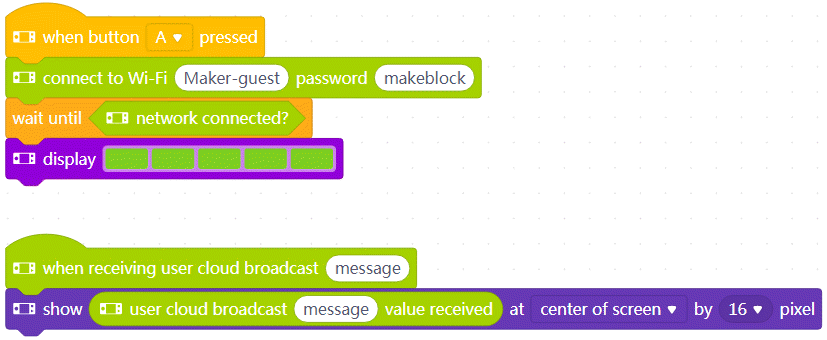
The following programs enable CyberPi to interact with another CyberPi.
CyberPi 1
CyberPi 2
Note: Set the Wi-Fi account and password to those available.
Compile the two programs in Upload mode and upload them to CyberPis 1 and 2, respectively.
Press button A on CyberPis 1 and 2. They start to connect to Wi-Fi.
After the LEDs on CyberPi are lit up in green, press button B on CyberPi 1. CyberPi 1 sends the user cloud message named message and the value 1.
After receiving the user cloud message, CyberPi 2 displays the value 1 on its screen.
81. [LOCATION] [WEATHER_TYPE]

Reports the specified weather condition of the specified district
How to use
Click to set the district and the weather condition you want to know about.
Example
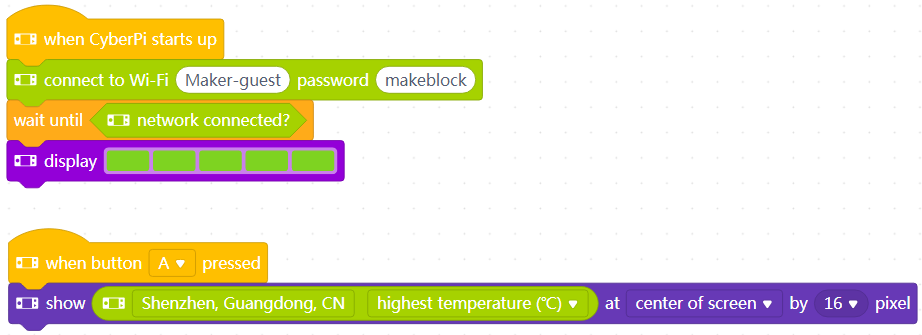
Note: Set the Wi-Fi account and password to those available.
Compile the program in Upload mode and upload it to CyberPi.
After the LEDs on CyberPi are lit up in green, press button A. CyberPi displays the highest temperature in Shenzhen on its screen.
82. air quality[METEOROLOGICAL] [aq_type]

Reports the specified weather quality condition of the specified district
How to use
Click to set the district and the weather quality condition you want to know about.

Example
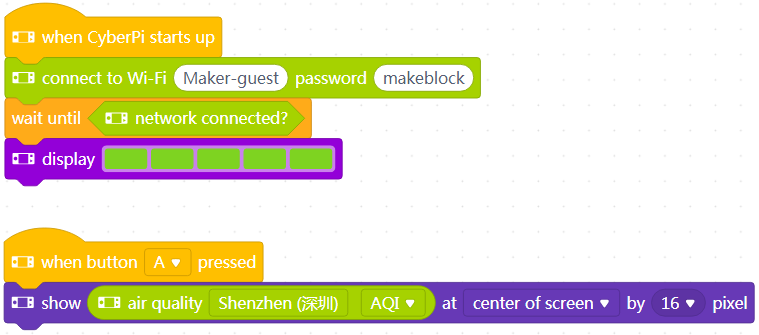
Note: Set the Wi-Fi account and password to those available.
Compile the program in Upload mode and upload it to CyberPi.
After the LEDs on CyberPi are lit up in green, press button A. CyberPi displays the air quality index (AQI) today in Shenzhen on its screen.
83. [LOCATION] [sun_move_type] [time_type]

Reports the sunrise or sunset time of the specified district
How to use
Click to set the district and the sunrise or sunset time you want to know about.
Example
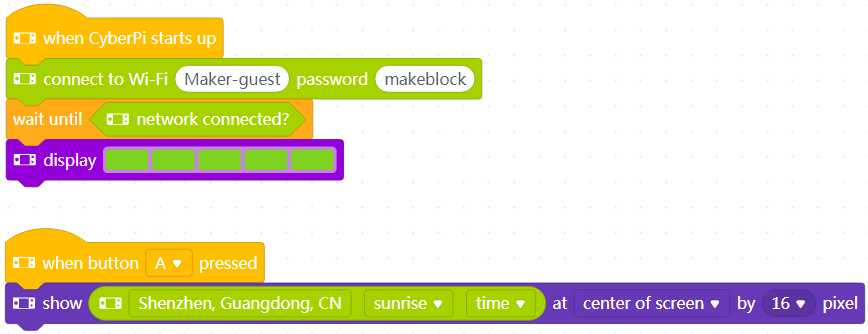
Note: Set the Wi-Fi account and password to those available.
Compile the program in Upload mode and upload it to CyberPi.
After the LEDs on CyberPi are lit up in green, press button A. CyberPi displays the sunrise time today in Shenzhen on its screen.
84. get [fieldMenu_1]’s [fieldMenu_2]

Reports the specified time information of the specified time zone (UTC)
How to use
Click to select a time zone and time item from the drop-down list boxes.
Example
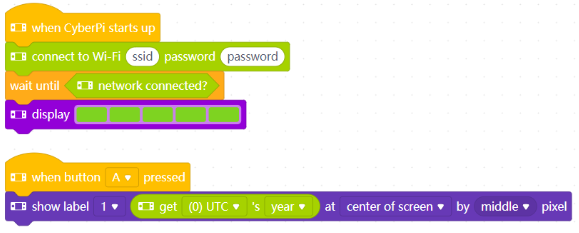
Note: Set the Wi-Fi account and password to those available.
Compile the program in Upload mode and upload it to CyberPi.
After the LEDs on CyberPi are lit up in green, press button A. CyberPi displays the year of the time zone UTC 0 on its screen.