How Can We Help?
[Halocode] Create an Extension for Halocode in Three Minutes
This page uses the WS2812 extension as an example to describe how to create an extension for Halocode in three minutes. It focuses on the key points and does not cover every detail. You can download the attached WS2812 extension to find more details.
Introduction to WS2812
Features
- The control circuit and RGB chip are integrated in a 5050 package component to form complete external control pixels.
- It is equipped with a built-in signal shaping circuit, shaping signals received by each pixel before outputting waveforms, and thus preventing line waveforms from distortion accumulation.
- It is equipped with built-in power-on and power-off reset circuits.
- The three primary colors of each pixel can achieve 256 levels of luminance, implementing full true color display of 16,777,216 colors with a scan frequency of no lower than 400Hz.
- The serial cascade interface enables the receiving and decoding of data through one signal line.
- Any two-point transmission within five meters does not require any additional circuit.
- At a refresh rate of 30 frames per second, the number of cascades in low-speed mode is no less than 512, and that in high-speed mode is no less than 1024.
- The maximum data transmission rate is 800 Kbps.
- It is cost-effective with highly consistent light color.
Application
It can be applied to LED full-color light strings, full-color LED modules, LED pixel screens, various electronic products, electronic equipment, and so on.
Preparation for Creating the WS2812 Extension
Goal: Create a Halocode extension that drives WS2812
Knowledge points:
- The hardware core of the Halocode is ESP32.
- The software core of the Halocode is MicroPython.
- WS2812 is an LED strip.
Keywords: MicroPython, NeoPixels, WS2812, mext
- MicroPython:
The “upload mode” of mBlock 5 is to convert the graphics blocks into Python statements and upload them to HaloCode for execution.
For more information about the syntax and ESP32, see the official MicroPython documentation Link: http://docs.micropython.org/en/latest/esp32/quickref.html.
- NeoPixels library: used to drive WS2812
https://github.com/micropython/micropython/blob/master/ports/esp32/modules/neopixel.py
- WS2812 driving example program:
http://docs.micropython.org/en/latest/esp8266/tutorial/neopixel.html?highlight=neopixel
- WS2812 manual:
https://wenku.baidu.com/view/b18fbd6bddccda38376bafbd.html
- mext
“mext” is the suffix of the extension file generated by the extension builder. The extension file demonstrated in this tutorial is attached at the end of this article.
To get started, drive WS2812 with Python code in mBlock 5. The Python code is provided at the end of this article.
Steps for Creating the WS2812 Extension
Step 1: Create a new extension (the first minute)
Choose My Plugin > My Extension, click Add extension, select Universal template in the dialog box that appears, and click OK.
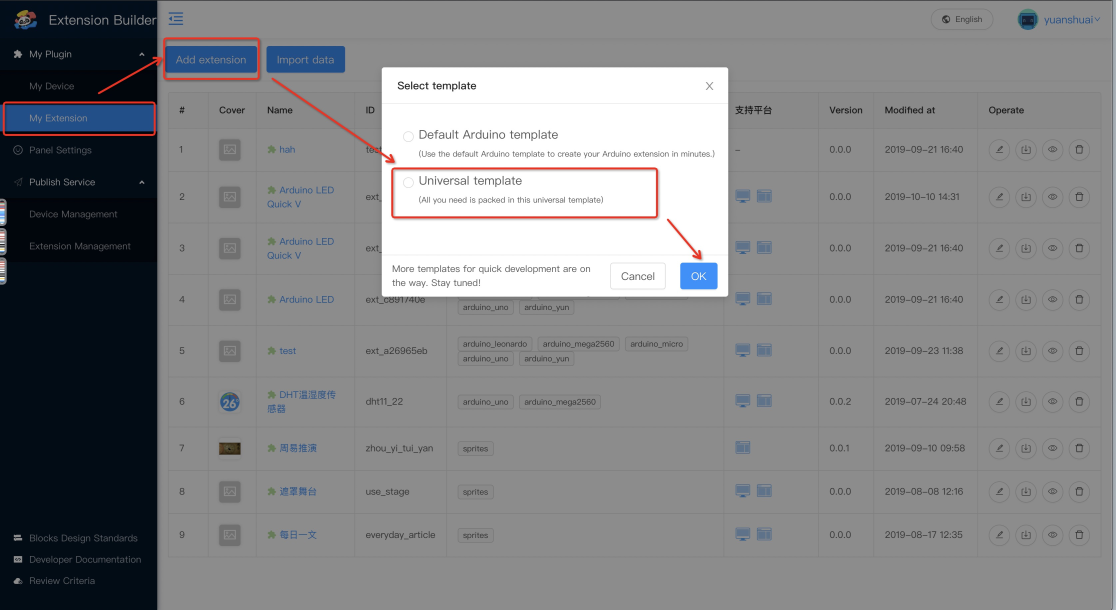
The basic information area is displayed.
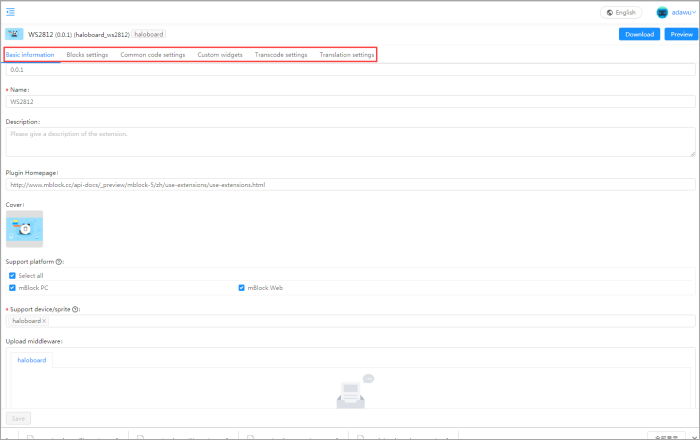
Step 2: Fill in the basic information

The information in the red rectangle boxes is mandatory.
Enter the basic information and click OK.
The homepage is displayed.
Step 3: Add categories and blocks
(1) Click the editing icon of the extension.

The editing page is displayed.
Six setting tabs are provided. For the WS2812 extension, you need to set the basic information (which is set in step 2), block settings, and transcode settings.
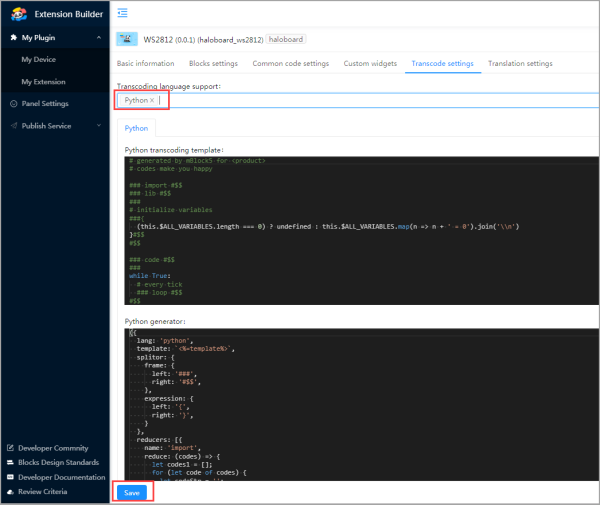
Let’s set the transcoding first.
(2) Set Transcoding language support to Python, and click Save.
(3) Click the Blocks settings tab and click Add category.
The Extension category area is displayed.
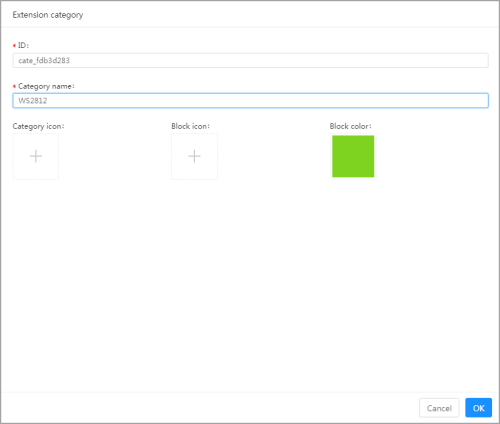
(4) Set the ID and category name, and click OK.
One minute is enough, isn’t it?
Let’s go to the next step.
Step 4: Design the Statement Block (second minute)
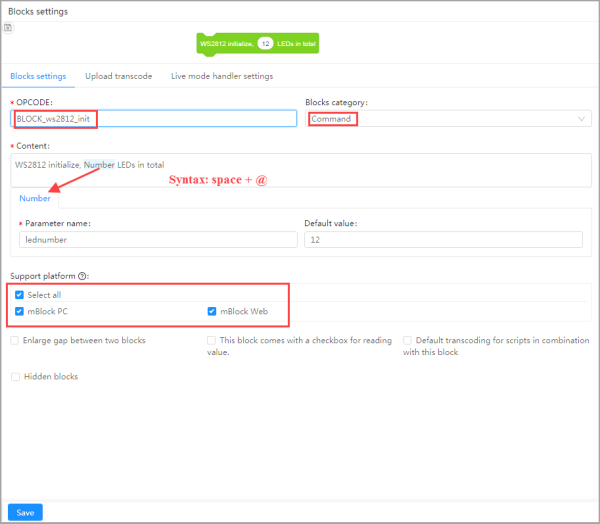
(1) Click the Blocks settings tab.
(2) Click +at the bottom of the Blocks list area to add a block, and set it in the Blocks settings area on the right.
Tips:
For details about block settings, see “Configure a block.”
For details about block category, see “Block Design Standards.”
Refer to the official blocks when designing blocks, so that other users can easily understand how to use the blocks.
You can add all the blocks you need, and then set the code for them.
This is the second minute.
Let’s go to the next step.
Step 5: Fill in transcode (third minute)
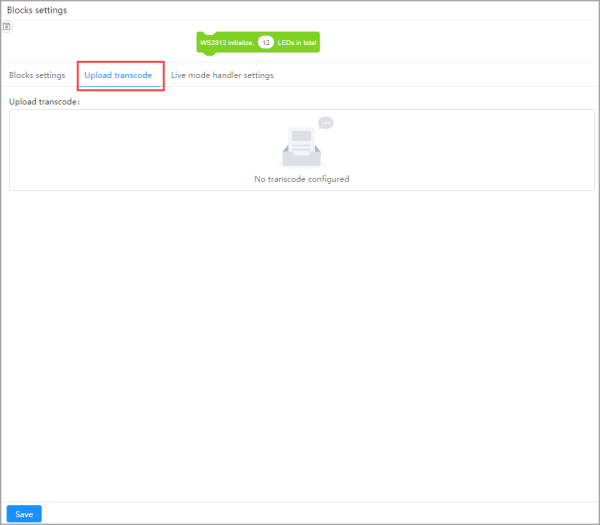
(1) Click the Upload transcode tab in the Blocks settings area.
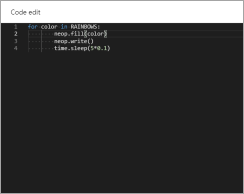
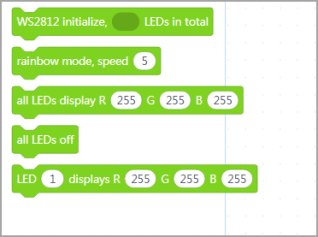
Let’s start with the following block.
![]()
(2) Click the Upload transcode tab.
You do not need to set the import, lib, and loop items.
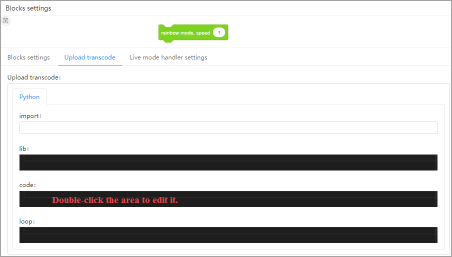
(3) Double-click the code area to edit it.
(4) Enter the following code and click OK.
Tips:
The following figure shows the mapping between Upload transcode and Python in mBlock 5. The reference variable syntax is {lednumber}.
The following figure shows the mapping between Upload transcode and Python statements on mBlock 5. The reference variable syntax is {lednumber}.
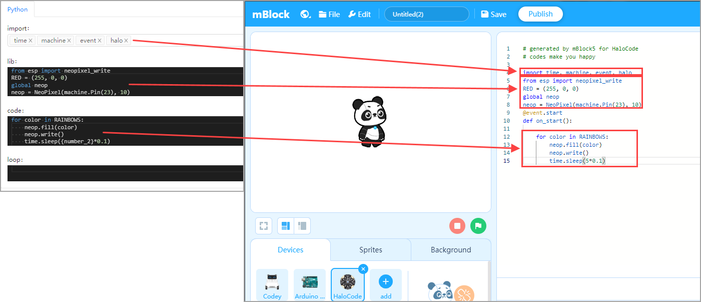
The loop item is not set in this example.
This is the third minute, and the extension has been created.
Now, let’s test the extension we have just created.
Test the WS2812 extension
Step 1: Download the extension and drag it to mBlock 5 on your PC.
- Click Download in the upper right corner.
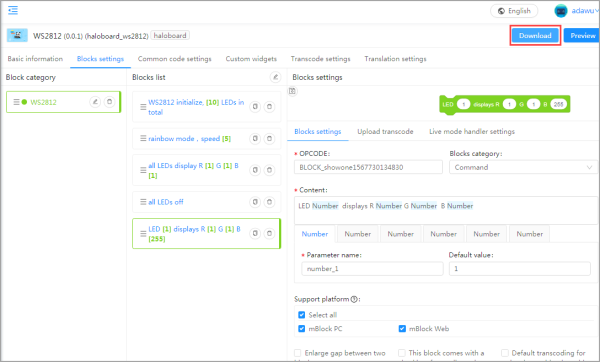
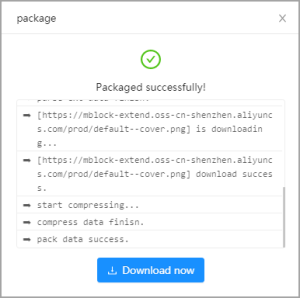
The package box is displayed.
2. Wait for the packaging to complete, and click Download now.
3. Open mBlock 5, find the halo_ws2812.mext file, and drag it to mBlock 5.
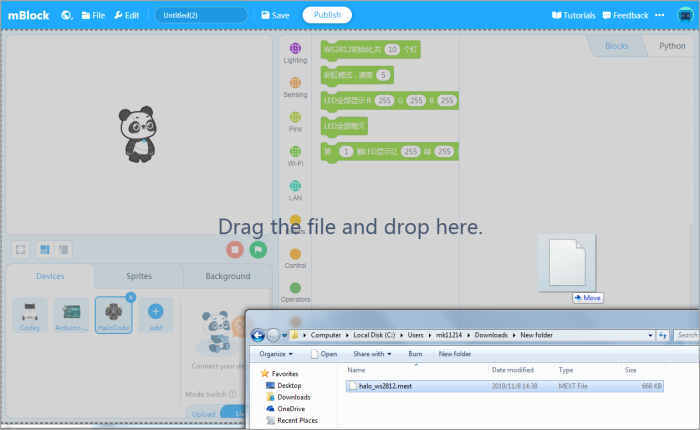
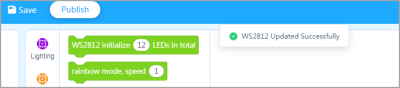
The installation is successful if the message indicating that WS2812 is successfully updated is displayed.
Tips:
If you have dragged the same extension to mBlock 5 multiple times, wait until the message indicating successful update is displayed and then close mBlock 5. Open mBlock 5 again to allow it to load the latest .mext file.
Step 2: Test the blocks
Drag and drop blocks to the Scripts area.
Before dragging the blocks, you need to:
(1) Set the mode to Upload, and drag an Events block to the Scripts area first.
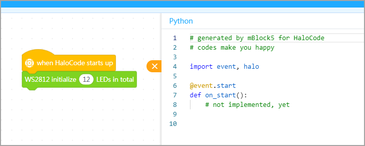
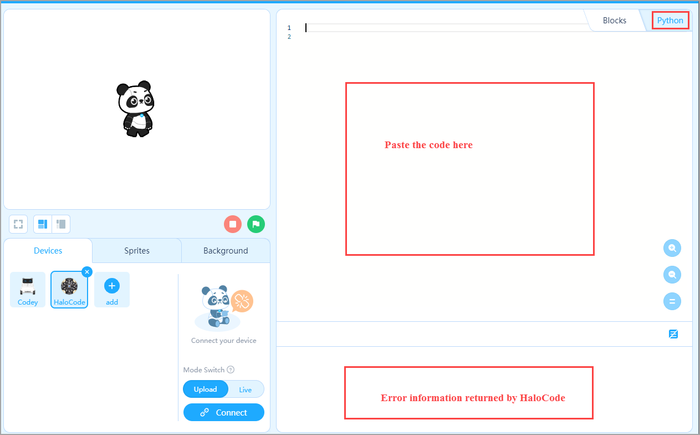
(2) Click the </> Button at the right sidebar to display the code interface.
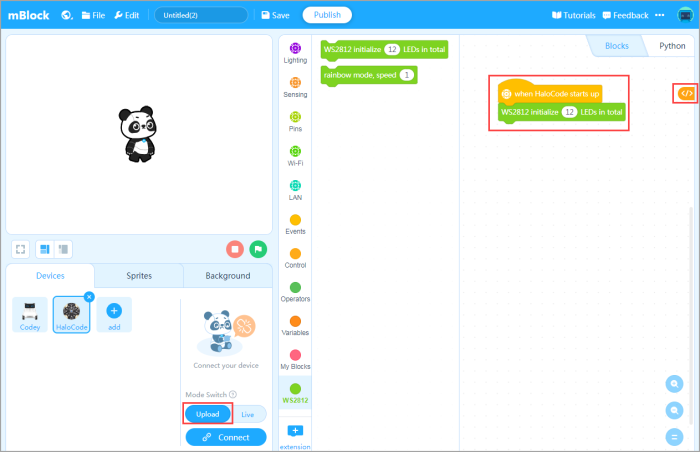
Check the code generated by the blocks carefully.
Tips:
You can copy the code and paste it to the Python editing interface. Upload the program to Halocode, and if there is any error, you can see the error information returned by Halocode.
Summary
Extension preview
Another way to learn extension block design
In addition to the step-by-step learning by following the tutorial, you can also find an extension, import it to the extension builder, and refer to it.
What you need is to import it to the extension builder.
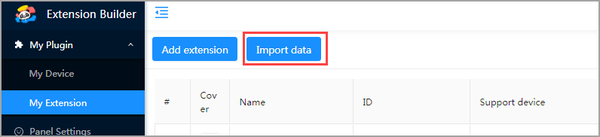
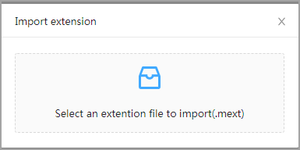
After importing an extension, you can see in detail how it is designed.
For details about how to import an extension, see “Importing an Extension into Extension Builder.”
Download the WS2812 extension package
Python code ready to use
Python:
1 #generated by mBlock5 for HaloCode
2 #codes make you happy
3 import time, machine, event, halo from esp import neopixel_write RED = (255, 0, 0) YELLOW = (255, 255, 0) GREEN = (0, 255, 0) AQUA = (0, 255, 255) BLUE = (0, 0, 255) PURPLE = (148, 0, 211) INDIGO = (75, 0, 130) ORANGE = (255, 127, 0) COLORS = (RED, YELLOW, GREEN, AQUA, BLUE, PURPLE) RAINBOWS = (PURPLE, INDIGO, BLUE, GREEN, YELLOW, ORANGE, RED) class NeoPixel: ORDER = (1, 0, 2, 3)
4
5 def __init__(self, pin, n, bpp=3, timing=1):
6 self.pin = pin
7 self.n = n
8 self.bpp = bpp
9 self.buf = bytearray(n * bpp)
10 self.pin.init(pin.OUT)
11 self.timing = timing
12 def __setitem__(self, index, val):
13 offset = index * self.bpp
14 for i in range(self.bpp):
15 self.buf[offset + self.ORDER[i]] = val[i]
16 def __getitem__(self, index):
17 offset = index * self.bpp
18 return tuple(self.buf[offset + self.ORDER[i]]
19 for i in range(self.bpp))
20 def fill(self, color):
21 for i in range(self.n):
22 self[i] = color
23 def fillone(self, ni, color):
24 self[ni] = color
25 def write(self):
26 neopixel_write(self.pin, self.buf, self.timing)
Python:
1 global neop neop = NeoPixel(machine.Pin(23), 10)
2 @event.start def on_start():
3 for color in RAINBOWS:
4 neop.fill(color)
5 neop.write()
6 time.sleep(5*0.1)