How Can We Help?
APIs for Neuron Extension Modules
dc_motor_driver – Dual DC Motor Driver
Function
dc_motor_driver.set_power(speed, ch = 0)
Set power for the motor driver in each channel, parameters:
- speed Refers to power value of the motor controlled, the parameter range is
-100 ~ 100. - ch Refers to channel number of the motor controlled, the parameter range is
0 ~ 2, and0: stands for both slots,1: for slot 1 channel,2: for slot 2 channel.
Sample Code:
import codey
import neurons
import event

@event.button_a_pressed
def on_button_a_pressed():
    print("button a event succeeded")
    neurons.dc_motor_driver.set_power(100, 1)

@event.button_b_pressed
def on_button_b_pressed():
    print("button b event succeeded")
    neurons.dc_motor_driver.set_power(100, 2)

@event.button_c_pressed
def on_button_c_pressed():
    print("button c event succeeded")
    neurons.dc_motor_driver.set_power(100, 0)
    neurons.dc_motor_driver.set_power(100, 1, 2)
servo_driver – Dual Servo Driver
Function
servo_driver.set_angle(position, ch = 0)
set power for the servo driver in each channel, parameters:
- position Refers to turning angle value of the servo controlled, the parameter range is
0 ~ 180. - ch Refers to channel number servo controlled, the parameter range is
0 ~ 2, and0: stands for both slots,1: for slot 1 channel,2: for slot 2 channel.
Sample Code:
import codey
import neurons
import event
import time

neurons.servo_driver.set_angle(0, 0)
time.sleep(1)

@event.button_a_pressed
def on_button_a_pressed():
    print("button a event succeeded")
    neurons.servo_driver.set_angle(100, 1)

@event.button_b_pressed
def on_button_b_pressed():
    print("button b event succeeded")
    neurons.servo_driver.set_angle(100, 2)

@event.button_c_pressed
def on_button_c_pressed():
    print("button c event succeeded")
    neurons.servo_driver.set_angle(100, 0)
led_strip – LED Strip Driver
Function
led_strip.set_single(index, red_value, green_value, blue_value)
Set color of each light on the LED Strip, parameters:
- index Set the light order No, the parameter range is
1 ~ the value of total lights on the LED Strip。 - red_value Set LED red value, the parameter range is
0 ~ 255, 0 means no red color, 255 means the brightest red color. - green_value Set LED green value, the parameter range is
0 ~ 255, 0 means no green color, 255 means the brightest green color. - blue_value Set LED blue value, the parameter range is
0 ~ 255, 0 means no blue color, 255 means the brightest blue color.
led_strip.set_all(red_value, green_value, blue_value)
Set color for all lights, parameters:
- red_value Set LED red value, the parameter range is
0 ~ 255, 0 means no red color, 255 means the brightest red color. - green_value Set LED green value, the parameter range is
0 ~ 255, 0 means no green color, 255 means the brightest green color. - blue_value Set LED blue value, the parameter range is
0 ~ 255, 0 means no blue color, 255 means the brightest blue color.
led_strip.set_effect(mode, speed, list)
Set effect of the LED Strip, parameters:
- mode effect mode, the parameter range is
0 ~ 5- 0: means static mode: lights status keep the last setting。
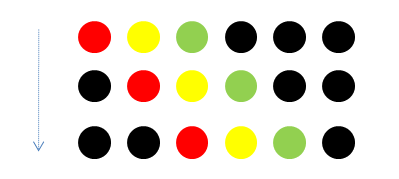
- 1: means rolling mode: the front N lights turn on firstly as the setting color, then the N lights move to 2~N+1 and the first one turns off, then 3~N+2 and first two lights turn off, just like below picture:
-
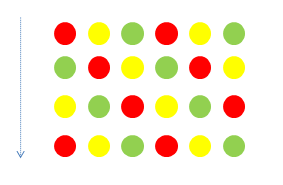
- 2: means repeat mode: the front N lights turn on firstly as the setting color, and rest lights will copy that status until the last light, just like below picture:
![]()
-
- 3: means marquee mode: N light turn on and then move repeatedly at a setting speed, as below picture:
-
- 4: means breathing mode: the lights change at the speed of human breath, that is they turn on/off each three seconds.
- 5: means gradient mode: all lights on the strip change their color gradually to the new setting color in a specific setting time.
- speed dynamic change speed, the parameter range is
0 ~ 8, 0 means the slowest speed and 8 is the fastest(It only works when there is dynamic change setting of lights status). - list changeable parameter list, the parameter range is
0 ~ 8,the first parameter means the first light color, the second parameter means the second light color, and so on; And color parameters are as below:black(0x00),red(0x01),orange(0x02),yellow(0x03),green(0x04),cray(0x05),blue(0x06),purple(0x07)andwhile(0x08).
Sample Code:
import codey
import neurons
import event
import time

neurons.led_strip.set_all(0, 0, 255)
time.sleep(1)

@event.button_a_pressed
def on_button_a_pressed():
    print("button a event successed")
    neurons.led_strip.set_all(0, 0, 0)
    neurons.led_strip.set_single(1, 255, 0, 0)
    time.sleep(1)
    neurons.led_strip.set_all(0, 0, 0)
    neurons.led_strip.set_single(2, 255, 0, 0)
    time.sleep(1)
    neurons.led_strip.set_all(0, 0, 0)
    neurons.led_strip.set_single(3, 255, 0, 0)
    time.sleep(1)

@event.button_b_pressed
def on_button_b_pressed():
    print("button b event successed")
    neurons.led_strip.set_effect(0, 8, (1,6,8,1,6,8,1,6,8))
    time.sleep(3)
    neurons.led_strip.set_effect(1, 8, (1,6,8,1,6,8,1,6,8))
    time.sleep(3)
    neurons.led_strip.set_effect(2, 8, (1,6,8,1,6,8,1,6,8))
    time.sleep(3)
    neurons.led_strip.set_effect(3, 8, (1,6,8,1,6,8,1,6,8))
    time.sleep(3)
    neurons.led_strip.set_effect(4, 8, (1,6,8,1,6,8,1,6,8))
    time.sleep(3)
    neurons.led_strip.set_effect(5, 8, (1,6,8,1,6,8,1,6,8))
    time.sleep(3)

@event.button_c_pressed
def on_button_c_pressed():
    print("button c event successed")
    neurons.led_strip.set_effect(0, 5, (1,1,1,1,1,1,1,1,1))
    time.sleep(3)
    neurons.led_strip.set_effect(1, 5, (1,1,1,1,1,1,1,1,1))
    time.sleep(3)
    neurons.led_strip.set_effect(2, 5, (1,1,1,1,1,1,1,1,1))
    time.sleep(3)
    neurons.led_strip.set_effect(3, 5, (1,1,1,1,1,1,1,1,1))
    time.sleep(3)
    neurons.led_strip.set_effect(4, 5, (1,1,1,1,1,1,1,1,1))
    time.sleep(3)
    neurons.led_strip.set_effect(5, 5, (1,1,1,1,1,1,1,1,1))
    time.sleep(3)
led_panel – RGB LED Panel
Function
led_panel.set_all(red_value, green_value, blue_value)
Set and display color of all lights on the panel, parameters:
- red_value Set LED red value, the parameter range is
0 ~ 255, 0 means no red color, 255 means the brightest red color. - green_value Set LED green value, the parameter range is
0 ~ 255, 0 means no green color, 255 means the brightest green color. - blue_value Set LED blue value, the parameter range is
0 ~ 255, 0 means no blue color, 255 means the brightest blue color.
led_panel.set_pixel(x, y, red_value, green_value, blue_value)
Set color for each pixel on the panel, parameters:
- x pixel’s X position on the panel, the parameter range is
0 ~ 7. - y pixel’s Y position on the panel, the parameter range is
0 ~ 7. - red_value Set LED red value, the parameter range is
0 ~ 255, 0 means no red color, 255 means the brightest red color. - green_value Set LED green value, the parameter range is
0 ~ 255, 0 means no green color, 255 means the brightest green color. - blue_value Set LED blue value, the parameter range is
0 ~ 255, 0 means no blue color, 255 means the brightest blue color.
led_panel.show_image(list, mode = 0)
Set the display content as image parameter mode, parameters:
- list changeable parameter list, the parameter range is
0 ~ 8,the first parameter means the first light color, the second parameter means the second light color, and so on; And color parameters are as below:black(0x00),red(0x01),orange(0x02),yellow(0x03),green(0x04),cray(0x05),blue(0x06),purple(0x07)andwhile(0x08). - mode contents displaying mode, the parameter range is
0 ~ 3- 0:means emerging mode, setting image will display directly.
- 1:means erase mode, original image disappear gradually and new setting image will display gradually and vertically.
- 2:means left moving mode, original image moves to the left and disappear gradually and new setting image will move to the left until display the whole image.
- 3:means right moving mode, original image moves to the right and disappear gradually and new setting image will move to the right until display the whole image.
led_panel.set_animation(frame_index, list)
Set the animation content on the panel, parameters:
- frame_index index of the animation frame, the parameter range is
0 ~ 3; 0 mean the first frame, 1 means the second, and so on. - list changeable parameter list, the parameter range is
0 ~ 8,the first parameter means the first light color, the second parameter means the second light color, and so on; And color parameters are as below:black(0x00),red(0x01),orange(0x02),yellow(0x03),green(0x04),cray(0x05),blue(0x06),purple(0x07)andwhile(0x08).
led_panel.show_animation(frame_speed, mode)
Show the animation frame setting by set_animation, parameters:
- frame_speed switch speed of the animation frame content, the parameter range is
0 ~ 2- 0:means slow speed that the animation frame rolls every one second
- 1:means normal speed that the animation frame rolls every half second
- 2:means fast speed that the animation frame rolls every 0.2 second.
- mode frame change mode, the parameter range is
0 ~ 3- 0:means emerging mode, setting image will display directly.
- 1:means erase mode, original image disappear gradually and new setting image will display gradually and vertically.
- 2:means left moving mode, original image moves to the left and disappear gradually and new setting image will move to the left until display the whole image.
- 3:means right moving mode, original image moves to the right and disappear gradually and new setting image will move to the right until display the whole image.
led_panel.show_string(red_value, green_value, blue_value, list)
Display the string as the setting color, parameters:
- red_value Set LED red value, the parameter range is
0 ~ 255, 0 means no red color, 255 means the brightest red color. - green_value Set LED green value, the parameter range is
0 ~ 255, 0 means no green color, 255 means the brightest green color. - blue_value Set LED blue value, the parameter range is
0 ~ 255, 0 means no blue color, 255 means the brightest blue color. - list changeable parameter list, the first character, the second character, the third character…
led_panel.clear()
Clear the display of the panel.
Sample Code:
import codey
import neurons
import event
import time

neurons.led_panel.clear()
neurons.led_panel.set_all(0, 0, 255)
time.sleep(1)
neurons.led_panel.clear()

@event.button_a_pressed
def on_button_a_pressed():
    print("button a event successed")
    neurons.led_panel.set_pixel(0, 0, 255, 0, 0)
    time.sleep(1)
    neurons.led_panel.set_pixel(4, 4, 255, 0, 0)
    time.sleep(1)
    neurons.led_panel.set_pixel(7, 7, 255, 0, 0)
    time.sleep(1)
    neurons.led_panel.set_pixel(0, 6, 255, 0, 0)
    time.sleep(1)

@event.button_b_pressed
def on_button_b_pressed():
    print("button b event successed")
    neurons.led_panel.show_image([1,6,8,0,0,0,1,6,8],0)
    time.sleep(1)
    neurons.led_panel.show_image([1,1,1,1,1,1,1,1,1],1)
    time.sleep(1)
    neurons.led_panel.show_image([6,6,6,6,6,6,6,6,6],2)
    time.sleep(1)
    neurons.led_panel.show_image([8,8,8,8,8,8,8,8,8],3)
    time.sleep(1)

@event.button_c_pressed
def on_button_c_pressed():
    print("button c event successed")
    neurons.led_panel.set_animation(0, (1,6,8,1,6,8,0,0,0))
    neurons.led_panel.set_animation(1, (6,6,6,6,6,6,6,6,6))
    neurons.led_panel.set_animation(2, [6,6,6,6,6,6,6,6,6])
    neurons.led_panel.set_animation(3, (8,8,8,8,8,8,8,8,8))
    neurons.led_panel.show_animation(1, 2)
    time.sleep(6)
    neurons.led_panel.show_string(255, 0, 0, "hello")
    time.sleep(4)
    neurons.led_panel.show_string(255, 0, 0, (100))
    time.sleep(4)
    neurons.led_panel.show_string(255, 0, 0, (1,2,3))
buzzer – Buzzer
Function
buzzer.play_note(note_num, beat = None)
Play note, digital note definitions please refer to: scratch digital note description, prameters:
- note_num numeric value, range of values
48 - 72, or string type, such asC4. - beat value data, indicates the number of beats, the default value is always playing.
notes and frequency is as follows:['C2','65'], ['D2','73'], ['E2','82'], ['F2','87'], ['G2','98'], ['A2','110'], ['B2','123'], ['C3','131'], ['D3','147'], ['E3','165'], ['F3','175'], ['G3','196'], ['A3','220'], ['B3','247'], ['C4','262'], ['D4','294'], ['E4','330'], ['F4','349'], ['G4','392'], ['A4','440'], ['B4','494'], ['C5','523'], ['D5','587'], ['E5','659'], ['F5','698'], ['G5','784'], ['A5','880'], ['B5','988'], ['C6','1047'], ['D6','1175'], ['E6','1319'], ['F6','1397'], ['G6','1568'], ['A6','1760'], ['B6','1976'], ['C7','2093'], ['D7','2349'], ['E7','2637'], ['F7','2794'], ['G7','3136'], ['A7','3520'], ['B7','3951'], ['C8','4186'], ['D8','4699'],
buzzer.play_tone(frequency, time = None)
Play the tone of setting frequency, prameters:
- frequency Numerical data, the frequency of sound which is played, and its value range is
0 ~ 5000. - time Numerical data, indicating the playback time (in
milliseconds - ms) and its value range is0 ~ the value range limit.
buzzer.rest(number)
Stop the beat, parameters:
- number Numerical data, the number of paused beats, its value range is
0 ~ the value range limit.
Constant
buzzer.tempo
Numerical data, indicating the nature of the playback speed, in bmp (beat per minute), which is the length of each beat.Its value range is 6 ~ 600. The default value is 60, which means that the duration of one beat is 1 second. The beats of the rest and play_note functions are affected by this constant.
Sample Code:
import codey
import time
import neurons

codey.display.show("hello")

neurons.buzzer.play_note(48, 1)
neurons.buzzer.rest(1)
codey.display.show("note")
codey.display.clear()
neurons.buzzer.play_note("C4", 1)
neurons.buzzer.rest(1)
codey.display.show("C4")
codey.display.clear()
neurons.buzzer.play_tone(1000, 2)
neurons.buzzer.rest(1)
codey.display.show("tone")
codey.display.clear()

while True:
    neurons.buzzer.tempo = 60
    print("tempo:", end = "")
    print(neurons.buzzer.tempo)
    neurons.buzzer.play_note("C4", 1)
    neurons.buzzer.rest(2)
    neurons.buzzer.tempo = 240
    neurons.buzzer.play_note("C4", 1)
    neurons.buzzer.rest(2)
button – Button
Function
button.is_pressed()
Get current status of button; the result will be True: button pressed or False: button is not pressed.
Sample Code:
import neurons

while True:
    if neurons.button.is_pressed():
        print("pressed!")
funny_touch – Funny Touch
Funny Touch User Guide
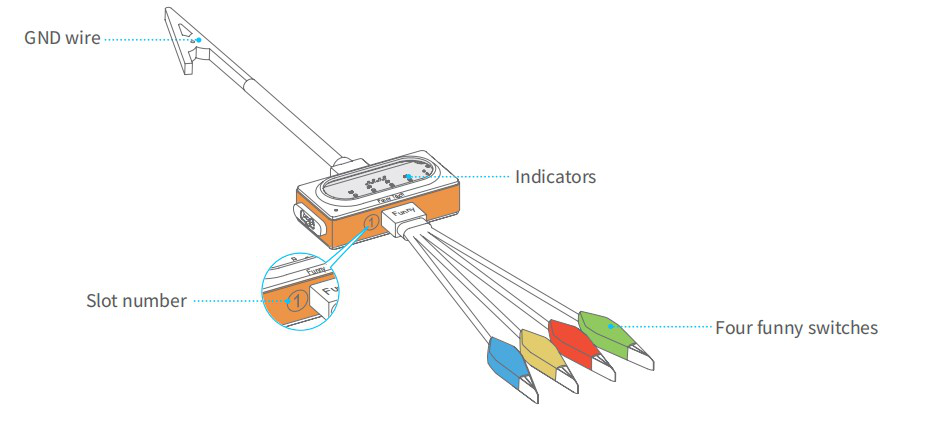
Funny touch can be connected to any conductive object (such as bananas and water) and turn it into a touch switch. A simple and interesting interactive effect can be achieved by detecting the conducting state between funny switches and GND wire.
How to use?
- Plug the funny switch to slot 1 and the GND wire to slot 2.
- Clip a funny switch to a conductive object.
- Hold the metal clip of the GND wire and touch the conductive object with the other hand, the relevant indicator will light up and the block will send out an on signal.
Note: Alligator clip is sharp, please do not clip yourself with the funny switch or the clip of GND wire, it may hurt you.
Function
funny_touch.is_red_touched()
Whether the red clip is touched or not, result will be True: yes, it is touched, or False: no, it isn’t touched.
funny_touch.is_green_touched()
Whether the green clip is touched or not, result will be True: yes, it is touched, or False: no, it isn’t touched.
funny_touch.is_yellow_touched()
Whether the yellow clip is touched or not, result will be True: yes, it is touched, or False: no, it isn’t touched.
funny_touch.is_blue_touched()
Whether the blue clip is touched or not, result will be True: yes, it is touched, or False: no, it isn’t touched.
Sample Code:
import codey
import time
import event
import neurons

@event.start
def start_cb():
    while True:
        if neurons.funny_touch.is_blue_touched():
            print("blue touched")
        if neurons.funny_touch.is_red_touched():
            print("red touched")
        if neurons.funny_touch.is_green_touched():
            print("green touched")
        if neurons.funny_touch.is_yellow_touched():
            print("yellow touched")

        time.sleep(0.1)
ultrasonic_sensor – Ultrasonic Sensor
Function
ultrasonic_sensor.get_distance()
Get the distance (cm) between the obstacle ahead and ultrasonic sensor; the result is floating point, ranging 0 ~ 300 cm; but measure distance ranges 3 ~ 300 cm as detection is not exact enough within 3 cm.
Sample Code:
import codey
import time
import event
import neurons

@event.start
def start_cb():
    while True:
        print(neurons.ultrasonic_sensor.get_distance())
        time.sleep(0.2)
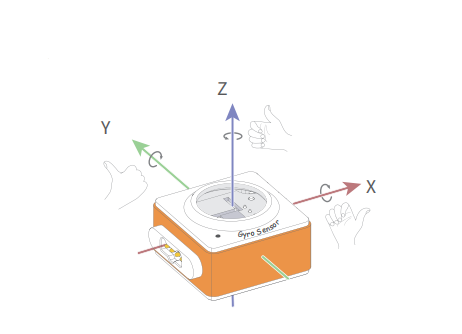
gyro_sensor – Gyro Sensor User Guide
Refer to the picture below for Gyro module coordinate system:
Function
gyro_sensor.get_roll()
Get the roll of the Euler angle, the returned data range is -90 ~ 90.
gyro_sensor.get_pitch()
Get the pitch of the Euler angle, the returned data range is -180 ~ 180.
gyro_sensor.get_yaw()
Get the yaw of the Euler angle, The returned data range is -32768 ~ 32767,Since the gyro sensor is a six-axis sensor, there is no electronic compass. So in fact the yaw angle is just the integral of the Z-axis angular velocity. It has accumulated errors. If you want to get a true yaw angle, this API is not suitable for use.
gyro_sensor.is_shaked()
Check if the gyro sensor is shaken, the return value is a Boolean value, where True means that gyro sensor is shaken, and False means that gyro sensor is not shaken.
gyro_sensor.get_acceleration(axis)
Get the acceleration values of the three axes in g, Parameters:
- axis String type, with
x,y,zrepresenting the axis defined by gyro sensor.
gyro_sensor.get_gyroscope(axis)
Get the angular velocity values of the three axes in °/sec, Parameters:
- axis String type, with
x,y,zrepresenting the axis defined by gyro sensor.
Sample Code 1:
import rocky
import event
import neurons

@event.button_a_pressed
def on_button_a_callback():
    codey.stop_other_scripts()
    codey.display.show("pit")
    while True:
        print(neurons.gyro_sensor.get_pitch())
        time.sleep(0.05)

@event.button_b_pressed
def on_button_b_callback():
    codey.stop_other_scripts()
    codey.display.show("rol")
    while True:
        print(neurons.gyro_sensor.get_roll())
        time.sleep(0.05)

@event.button_c_pressed
def on_button_c_callback():
    codey.stop_other_scripts()
    codey.display.show("yaw")
    while True:
        print(neurons.gyro_sensor.get_yaw())
        time.sleep(0.05)
Sample Code 2:
import rocky
import event
import neurons

@event.start
def start_cb():
    codey.display.show("sha")
    while True:
        print(neurons.gyro_sensor.is_shaked())
        time.sleep(0.2)
Sample Code 3:
import rocky
import event
import neurons

@event.start
def start_cb():
    while True:
        print("gyro z:", end = "")
        print(neurons.gyro_sensor.get_gyroscope("z"))
        print("accel z:", end = "")
        print(neurons.gyro_sensor.get_acceleration("z"))
        time.sleep(0.2)
pir_sensor – PIR Sensor
Function
pir_sensor.is_activated()
Get the detecting result from the sensor. Result will be True: it detects human nearby or False: it doesn’t detect human nearby.
Sample Code:
import codey
import time
import event
import neurons

@event.start
def start_cb():
    while True:
        print(neurons.pir_sensor.is_activated())
        time.sleep(0.2)
soil_moisture – Soil Moisture
Function
soil_moisture.get_value()
Get humidity of soil detected, ranging 0 ~ 100; the higher value is, the higher humidity is.
Sample Code:
import codey
import time
import event
import neurons

@event.start
def start_cb():
    while True:
        print(neurons.soil_moisture.get_value())
        time.sleep(0.2)