How Can We Help?
APIs for mBuild Modules
The more than 30 mBuild modules and supporting parts can meet your needs for electronic modules in various scenarios, including making your creative ideas come to life, comprehensive practice, project-based eduction, porgramming popularization, AI popularization, and robotics competitions.
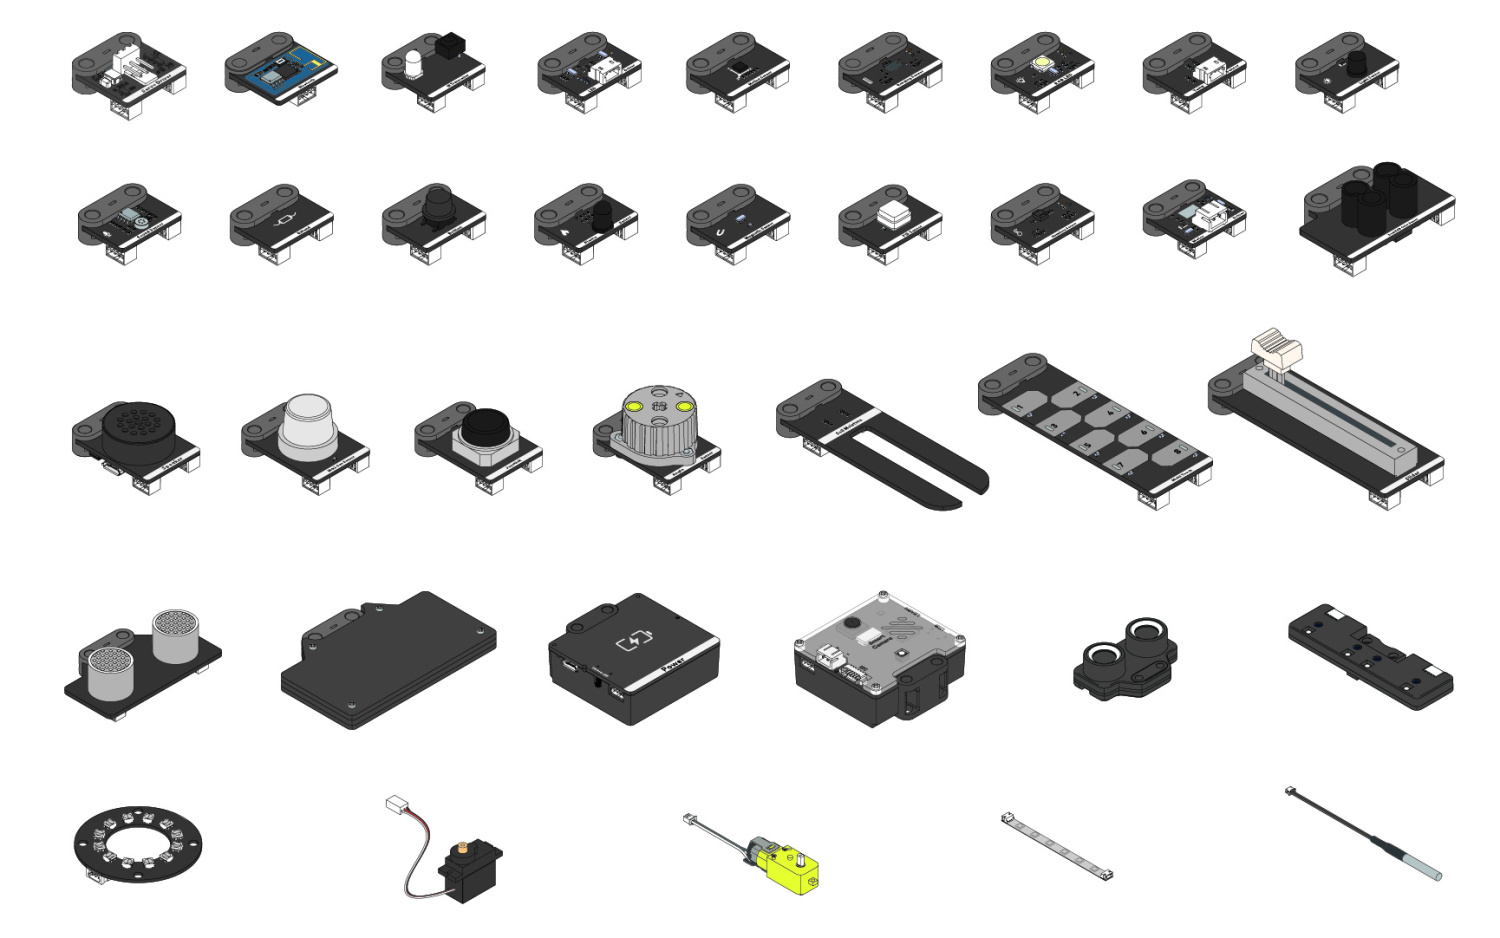
Note: To use the functions of mBuild modules, you need to purchase the corresponding mBuild add-on kits or packs.
mBuild modules support multiple main control boards and can work with them through different Python API libraries, with the same functions.
Import the corresponding API library when using mBuild modules with a main control board. In addition, mBuild modules can also be used as a standalone device.
For example, to use mBuild modules through CyberPi, import the cyberpi library.
from cyberpi import *
To help you use the APIs more efficiently, the application scenarios of the APIs are labelled as follows:
![]() : indicates that an API supports Python 3 programming and can be used in Live mode on the mBlock Python editor.
: indicates that an API supports Python 3 programming and can be used in Live mode on the mBlock Python editor.
![]() : indicates that an API supports MicroPython programming and can be used in Upload mode on the mBlock Python editor.
: indicates that an API supports MicroPython programming and can be used in Upload mode on the mBlock Python editor.
![]()
![]() : indicates that an API supports both Python 3 and MicroPython programming and can be used in both Live and Upload modes on the mBlock Python editor.
: indicates that an API supports both Python 3 and MicroPython programming and can be used in both Live and Upload modes on the mBlock Python editor.
To use mBuild modules through Halocode, import the halocode library.
from halocode import *
To use mBuild modules as a standalone device, import the mbuild library.
from mbuild import *
Common parameter index
All APIs for mBuild modules include the parameter index, which indicates the place of a module among the ones connected to the main control board. Generally, the default value is 1. Therefore, if only one module of each type is used, you don’t need to set this parameter. When two or more modules of the same type are used, you need to set index to 2, 3, 4, or another number to specify the second, third, forth, or another module. For example, motor_driver.set(100, index = 2) indicates that the output power of the second motor driver is set to 100.
Input modules
Interaction Modules
Button


button.is_press(index = 1)
Detects whether the button is pressed.
Returns a boolean value:
True: button pressed
False: button not pressed
button.get_count(index = 1)
Obtains the number of times the button is pressed after it is powered on.
Returns a numeric value.
button.reset_count(index = 1)
Resets the number of times the button is pressed to zero.
Angle Sensor
angle_sensor.get(index = 1)
Obtains the angle the angle sensor rotates (relative to the position it is located when being powered).
Returns a numeric value in degrees (°). The value is increased when the angle sensor rotates clockwise and is reduced when it rotates counterclockwise.
angle_sensor.reset(index = 1)
Resets the angle the angle sensor rotates.
angle_sensor.get_speed(index = 1)
Obtains the speed at which the angle sensor rotates.
Returns a numeric value in degrees per second (°/s). The value is positive when the angle sensor rotates clockwise and is negative when it rotates counterclockwise.
angle_sensor.is_clockwise(index = 1).
Detects whether the angle sensor is rotating clockwise.
Returns a boolean value:
True: rotating clockwise
False: not rotating clockwise
angle_sensor.is_anticlockwise(index = 1)
Detects whether the angle sensor is rotating counterclockwise.
Returns a boolean value:
True: rotating counterclockwise
False: not rotating counterclockwise
Slider
slider.get(index = 1)
Obtains the position of the slider.
Returns a numeric value ranging from 0 to 100, in percentage (%).
It indicates the position of the slider.
Joystick
joystick.get_x(index = 1)
Obtains the output value of the joystick at the x axis.
Returns a numeric value ranging from –100 to +100.
joystick.get_y(index = 1)
Obtains the output value of the joystick at the y axis.
Returns a numeric value ranging from –100 to +100.
joystick.is_up(index = 1)
Determines whether the joystick pivots upwards.
Returns a boolean value:
True: pivoting upward
False: not pivoting upward
joystick.is_down(index = 1)
Determines whether the joystick pivots downward.
Returns a boolean value:
True: pivoting downward
False: not pivoting downward
joystick.is_left(index = 1)
Determines whether the joystick pivots towards the left.
Returns a boolean value:
True: pivoting towards the left
False: not pivoting towards the left
joystick.is_right(index = 1)
Determines whether the joystick pivots towards the right.
Returns a boolean value:
True: pivoting towards the right
False: not pivoting towards the right
Multi Touch
multi_touch.is_touch(ch = "any", index = 1)
Detects whether the specified touch sensor of Multi Touch is touched. The Multi touch module detects objects through the capacitance change of touch sensors. Therefore, with proper threshold settings, it can detect the touching through paper, wooden boards, plastics, or other insulators. The approaching of a conductor, after all, changes the capacitance of a touch sensor.
Parameters:
- ch: character string or numeric value. The default value is any. To set ch to a character string, it must be set to any, which indicates that the touching of any touch sensor can be detected.
To set ch to a numeric value, it can be set to a number ranging from 1 to 8, which indicates the serial number of the corresponding touch sensor.
Returns a boolean value:
True: touched
False: not touched
multi_touch.reset(level = "middle", index = 1)
Sets the threshold for Multi Touch.
Parameters:
- level: character string. The values are described as follows:
low: low sensitivity
middle: moderate sensitivity
high: high sensitivity
Sensors
Science sensor
The science sensor is a multi-in-one sensor developed independently by Makeblock. Integrating the gas, heart rate, magnetic field, flame, air pressure, temperature & humidity, PIR, touch, and soil moisture sensing components, the science sensor can be used in various data collecting, science exploring, and Internet of Things (IoT) projects.
For more information about the science sensor, see Science Sensor.
The following describes the APIs provided for the science sensor. Like the other mBuild modules, each API for the science sensor includes the parameter index, which is a common parameter. For the definition and function of this parameter, see “Common parameter index.”
PIR sensor
![]()
![]()
science.pir_is_active(index=1)
Determines whether the PIR sensor on the science sensor detects the motion of a human being or animal.
A boolean value is returned.
Fire sensor
![]()
![]()
science.flame_is_active(index=1)
Determines whether the fire sensor on the science sensor detects a flame.
A boolean value is returned.
![]()
![]()
cyberpi.science.flame_get(index=1)
Obtains the output value of the fire sensor.
An integer is returned.
Soil moisture sensor
![]()
![]()
science.soil_get(index=1)
Obtains the output value of the soil moisture sensor, that is, the soil moisture value.
An integer is returned.
![]()
![]()
science.soil_get_resistance(index=1)
Obtains the resistance (kΩ) between the two probes of the soil moisture sensor.
An integer is returned.
![]()
![]()
science.soil_get_adc_value(index=1)
Determines whether electricity is conducted between the two probes of the soil moisture sensor.
A boolean value is returned.
MQ2 gas sensor
![]()
![]()
science.mq2_is_active(index=1)
Determines whether the MQ2 gas sensor on the science sensor detects a flammable gas.
A boolean value is returned.
![]()
![]()
science.mq2_get(index=1)
Obtains the output value of the MQ2 gas sensor, that is, the concentration of the flammable gas.
An integer is returned.
![]()
![]()
science.mq2_on(threshold, index=1)
Turns the MQ2 gas sensor on and sets its sensitivity.
- threshold:
float, sensitivity of the sensor, ranging from 0.1 to 1.0, where a greater value indicates a higher sensitivity
![]()
![]()
science.mq2_off(index=1)
Turns the MQ2 gas sensor off.
Touch sensor
![]()
![]()
science.touch_get_resistance(index=1)
Obtains the resistance (kΩ) detected at the touch point of the touch sensor on the science sensor.
An integer is returned.
![]()
![]()
science.touch_get_adc_value(index=1)
Determines whether the touch point of the touch sensor is touched.
A boolean value is returned.
Humiture sensor
![]()
![]()
science.humiture_get_temp(index=1)
Obtains the temperature (in degrees centigrade) detected by the humiture sensor.
A float value is returned.
![]()
![]()
science.humiture_get_humidity(index=1)
Obtains the humidity (in percentage) detected by the humiture sensor.
An integer is returned.
Magnetic field sensor
![]()
![]()
science.compass_get(axis,index = 1)
Obtains the amount (Φ/G) of the magnetic flux detected at the specified axis (x, y, or z).
The axes of the science sensor are defined as follows:

- axis:
str, axis at which the magnetic flux is to be detected
setting range: x, y, z
An integer is returned.
![]()
![]()
science.compass_get_angle(index = 1)
Obtains the the compass direction (angle) detected by the magnetic field sensor.
An integer is returned.
![]()
![]()
science.compass_reset(switch,index = 1)
Enables or disables the function for calibrating the magnetic field sensor.
- switch:
int, setting range: 0 and 1, where 0 indicates disabling and 1 indicates enabling
![]()
![]()
science.compass_is_active(index = 1)
Determines whether the magnetic field sensor detects a magnet.
A boolean value is returned.
Air pressure sensor
![]()
![]()
science.atmos_get(index=1)
Obtains the air pressure detected by the air pressure sensor.
An integer is returned.
![]()
![]()
science.atmos_get_altitude(index = 1)
Obtains the altitude estimated by the air pressure sensor.
An integer is returned.
Quad RGB Sensor
quad_rgb_sensor.get_line_sta(index = 1)
Obtains the state of the background.
Returns an integer ranging from 0 to 15, corresponding to the binary numbers 0000 to 1111, where 1 indicates that the background color (light color by default) is detected and 0 indicates that the line (dark color by default) is detected.
The following table describes the possible returned values and the corresponding line states.
|
Returned value |
Binary number |
Line state detected (Dark line on a light background) |
|
0 |
0000 |
|
|
1 |
0001 |
|
|
2 |
0010 |
|
|
3 |
0011 |
|
|
4 |
0100 |
|
|
5 |
0101 |
|
|
6 |
0110 |
|
|
7 |
0111 |
|
|
8 |
1000 |
|
|
9 |
1001 |
|
|
10 |
1010 |
|
|
11 |
1011 |
|
|
12 |
1100 |
|
|
13 |
1101 |
|
|
14 |
1110 |
|
|
15 |
1111 |
|


quad_rgb_sensor.get_offset_track(index = 1)
Obtains how much Quad RGB Sensor deviates from the line to be followed.
Returns an integer ranging from –100 to +100. The deviation of –100 indicates that Quad RGB Sensor is on the left of the line to be followed.
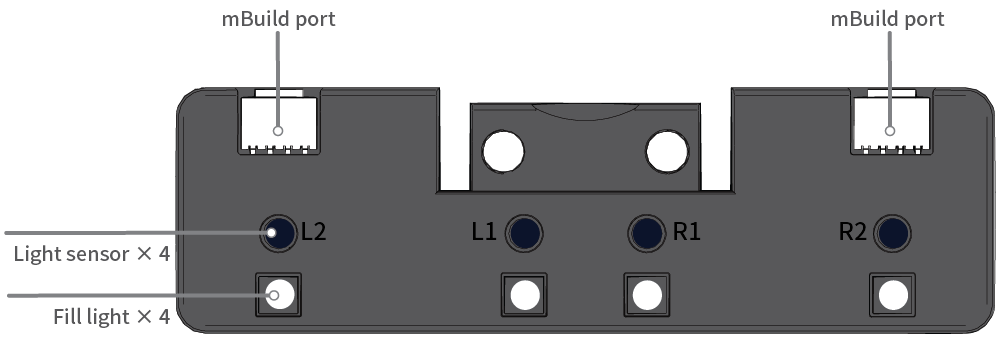
quad_rgb_sensor.is_line(ch, index = 1)
Determines whether a line is detected by the specified sensor.
Parameter:
- ch:
intorstr, indicates the specified sensor.
Value range: “any”/”L2″/”L1″/”R1″/”R2″/”l2″/”l1″/”r1″/”r2″/4/3/2/1
Returns a boolean value:
True: detected
False: not detected
quad_rgb_sensor.is_background(ch, index = 1)
Determines whether a background is detected by the specified sensor.
Parameter:
- ch:
intorstr, indicates the specified sensor.
Value range: “any”/”L2″/”L1″/”R1″/”R2″/”l2″/”l1″/”r1″/”r2″/4/3/2/1
Returns a boolean value:
True: detected
False: not detected
quad_rgb_sensor.is_color(color = "white", ch, index = 1)
Determines whether the specified sensor detects the specified color.
Parameters:
- color: string, indicates the specified color. The following describes the colors and their abbreviations:
red r

yellow y

green g

cyan c

blue b

purple p

white w

black k
- ch:
intorstr, indicates the specified sensor.
Value range: “any”/”L2″/”L1″/”R1″/”R2″/”l2″/”l1″/”r1″/”r2″/4/3/2/1
Returns a boolean value:
True: detected
False: not detected
quad_rgb_sensor.get_red(ch, index = 1)
Obtains the R value of the color detected by the sensor
Parameter:
- ch:
intorstr, indicates the specified sensor.
Value range: “L2″/”L1″/”R1″/”R2″/”l2″/”l1″/”r1″/”r2″/4/3/2/1
Returns a value ranging from 0 to 255.
quad_rgb_sensor.get_green(ch, index = 1)
Obtains the G value of the color detected by the sensor
Parameter:
- ch:
intorstr, indicates the specified sensor.
Value range: “L2″/”L1″/”R1″/”R2″/”l2″/”l1″/”r1″/”r2″/4/3/2/1
Returns a value ranging from 0 to 255.
quad_rgb_sensor.get_blue(ch, index = 1)
Obtains the B value of the color detected by the sensor.
Parameter:
- ch:
intorstr, indicates the specified sensor.
Value range: “L2″/”L1″/”R1″/”R2″/”l2″/”l1″/”r1″/”r2″/4/3/2/1
Returns a value that ranging from 0 to 255.
quad_rgb_sensor.get_gray(ch, index = 1)
Obtains the gray scale detected by the specified sensor.
The value of the gray scale is the difference between the ambient light intensity with the fill light turned on and that without the fill light, directly indicating how well the object reflects light.
Parameter:
- ch:
intorstr, indicates the specified sensor.
Value range: “L2″/”L1″/”R1″/”R2″/”l2″/”l1″/”r1″/”r2″/4/3/2/1
Returns a value ranging from 0 to 100.
quad_rgb_sensor.get_color(ch, index = 1)
Obtains the hex value of the color detected by the specified sensor.
Parameter:
- ch:
intorstr, indicates the specified sensor.
Value range: “L2″/”L1″/”R1″/”R2″/”l2″/”l1″/”r1″/”r2″/4/3/2/1
Returns a hex value ranging from 0x000000 to 0xffffff.
quad_rgb_sensor.get_color_sta(ch, index = 1)
Obtains the name (character string) of the color detected by the specified sensor.
Parameter:
- ch:
intorstr, indicates the specified sensor.
Value range: “L2″/”L1″/”R1″/”R2″/”l2″/”l1″/”r1″/”r2″/4/3/2/1
Returns a character string that may be:
"red"
"yellow"
"green"
"cyan"
"blue"
"purple"
"white"
"black"
quad_rgb_sensor.get_light(ch, index = 1)
Obtains the ambient light intensity detected by the specified sensor.
The light emitted by the fill lights is part of the ambient light. If necessary, you can turn off all the fill lights before using this API.
Parameter:
- ch:
intorstr, indicates the specified sensor.
Value range: “L2″/”L1″/”R1″/”R2″/”l2″/”l1″/”r1″/”r2″/4/3/2/1
Returns a value ranging from 0 to 100.
quad_rgb_sensor.set_led(color = "white", index = 1)
Sets the color of all fill lights.
Parameter:
- color: string or hex, indicates the color of the fill lights.
To set it to a string, enter the full name or abbreviation of a color; the following describes colors and their abbreviations:
red r

yellow y

green g

cyan c

blue b

purple p

white w

black k
To set it to a hex value, enter the hex value of the color.
quad_rgb_sensor.off_led(index = 1)
Turns off the fill lights.
Note that when the API for detecting colors is executed, the quad RGB sensor automatically sets the fill lights to the color it requires.
Ultrasonic Sensor 2
ultrasonic2.get(index = 1)
Obtains the distance between an obstacle and the ultrasonic sensor 2.
Returns a value ranging from 3 to 300, in centimeters, with an error of ±5%.
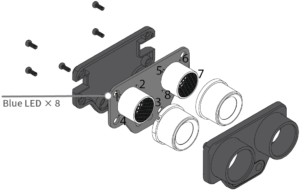
ultrasonic2.led_show(bri, index =1)
Sets the brightness of all the LEDs.
Parameter:
- bri: int_list
This parameter must be set in the format of [bri1,bri2,bri3,bir4,bri5,bri6,bri7,bri8], where x indicates the number of an LED.
The following figure shows the LEDs and their numbers.
ultrasonic2.set_bri(led_bri, id, index =1)
Sets the brightness of the specified LED.
Parameters:
- led_bri float: brightness of the specified LED, ranging from 0 to 100
- id: int or str
int: number of the specified LED, ranging from 1 to 8
str: The value can only be all, indicating all the LEDs.
ultrasonic2.add_bri(led_bri, id, index =1)
Increases the brightness of the specified LED.
Parameters:
- led_bri float: value by which the brightness is to be increased, ranging from 0 to 100.
- id: int or str
int: number of the specified LED, ranging from 1 to 8
str: The value can only be all, indicating all the LEDs.
ultrasonic2.get_bri(id, index =1)
Obtains the brightness of the specified LED.
Parameter:
- id: int or str
int: number of the specified LED, ranging from 1 to 8
str: The value can only be all, indicating all the LEDs.
ultrasonic2.play(emotion, index =1) [to be implemented]
Makes the ultrasonic sensor 2 express the specified emotion through its blue LEDs.
This API blocks the thread till the emotion is completely expressed.
Parameter:
emotion: str
The following table describes the available values and their corresponding emotions.
|
Value |
Emotion |
|
“sleepy” |
Standby |
|
“happy” |
Happy |
|
“dizzy” |
Dizzy |
|
“wink” |
Raise eyebrows |
|
“thinking” |
Thinking |
Light Sensor
light_sensor.get(index = 1)
Obtains the output value of the light sensor.
Returns a numeric value ranging from 0 to 100.
Dual RGB Color Sensor
dual_rgb_sensor.is_color(color = "white", ch, index = 1)
Determines whether the color sensor detects the specified color.
Parameters:
- color: character string. It indicates the color to be detected. The following shows the color names and their abbreviations:
red r
yellow y
green g
cyan c
blue b
purple p
white w
black k
- ch: numeric value, ranging from 1 to 2, where 1 indicates RGB1, and 2 indicates RGB2.
Returns a boolean value:
True: detected
False: not detected
dual_rgb_sensor.get_red(ch = 1, index = 1)
Obtains the R value of the color detected by the color sensor.
Parameters:
- ch: numeric value ranging from 1 to 2, where 1 indicates RGB1 and 2 indicates RGB2. The default value is 1.
Returns a numeric value ranging from 0 to 255.
dual_rgb_sensor.get_green(ch = 1, index = 1)
Obtains the G value of the color detected by the color sensor.
Parameters:
- ch: numeric value ranging from 1 to 2, where 1 indicates RGB1 and 2 indicates RGB2. The default value is 1. gitbb Returns a numeric value ranging from 0 to 255.
dual_rgb_sensor.get_blue(ch = 1, index = 1)
Obtains the B value of the color detected by the color sensor.
Parameters:
- ch: numeric value ranging from 1 to 2, where 1 indicates RGB1 and 2 indicates RGB2. The default value is 1.
Returns a numeric value ranging from 0 to 255.
dual_rgb_sensor.get_light(ch = 1, index = 1)
Obtains the ambient light intensity detected by the color sensor. The fill light provided by the color sensor is also part of the ambient light. Turn off the fill light before you use this API function, if necessary.
Parameters:
- ch: numeric value ranging from 1 to 2, where 1 indicates RGB1 and 2 indicates RGB2. The default value is 1.
Returns a numeric value ranging from 0 to 100.
dual_rgb_sensor.get_gray_level(ch = 1, index = 1)
Obtains the reflected light intensity detected by the color sensor. The value is the difference between the ambient light intensity detected when the fill light is turned on and that detected when the fill light is turned off.
Parameters:
- ch: numeric value ranging from 1 to 2, where 1 indicates RGB1 and 2 indicates RGB2. The default value is 1.
Returns a numeric value ranging from 0 to 100.
dual_rgb_sensor.set_led(color = "white", index = 1)
Sets the color of the fill light.
Parameters:
- color: character string. It indicates the color in which the fill light is lit up. The following shows the color names and their abbreviations:
red r
yellow y
green g
cyan c
blue b
purple p
white w
black k
- ch: numeric value ranging from 1 to 2, where 1 indicates RGB1 and 2 indicates RGB2.
dual_rgb_sensor.off_led(index = 1)
Turns off the fill light. Note that the color sensor automatically sets the fill light to the required color when you use the API for detecting colors.
Sound Sensor
sound_sensor.get(index = 1)
Obtains the output value of the sound sensor.
Returns a numeric value ranging from 0 to 100.
PIR Sensor
pir.is_detect(index = 1)
Determines whether the PIR sensor detects the motion of a human being or animal. The indicator is lit up when the PIR sensor is triggered. It remains in the triggered state for three seconds. It exits from the triggered state and turns off the indicator if it doesn’t detect human or aniaml motion in the subsequent three seconds.
Returns a boolean value:
True: motion detected
False: no motion detected
pir.get_count(index = 1)
Obtains the number of times the PIR sensor is triggered after it is powered on.
Returns a positive integer.
pir.reset_count(index = 1)
Resets the number of times the PIR sensor is triggered to zero.
Ultrasonic Sensor
ultrasonic.get(index = 1)
Obtains the distance between the ultrasonic sensor and obstacle.
Returns a numeric value ranging from 3 to 300, in centimeters (cm), with a deviation of ±5%.
Ranging Sensor
ranging_sensor.get(index = 1)
Obtains the distance between the ranging sensor and obstacle.
Returns a numeric value ranging from 2 to 200, in centimeters (cm), with a deviation of ±5%.
Motion Sensor
motion_sensor.is_shake(index = 1)
Detects whether the motion sensor is shaken.
Returns a boolean value:
True: shaken
False: not shaken
motion_sensor.get_shakeval(index = 1)
Obtains the strength the motion sensor is shaken.
Returns a numeric value ranging from 0 to 100. A greater value indicates stronger shaking.
motion_sensor.get_accel(axis, index = 1)
Obtains the acceleration at the x-, y-, or z-axis.
Parameters:
- axis: character string, which can be x, y, or z, indicating an axis defined for the motion sensor.
Returns a numeric value in meters per second squared (m/s²).
motion_sensor.is_tiltleft(index = 1)
Detects whether the motion sensor is tilted towards the left. The threshold is 15 degrees.
Returns a boolean value:
True: tilted towards the left
False: not tilted towards the left
motion_sensor.is_tiltright(index = 1)
Detects whether the motion sensor is tilted towards the right. The threshold is 15 degrees.
Returns a boolean value:
True: tilted towards the right
False: not tilted towards the right
motion_sensor.is_tiltup(index = 1)
Detects whether the motion sensor is tilted upwards. The threshold is 15 degrees.
Returns a boolean value:
True: tilted upwards
False: not tilted upwards
motion_sensor.is_tiltdown(index = 1)
Detects whether the motion sensor is tilted downwards. The threshold is 15 degrees.
Returns a boolean value:
True: tilted downwards
False: not tilted downwards
motion_sensor.is_faceup(index = 1)
Detects whether the motion sensor is placed face up.
True: placed face up
False: not placed face up
motion_sensor.is_facedown(index = 1)
Detects whether the motion sensor is placed face down.
True: placed face down
False: not placed face down
motion_sensor.get_roll(index = 1)
Obtains the rolling angle of the motion sensor.
Returns a numeric value ranging from –90 to +90, in degrees (°).
motion_sensor.get_pitch(index = 1)
Obtains the pitch angle of the motion sensor.
Returns a numeric value ranging from –180 to +180, in degrees (°).
motion_sensor.get_yaw(index = 1)
Obtains the yaw angle of the motion sensor.
Returns a numeric value ranging from 0 to 360, in degrees (°).
Note: No electronic compass is used, and therefore the yaw angle is the integral of the angular speed of the motion sensor at the z axis. Accumulative error may occur. This API function can’t be used to obtain the accurate yaw angle.
motion_sensor.get_gyro(axis, index = 1)
Obtains the angular speed of the motion sensor at the x-, y-, or z-axis.
Parameters:
- axis: character string, which can be x, y, or z, indicating an axis defined for the motion sensor.
Returns a numeric value in degrees per second (°/s).
motion_sensor.get_rotation(axis, index = 1)
Obtains the angle the motion sensor rotates at the x-, y-, or z-axis.
The angle is positive when the motion sensor is rotated counterclockwise.
Parameters:
- axis: character string, which can be x, y, or z, indicating an axis defined for the motion sensor.
Returns a numeric value in degrees (°).
motion_sensor.reset_rotation(axis= "all", index = 1)
Initializes the current angle of the motion sensor at the x, y, and/or z axis as zero. After the initialization,
get_rotation() calculates from zero.
Parameters:
- axis: character string, which can be x, y, z, or all. x, y, and z are the axes defined for the motion sensor. The default value is all, indicating all the three axes.
Soil Moisture Sensor
soil_sensor.get(index = 1)
Obtains the output value of the soil moisture sensor.
Returns a numeric value ranging from 0 to 100.
Temperature Sensor
temp_sensor.get(index = 1)
Obtains the output value of the temperature sensor.
Returns a numeric value ranging from –55 to +125, in degrees centigrade (℃).
Humiture Sensor
humiture.get_humidity(index = 1)
Obtains the humidity detected by the humiture sensor.
Returns a numeric value ranging from 0 to 100, in percentage (%).
humiture.get_temp(index = 1)
Obtains the temperature detected by the humiture sensor.
Returns a numeric value ranging from –40 to +125, in degrees centigrade (℃).
MQ2 Gas Sensor
mq2.is_detect(level = “high”, index = 1)
Determines whether the concentration of the detected flammable gas exceeds the threshold.
Parameters:
- level: character string. The values are described as follows:
high: high sensitivity, with which the sensor is triggered more easily
low: low sensitivity, with which the sensor isn’t triggered easily
mq2.get(index = 1)
Obtains the output value of the MQ2 gas sensor.
Returns a numeric value ranging from 0 to 100. A greater value indicates a higher concentration of flammable gas.
Flame Sensor
flame_sensor.is_detect(index = 1)
Determines whether a flame is detected.
Returns a boolean value:
True: detected
False: not detected
flame_sensor.get(index = 1)
Obtains the output value of the flame sensor.
Returns a numeric value ranging from 0 to 100.
Magnetic Sensor
magnetic_sensor.is_detect(index = 1)
Determines whether a magnet is detected around the magnetic sensor.
Returns a boolean value:
True: detected
False: not detected
magnetic_sensor.get_count(index = 1)
Obtains the number of times the magnetic sensor is triggered after it is powered on.
Returns a numeric value.
magnetic_sensor.reset_count(index = 1)
Resets the number of times the magnetic sensor is triggered to zero.
Smart Camera
smart_camera.set_mode(mode = "color", index = 1)
Sets the detection mode of the smart camera.
Parameters:
- mode: character string.
color: color block detection mode, in which the smart camera can detect and trace color blocks
line: line tracking mode, in which the smart camera can track lines and barcodes.
smart_camera.learn(sign = 1, t = "until_button", index = 1)
Sets the number of the color block to be learned.
Parameters:
- sign: numeric value ranging from 1 to 7, indicating the number of a color block.
- t: numeric value or character string. The default value is until_button.
To set t to a character string, it must be set to until_button, which indicates that the learning ends when the on-board button is pressed.
When t is set to a numeric value, it indicates the waiting time before the color block is learned and recorded. The thread is blocked until the learning and recording are complete.
smart_camera.detect_sign(sign, index = 1)
Determines whether the specified color block is detected.
Parameters:
- sign: numeric value ranging from 1 to 7, indicating the serial number of a color block.
Returns a boolean value:
True: detected
False: not detected
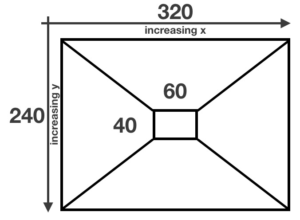
smart_camera.detect_sign_location(sign, location, index = 1)
Determines whether the specified color block is detected in the specified area of the captured image.
Parameters:
- sign: numeric value ranging from 1 to 7, indicating the serial number of a color block.
- location: character string. The values are described as follows:
up: upper area of the captured image
down: lower area of the captured image
left: left side of the captured image
right: right side of the captured image
middle: center of the captured image
The following figure shows the areas of a captured image.
Returns a boolean value:
True: detected
False: not detected
smart_camera.get_sign_x(sign, index = 1)
Obtains the x-coordinate of the specified color block in the captured image.
Parameters:
- sign: numeric value ranging from 1 to 7, indicating the serial number of a color block.
Returns a numeric value ranging from 0 to 319. If the specified color block is not detected, the value 0 is returned.
smart_camera.get_sign_y(sign, index = 1)
Obtains the y-coordinate of the specified color block in the captured image.
Parameters:
- sign: numeric value ranging from 1 to 7, indicating the serial number of a color block.
Returns a numeric value ranging from 0 to 239. If the specified color block is not detected, the value 0 is returned.
smart_camera.get_sign_wide(sign, index = 1)
Obtains the width of the specified color block in the captured image.
Parameters:
- sign: numeric value ranging from 1 to 7, indicating the serial number of a color block.
Returns a numeric value ranging from 0 to 319. If the specified color block is not detected, the value 0 is returned.
smart_camera.get_sign_hight(sign, index = 1)
Obtains the height of the specified color block in the captured image.
Parameters:
- sign: numeric value ranging from 1 to 7, indicating the serial number of a color block.
Returns a numeric value ranging from 0 to 239. If the specified color block is not detected, the value 0 is returned.
smart_camera.open_light(index = 1)
Turns on the two LED fill lights on the smart camera.
smart_camera.close_light(index = 1)
Turns off the two LED fill lights on the smart camera.
smart_camera.reset(index = 1)
Resets the white balance for the smart camera. This API function blocks the thread being executed for five seconds.
smart_camera.detect_label(label, index = 1)
Determines whether the specified barcode is detected.
Parameters:
- label: numeric value ranging from 1 to 15, indicating the serial number of a barcode.
Returns a boolean value:
True: detected
False: not detected
smart_camera.get_label_x(label, index = 1)
Obtains the x-coordinate of the specified barcode in the captured image.
Parameters:
- label: numeric value ranging from 1 to 15, indicating the serial number of a barcode.
Returns a numeric value ranging from 0 to 319. If the specified barcode is not detected, the value 0 is returned.
smart_camera.get_label_y(sign, index = 1)
Obtains the y-coordinate of the specified barcode in the captured image.
Parameters:
- label: numeric value ranging from 1 to 15, indicating the serial number of a barcode.
Returns a numeric value ranging from 0 to 239. If the specified barcode is not detected, the value 0 is returned.
smart_camera.detect_cross(index = 1)
Determines whether an intersection is detected in the captured image.
smart_camera.get_cross_x(index = 1)
Obtains the x-coordinate of the detected intersection.
Returns a numeric value ranging from 0 to 319. If no intersection is detected, the value 0 is returned.
smart_camera.get_cross_y(index = 1)
Obtains the y-coordinate of the detected intersection.
Returns a numeric value ranging from 0 to 239. If no intersection is detected, the value 0 is returned.
smart_camera.get_cross_road(index = 1)
Obtains the number of detected crossroads.
Returns a numeric value.
smart_camera.get_cross_angle(sn = 1, index = 1)
Obtains the angle between the specified crossroad and vector, which is the line where the smart camera is located.
Parameters:
- sn: numeric value, indicating the space of a crossroad among the ones detected in the captured image. The number 1 indicates the first crossroad, 2 indicates the second one, and so on.
smart_camera.set_line(mode = "black, index = 1)
Sets the color preference for the line tracking mode.
Parameters:
- mode: character string. The values are described as follows:
black: detecting dark lines in light backgrounds
white: detecting light lines in dark backgrounds
smart_camera.get_vector_start_x(index = 1)
Obtains the start x-coordinate of the vector where the smart camera is located.
Returns a numeric value ranging from 0 to 319.
smart_camera.get_vector_start_y(index = 1)
Obtains the start y-coordinate of the vector where the smart camera is located.
Returns a numeric value ranging from 0 to 239.
smart_camera.get_vector_end_x(index = 1)
Obtains the end x-coordinate of the vector where the smart camera is located.
Returns a numeric value ranging from 0 to 319.
smart_camera.get_vector_end_y(index = 1)
Obtains the end y-coordinate of the vector where the smart camera is located.
Returns a numeric value ranging from 0 to 239.
smart_camera.set_vector_angle(angle, index = 1)
Sets the angle preference for the vector.
Parameters:
- angle: numeric value, indicating the angle preference for the vector. After the setting, the smart camera takes the crossroad whose angle is closest to the set value as the next vector.
smart_camera.get_vector_angle(index = 1)
Obtains the set angle preference.
Returns a numeric value ranging from –180 to +180, in degrees (°).
smart_camera.set_kp(kp, index = 1)
Sets the coefficient Kp for the smart camera to calculate the motor differential speed.
Parameters:
- kp: numeric value.
smart_camera.get_sign_diff_speed(sign, axis, axis_val, index = 1)
Calculates the motor differential speed required for keeping the specified color block in the specified x- or y-coordinate of the captured image. The motor differential speed is positively related to Kp. A greater Kp value indicates a greater motor differential speed.
Parameters:
- sign: numeric value ranging from 1 to 7, indicating the serial number of a color block.
- axis: character string. The values are described as follows:
x: specifies the x-axis
y: specifies the y-axis
- axis_val: numeric value. If axis is set to x, the setting range is 0 to 319; and if axis is set to y, the setting range is 0 to 239.
Returns a numeric value ranging from 0 to 100.
smart_camera.get_label_diff_speed(label, axis, axis_val, index = 1)
Calculates the motor differential speed required for keeping the specified barcode in the specified x- or y-coordinate of the captured image. The motor differential speed is positively related to Kp. A greater Kp value indicates a greater motor differential speed.
Parameters:
- label: numeric value ranging from 1 to 15, indicating the serial number of a barcode.
- axis: character string. The values are described as follows:
x: specifies the x-axis
y: specifies the y-axis
- axis_val: numeric value. If axis is set to x, the setting range is 0 to 319; and if axis is set to y, the setting range is 0 to 239.
Returns a numeric value ranging from 0 to 100.
smart_camera.get_follow_vector_diff_speed(index = 1)
Calculates the motor differential speed required for keeping the vector in the center of the captured image. The motor differential speed is positively related to Kp. A greater Kp value indicates a greater motor differential speed.
Returns a numeric value ranging from 0 to 100.
smart_camera.is_lock_sign(sign, axis, axis_val, index = 1)
Determines whether the specified color block is near the specified x- or y-coordinate of the captured image.
Parameters:
- sign: numeric value ranging from 1 to 7, indicating the serial number of a color block.
- axis: character string. The values are described as follows:
x: specifies the x-axis
y: specifies the y-axis
- axis_val: numeric value. If axis is set to x, the setting range is 0 to 319; and if axis is set to y, the setting range is 0 to 239.
Returns a boolean value:
True: near the specified point
False: not near the specified point
smart_camera.is_lock_label(sign, axis, axis_val index = 1)
Determines whether the specified barcode is near the specified x- or y-coordinate of the captured image.
Parameters:
- label: numeric value ranging from 1 to 15, indicating the serial number of a barcode.
- axis: character string. The values are described as follows:
x: specifies the x-axis
y: specifies the y-axis
- axis_val: numeric value. If axis is set to x, the setting range is 0 to 319; and if axis is set to y, the setting range is 0 to 239.
Returns a boolean value:
True: near the specified point
False: not near the specified point
Output modules
Light
LED Matrix
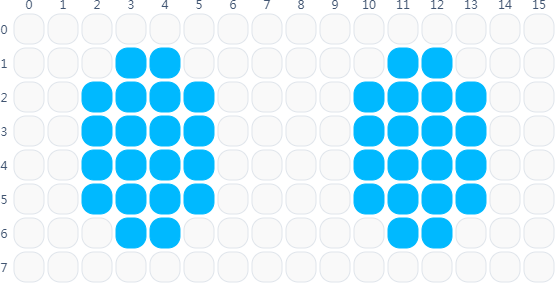
led_matrix.show(image = "hi", index = 1)
Sets the image to be displayed on the LED matrix.
Parameters:
- image: character string. The default value is hi. The following figure shows the image on the LED matrix when image is set to hi.

To display an image that is not predefined, you need to set image to the hexadecimal number corresponding to the image. The hexadecimal numbers are obtained as follows:
Take the on/off state of the eight LEDs on one column as an 8-digit binary number. Convert the 8-digit binary number into a 2-digit hexadecimal number. There is 16 columns, and therefore a 32-digit hexadecimal number can be used to indicate the on/off state of the LEDs. The following figure shows the LEDs on the LED matrix.
Example program 1
from halocode import *
led_matrix.show(image = "hello", index = 1) #Enables the LED matrix to display the image "hello"
Example program 2
from halocode import *
led_matrix.show(image = "00003c7e7e3c000000003c7e7e3c0000", index = 1)
#Enables the LED matrix to display the image "hello"
led_matrix.print(message, index = 1)
Displays the specified characters on the LED matrix in scrolling mode.
Parameters:
- message: character string. The value can be a combination of any English characters, digits, and punctuations. Chinese characters are not supported. When exceeding the display range of the LED matrix, a message is displayed in scrolling mode.
led_matrix.print_until_done(message, index = 1)
Displays the specified characters on the LED matrix till the scrolling ends.
Parameters:
- message: character string. The value can be a combination of any English characters, digits, and punctuations. Chinese characters are not supported. When exceeding the display range of the LED matrix, a message is displayed in scrolling mode. The thread is blocked till the scrolling ends.
led_matrix.print_at(message, x, y, index = 1)
Displays the specified characters with the specified start point (x,y) on the LED matrix.
Parameters:
- message: character string. The value can be a combination of any English characters, digits, and punctuations. Chinese characters are not supported. When exceeding the display range of the LED matrix, a message is displayed in scrolling mode. The thread is blocked until the scrolling ends.
- x: numeric value ranging from 0 to 15, indicating the start x-coordinate
- y: numeric value ranging from 0 to 7, indicating the start y-coordinate
led_matrix.on(x, y, index = 1)
Lights up the LED in the specified position (x,y) on the LED matrix.
Parameters:
- x: numeric value ranging from 0 to 15, indicating the x-coordinate of the LED to be lit up
- y: numeric value ranging from 0 to 7, indicating the y-coordinate of the LED to be lit up
led_matrix.off(x, y, index = 1)
Turns off the LED in the specified position (x,y) on the LED matrix.
Parameters:
- x: numeric value ranging from 0 to 15, indicating the x-coordinate of the LED to be turned off
- y: numeric value ranging from 0 to 7, indicating the y-coordinate of the LED to be turned off
led_matrix.toggle(x, y, index = 1)
Changes the state (on/off) of the LED in the specified position (x,y) on the LED matrix.
Parameters:
- x: numeric value ranging from 0 to 15, indicating the x-coordinate of the LED of which the state is to be changed
- y: numeric value ranging from 0 to 7, indicating the y-coordinate of the LED of which the state is to be changed
led_matrix.clear(index = 1)
Turns off all the LEDs on the LED matrix.
RGB LED
rgb_led.on(r, g, b, index = 1)
Sets the color of the RGB LED.
Parameters:
- r: numeric value or character string
To set r to a numeric value, indicating the value of the red component. The setting range is 0 to 255. The value 0 indicates no red component, and 255 indicates the maximum red component.
To set r to a character string, the value is a color name or abbreviation. The following shows the color names and their abbreviations:
red r
orange o
yellow y
green g
cyan c
blue b
purple p
white w
black k
- g: numeric value, indicating the value of the green component. The setting range is 0 to 255. The value 0 indicates no green component, and 255 indicates the maximum green component.
- b: numeric value, indicating the value of the blue component. The setting range is 0 to 255. The value 0 indicates no blue component, and 255 indicates the maximum blue component.
- pct: numeric value. The setting range is 0 to 100, indicating the brightness of the LED. The default value is 100. When it is set to 0, the LED is turned off; and when it is set to 100, the LED is lit up in the color with the set red, green, and blue components.
rgb_led.off(index = 1)
Turns off the RGB LED.
rgb_led.set_red(val, index = 1)
Changes the R value of the RGB LED.
Parameters:
- val: numeric value, indicating the R value of the RGB LED after the change. The setting range is 0 to 255.
rgb_led.set_green(val, index = 1)
Changes the G value of the RGB LED.
Parameters:
- val: numeric value, indicating the G value of the RGB LED after the change. The setting range is 0 to 255.
rgb_led.set_blue(val, index = 1)
Changes the B value of the RGB LED.
Parameters:
- val: numeric value, indicating the B value of the RGB LED after the change. The setting range is 0 to 255.
rgb_led.add_red(val, index = 1)
Increases the R value of the RGB LED.
Parameters:
- val: numeric value, indicating the amount by which the R value of the RGB LED is increased. The setting range is –255 to +255.
rgb_led.add_green(val, index = 1)
Increases the G value of the RGB LED.
Parameters:
- val: numeric value, indicating the amount by which the G value of the RGB LED is increased. The setting range is –255 to +255.
rgb_led.add_blue(val, index = 1)
Increases the B value of the RGB LED.
Parameters:
- val: numeric value, indicating the amount by which the B value of the RGB LED is increased. The setting range is –255 to +255.
rgb_led.get_red(val, index = 1)
Obtains the R value of the RGB LED.
Returns a numeric value ranging from 0 to 255.
rgb_led.get_green(index = 1)
Obtains the G value of the RGB LED.
Returns a numeric value ranging from 0 to 255.
rgb_led.get_blue(index = 1)
Obtains the B value of the RGB LED.
Returns a numeric value ranging from 0 to 255.
LED Driver
led_driver.on(r, g, b, id = "all", index = 1)
Sets the color of the specified LED or all LEDs.
Parameters:
- r: numeric value or character string.
To set r to a numeric value,indicating the value of the red component. The setting range is 0 to 255. The value 0 indicates no red component, and 255 indicates the maximum red component.
To set r to a character string, the value is a color name or abbreviation. The following shows the color names and their abbreviations:
red r
orange o
yellow y
green g
cyan c
blue b
purple p
white w
black k
- g: numeric value, indicating the value of the green component. The setting range is 0 to 255. The value 0 indicates no green component, and 255 indicates the maximum green component.
- b: numeric value, indicating the value of the blue component. The setting range is 0 to 255. The value 0 indicates no blue component, and 255 indicates the maximum blue component.
- id: character string or numeric value. The default value is all.
To set id to a character string, the value must be all, indicating all LEDs.
To set id to a numeric value, the setting range is 1 to 96, indicating the serial number of an LED.
led_driver.show(color, index = 1)
Sets color(s) for multiple LEDs.
Parameters:
- color: character string, in the format of “color1 color2 color3 color4 color5 color6 color7 color8 color9 color10 color11 color12”, where colorx can be red, green, blue, yellow, cyan, purple, white, orange, or black, or it can also be r, g, b, y, c, p, w, o, or k, the abbreviation of a color name. When more than 12 LEDs are specified, only the first 12 LEDs are set.
led_driver.off(led_id = "all", index = 1)
Turns off the specified LED or all LEDs.
Parameters:
- id: character string or numeric value. The default value is all.
To set id to a character string, the value must be all, indicating all LEDs.
To set id to a numeric value, the setting range is 1 to 96, indicating the serial number of an LED.
led_driver.set_red(val, led_id = "all", index = 1)
Changes the R value of the specified LED.
Parameters:
- val: numeric value, indicating the R value of the specified LED after the change. The setting range is 0 to 255.
- id: character string or numeric value. The default value is all.
To set id to a character string, the value must be all, indicating all LEDs.
To set id to a numeric value, the setting range is 1 to 96, indicating the serial number of an LED.
led_driver.set_green(val, led_id = "all", index = 1)
Changes the G value of the specified LED.
Parameters:
- val: numeric value, indicating the G value of the specified LED after the change. The setting range is 0 to 255.
- id: character string or numeric value. The default value is all.
To set id to a character string, the value must be all, indicating all LEDs.
To set id to a numeric value, the setting range is 1 to 96, indicating the serial number of an LED.
led_driver.set_blue(val, led_id = "all", index = 1)
Changes the B value of the specified LED.
Parameters:
- val: numeric value, indicating the B value of the specified LED after the change. The setting range is 0 to 255.
- id: character string or numeric value. The default value is all.
To set id to a character string, the value must be all, indicating all LEDs.
To set id to a numeric value, the setting range is 1 to 96, indicating the serial number of an LED.
led_driver.add_red(val, led_id = "all", index = 1)
Increases the R value of the specified LED.
Parameters:
- val: numeric value, indicating the amount by which the R value of the specified LED is increased. The setting range is –255 to +255.
- id: character string or numeric value. The default value is all.
To set id to a character string, the value must be all, indicating all LEDs.
To set id to a numeric value, the setting range is 1 to 96, indicating the serial number of an LED.
led_driver.add_green(val, led_id = "all", index = 1)
Increases the G value of the specified LED.
Parameters:
- val: numeric value, indicating the amount by which the G value of the specified LED is increased. The setting range is –255 to +255.
- id: character string or numeric value. The default value is all.
To set id to a character string, the value must be all, indicating all LEDs.
To set id to a numeric value, the setting range is 1 to 96, indicating the serial number of an LED.
led_driver.add_blue(val, led_id = "all", index = 1)
Increases the B value of the specified LED.
Parameters:
- val: numeric value, indicating the amount by which the B value of the specified LED is increased. The setting range is –255 to +255.
- id: character string or numeric value. The default value is all.
To set id to a character string, the value must be all, indicating all LEDs.
To set id to a numeric value, the setting range is 1 to 96, indicating the serial number of an LED.
led_driver.set_mode(mode = "steady", index = 50)
Sets the display mode of the LED driver.
Parameters:
- mode: character string. The values are described as follows:
steady: static mode. In this mode, the LEDs are normally on.
breath: blinking mode. In this mode, the LEDs blink periodically.
marquee: marquee mode. In this mode, LEDs on the LED strip or LED ring are lit up in scrolling mode.
Play
Speaker
speaker.mute(index = 1)
Stops the playing of the speaker.
speaker.play_tone(freq, index = 1)
Sets the frequency of the speaker.
Parameters:
- freq: numeric value. The setting range is 20 to 20,000. The speaker makes no sound if the frequency you set exceeds the setting range. In addition, to protect your ears, the upper limit of the frequency is set to 5,000 Hz. If the value you set ranges from 5,000 to 20,000, the speaker plays sounds at the frequency of 5,000 Hz. To play a melody by changing the frequency of the speaker, you need to know the mapping between frequency and notes. The following is a reference.
|
do / C |
re / D |
mi / E |
fa / F |
sol / G |
la / A |
si / B |
|
|
2 |
65 Hz |
73 Hz |
82 Hz |
87 Hz |
98 Hz |
110 Hz |
123 Hz |
|
3 |
131 Hz |
147 Hz |
165 Hz |
175 Hz |
196 Hz |
220 Hz |
247 Hz |
|
4 (Standard Alto) |
262 Hz |
294 Hz |
330 Hz |
349 Hz |
392 Hz |
440 Hz |
494 Hz |
|
5 |
523 Hz |
587 Hz |
659 Hz |
698 Hz |
784 Hz |
880 Hz |
988 Hz |
|
6 |
1047 Hz |
1175 Hz |
1319 Hz |
1397 Hz |
1568 Hz |
1760 Hz |
1976 Hz |
|
7 |
2093 Hz |
2349 Hz |
2637 Hz |
2794 Hz |
3136 Hz |
3520 Hz |
3951 Hz |
|
8 |
4186 Hz |
4699 Hz |
For example, the standard alto pitch (the first international pitch) is A4 = 440Hz.
speaker.play_music(music, index = 1)
Plays the specified preset or user-defined audio file by the speaker.
Parameters:
- music: character string. The value can be a 4-byte combination of any English characters, numbers, and punctuations, indicating the name of an audio file stored on the speaker. The speaker supports only mp3 files. This API function does not block the current thread when being implemented. A large number of short audio files are preset on the speaker. A large number of short audio files are preset on the speaker. For the file names and descriptions, click Preset sounds to download the list. For how to play a user-defined audio file, see Speaker.
speaker.play_music_until_done(music, index = 1)
Plays the specified preset or user-defined audio file by the speaker until the playing is complete.
Parameters:
- music: character string. The value can be a 4-byte combination of any English characters, numbers, and punctuations, indicating the name of an audio file stored on the speaker. The speaker supports only mp3 files. This API function blocks the current thread until the playing is complete.
speaker.set_vol(val, index = 1)
Sets the volume of the speaker.
Parameters:
- vol: numeric value, indicating the volume value of the speaker. The setting range is 0 to 100.
speaker.add_vol(val, index = 1)
Changes the volume of the speaker (not applicable to some sounds with special frequency).
Parameters:
- vol: numeric value, indicating the amount by which the volume of the speaker is changed. The setting range is –100 to +100.
speaker.get_vol(index = 1)
Obtains the volume of the speaker.
Returns a numeric value ranging from 0 to 100. The value 100 indicates the maximum volume of the speaker.
speaker.is_play(index = 1)
Determines whether the speaker is playing music.
Returns a boolean value:
True: playing music
False: not playing music
Motion
Motor Driver
motor_driver.set(power, index = 1)
Sets the output power of the motor driver.
Parameters:
- power: numeric value, indicating the output power of the motor driver. The setting range is –100 to +100, in percentage (%). The output power of 100% corresponds to the PWM waveform with a resolution of 1024. Generally, a positive value enables a motor to run counterclockwise, and a negative value enables a motor to run clockwise.
motor_driver.add(power, index = 1)
Increases the output power of the motor driver.
Parameters:
- power: numeric value, indicating the amount by which the output power of the motor driver is increased, in percentage (%). The setting range is –200 to +200. The output power of 100% corresponds to the PWM waveform with a resolution of 1024.
motor_driver.get(index = 1)
Obtains the output power of the motor driver.
Returns a numeric value ranging from –100 to +100.
motor_driver.get_load(index = 1)
Obtains the load value of the motor driver. The load value varies according to the operation of the connected motor. When the motor operates with a heavy load or is stalled (heavy load may also be caused by short circuit), a large load value is obtained.
Returns a numeric value ranging from 0 to 1024.
motor_driver.stop(index = 1)
Stops the power output of the motor driver.
Servo Driver
servo_driver.set(angle, index = 1)
Sets the angle the servo connected to the servo driver is located.
Parameters:
- angle: numeric number, indicating the angle the connected servo is located. The setting range is 0 to 180, in degrees (°).
servo_driver.add(angle, index = 1)
Sets the angle the connected servo rotates from the current position.
Parameters:
- angle: numeric number, indicating the angle the servo rotates from the current position. The setting range is –180 to +180, in degrees (°).
servo_driver.get(index = 1)
Obtains the angle the servo connected to the servo driver is located.
Returns a numeric value ranging from 0 to 180, in degrees (°).
servo_driver.get_load(index = 1)
Obtains the load value of the servo driver. The load value varies according to the operation of the connected servo. When the servo operates with a heavy load or is stalled (heavy load may also be caused by short circuit), a large load value is obtained.
Returns a numeric value ranging from 0 to 1024.
servo_driver.release(index = 1)
Releases the servo connected to the servo driver. After the servo is released, you can manually rotate it and the servo_driver.get(index) function can no longer obtains the correct angle of the servo.
Smart Servo Motor (12 Kg)
smart_servo.turn(angle, speed, index = 1)
Rotates the smart servo by the specified angle. This function blocks the current thread until the rotating is completed or suspended by another function.
Parameters:
- angle: numeric value, indicating the angle the servo rotates from the current position. A positive value indicates clockwise rotation, and a negative value indicates counterclockwise rotation.
smart_servo.turn_to(angle, speed, index = 1 )
Rotates the smart servo to the specified angle. This function blocks the current thread until the rotating is completed or suspended by another function.
Parameters:
- angle: numeric value, indicating the angle the servo is located after the rotation. A positive value indicates clockwise rotation, and a negative value indicates counterclockwise rotation.
smart_servo.run(power, index = 1)
Sets the speed at which the smart servo rotates.
Parameters:
- power: numeric value. The setting range is 0 to 100.
smart_servo.stop(index = "all")
Stops the motion of the smart servo.
Parameters:
- index: character string or numeric value. The default value is all, indicating all smart servos connected in the chain.
smart_servo.get_angle(index = 1)
Obtains the angle the smart servo is located.
Returns a numeric value, indicating the angle the smart servo rotates from the initial position.
smart_servo.get_speed(index = 1)
Obtains the rotating speed of the smart servo, either the automatic rotating or the rotating drived by external force.
Returns a numeric value. indicating the rotating speed, in degrees per second (°/s).
smart_servo.release_angle(index = "all")
Releases the smart servo. After the smart servo is released, it is no longer locked at the angle and you can rotate it manually. If you do not rotate it, it remains at the angle when it is released until any one of the following functions is executed:
smart_servo.turn(angle)
smart_servo.turn_to(angle)
smart_servo.drive(power, t = “forever”)
smart_servo.lock_angle()
smart_servo.lock_angle(index = "all")
Locks the smart servo at the current angle. After being locked, a smart servo cannot be rotated by external force.
smart_servo.reset(index = "all")
Resets the smart servo. After being reset, the smart servo takes the current position as the zero point. The number of times a smart servo can be reset is limited, and therefore this function blocks the current thread for three seconds to prevent it from being executed again.
Other modules
IR Remote
ir.send(message, index = 1)
Sends an IR message.
Parameters:
- message: character string with a maximum length of 30. Currently, only English characters, numbers, and punctuations are supported.
ir.receive(index = 1)
Obtains the received IR message.
Returns a character string.
ir.record(record_id, index = 1)
Records an IR message. This API function blocks the current thread for three seconds to complete the recording of the IR signal.
Parameters:
- record_id: numeric value, indicating the serial number of an IR message. The setting range is 1 to 2. The IR remote module can record a maximum of two IR signals.
ir.send_record(record_id, index = 1)
Sends the recorded IR message.
Parameters:
- record_id: numeric value, indicating the serial number of an IR message. The setting range is 1 to 2. The IR remote module can record a maximum of two IR signals.
ir.is_receive(message, index = 1)
Determines whether the IR remote module receives the specified IR signal.
Parameters:
- message: character string or character string variable. The following table describes the available variables and their definitions.
|
Variable |
Definition |
|
IR_REMOTE.up |
↑ |
|
IR_REMOTE.down |
↓ |
|
IR_REMOTE.left |
← |
|
IR_REMOTE.right |
→ |
|
IR_REMOTE.set |
Setting |
|
IR_REMOTE.zero |
0 |
|
IR_REMOTE.one |
1 |
|
IR_REMOTE.two |
2 |
|
IR_REMOTE.three |
3 |
|
IR_REMOTE.four |
4 |
|
IR_REMOTE.five |
5 |
|
IR_REMOTE.six |
6 |
|
IR_REMOTE.seven |
7 |
|
IR_REMOTE.eight |
8 |
|
IR_REMOTE.nine |
9 |
|
IR_REMOTE.A |
A |
|
IR_REMOTE.B |
B |
|
IR_REMOTE.C |
C |
|
IR_REMOTE.D |
D |
|
IR_REMOTE.E |
E |
|
IR_REMOTE.F |
F |